1. Design Editor API
Design Editor is the very first API and the origin of Customer’s Canvas. This is the API that implements the functionality of the online editor web application where you personalize designs. This is what we used to call Customer’s Canvas.
This editor application exposes an API that allows you to configure the editor’s features, pass the IDML or PSD template, and receive a URL to a proof image or PDF print file.
For example, here is a simple code snippet illustrating how to load the editor to the page and open it with a template.
let product = {
    "surfaces": [{
        "printAreas": [{
            "designFile": "samples/test-page"
         }]
    }]
};

let config = {};

var editor = await CustomersCanvas.IframeApi.loadEditor(
               document.getElementById("editorFrame"), product, config);
This code loads the editor:
In this code, we are loading the editor with the default settings, which are described in a separate JSON config file on the server. However, as usual, you want to override these values. To do it, you need to add part of a JSON config (as described here) to the object you pass as a third parameter of the loadEditor method.
Example: Add an image quality meter
Let’s assume that you want to enable a quality meter. You can do it by modifying the config variable as follows:
let config = {
  "violationWarningsSettings": {
        "qualityMeter": {
            "enabled": true,
            "qualityLevels": {
                "warning": 300,
                "bad": 270
            }
        }
    }
};
What will happen in the editor:
Learn more about Design Editor API
2. Design Atoms Framework
This is the latest API that was added in version 5.0. The Design Atoms API reinvents the way you use Customer’s Canvas. Now, you can work with each individual element of a design loaded into the editor: iterate, query a specific element by its name, read and modify its properties, or add or remove elements. In other words, it’s similar to the DOM API in JS.
What you can do with this API:
- Generate designs
- Manipulate elements through code
- Import templates of custom formats
- Render outside of the Customer’s Canvas server
- Create completely custom editors
Example 1: Allow elements to move only horizontally
Code:
document.getElementById("move-horiz")
        .addEventListener("click", () => {
            const selectedHandlers = viewer.canvas.get_selectedItemHandlers();

            if (selectedHandlers == null || selectedHandlers.get(0).item.mask == null)
                return;

            selectedHandlers.get(0).item.manipulationPermissions.allowMoveVertical = false;
        });
What will happen in the editor:
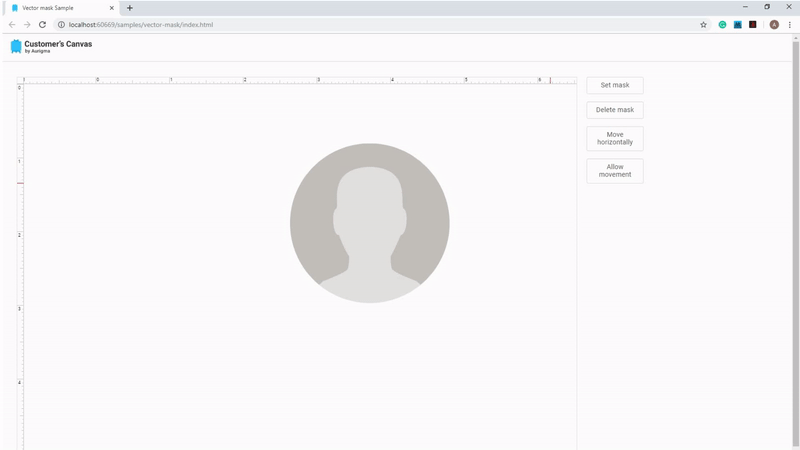
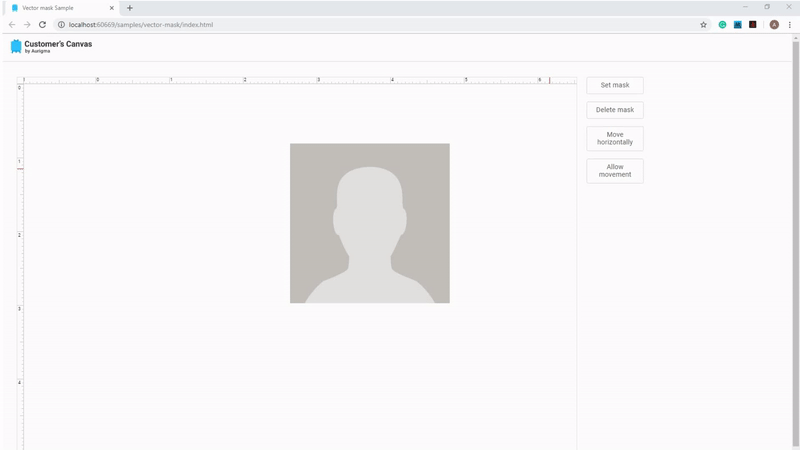
Example 2: Add a vector mask to an element
Code:
document.getElementById("set-mask")
        .addEventListener("click", () => {
            const selectedHandlers = viewer.canvas.get_selectedItemHandlers();

            if (selectedHandlers == null)
                return;

            const item = selectedHandlers.get(0).item as ShapeItem;

            const itemBounds = item.sourcePath.bounds;
            const mask = new ItemMask();
            mask.vectorMask = Path.ellipse(itemBounds.left, itemBounds.top, itemBounds.width, itemBounds.height);

            item.mask = mask;
        });
What will happen in the editor:
In other words, you may automate almost any design manipulation task using this API.
This API is also available as a C# assembly, so you may write a similar code on a backend.
Learn more about Design Atoms Framework
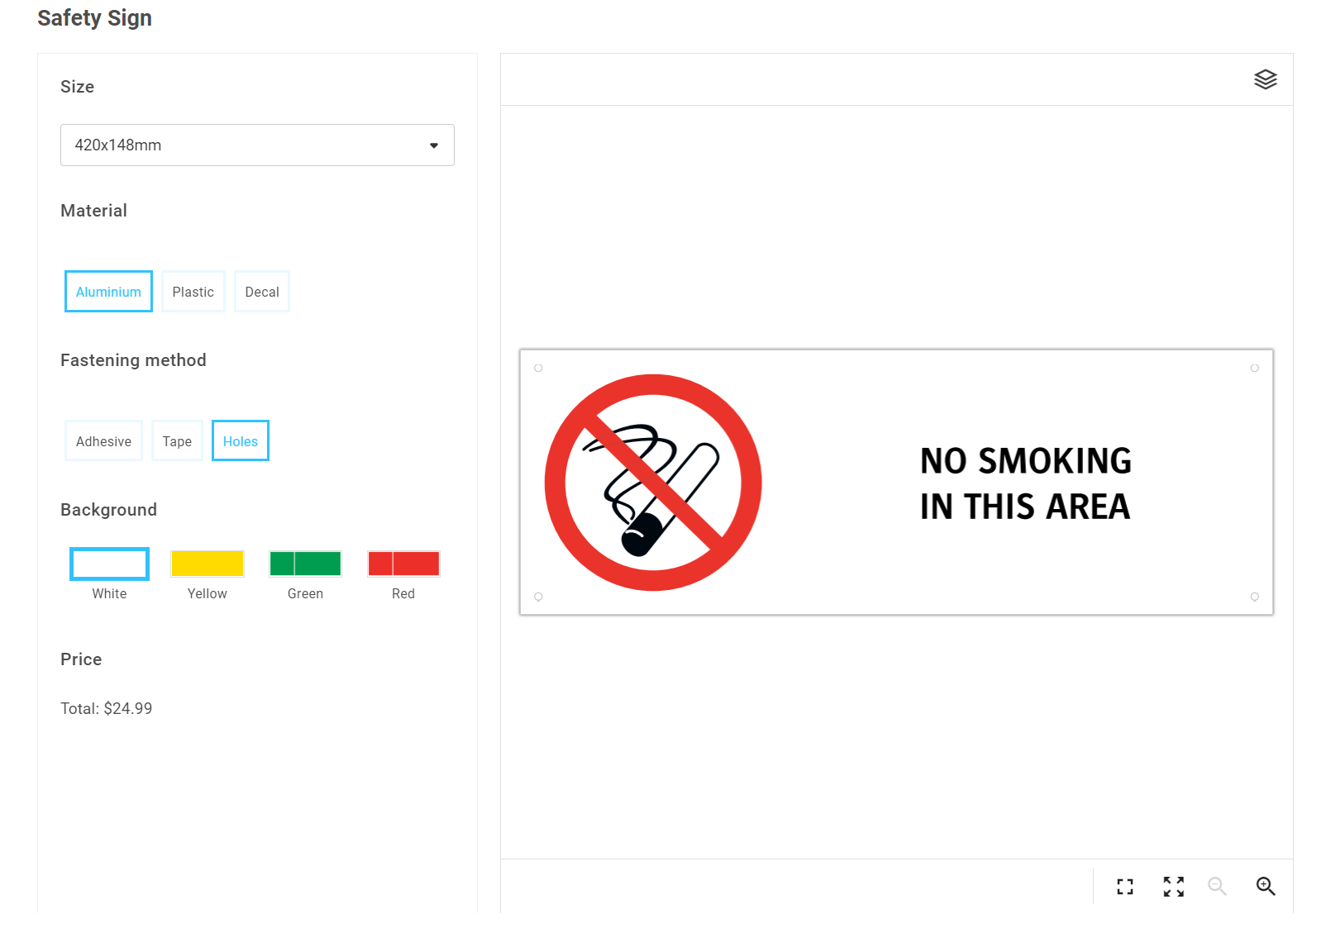
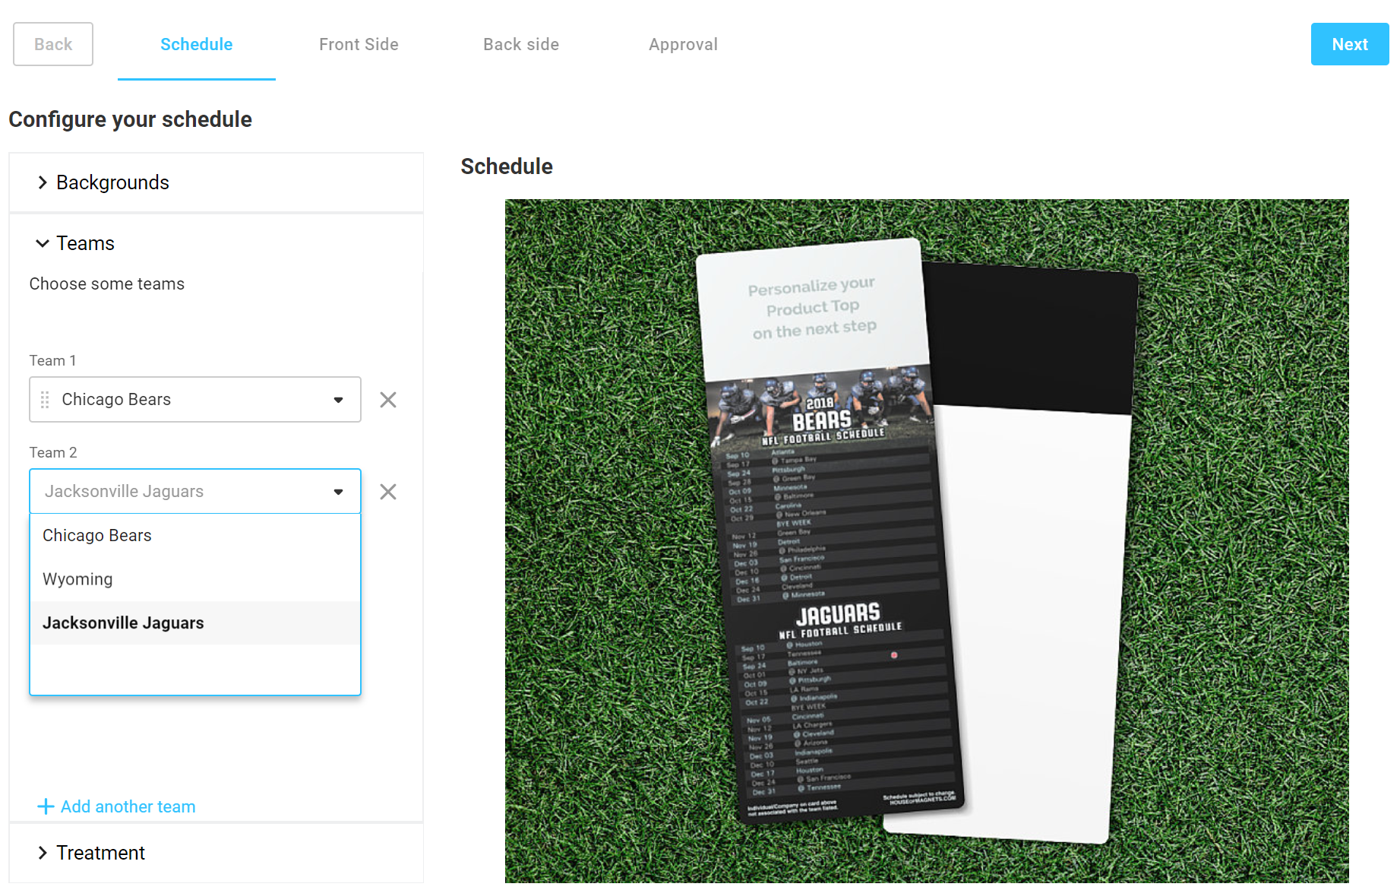
3. UI Framework
This is a low-code development framework that allows you to implement almost any personalization workflow by composing your application from widgets like building blocks in a configuration file. It can be used by developers as well as product managers, designers, and content managers to create user interfaces where end-users may change a product’s options and reflect those changes in an online preview and in the print-ready file.
What you can do with this API:
- Create multistep wizards
- Add and configure widgets (editor, image list, inputs, options, tables, custom HTML, etc.)
- Write JSON + Javascript one-liners
- Use the test-stand app to see results immediately
The idea of this API is the following. You load the JS application and create a JSON config like this:
{
   “widgets”: [
        {...},
        {...}
   ],
   “steps: [{
        mainPanel: {...},
        toolPanel: {...}
    },
    {
        mainPanel: {...},
        toolPanel: {...}
    }]
}
First, you must define all the widgets used in your project - editors, dropdowns, image lists, etc. After that, you want to say something like this: “On Step 1, I want to show widget foo1 in the main panel and foo2 in the left tool panel; On Step 2, I want to show widget bar1 in the main panel and bar2 in the tool panel”.
It is also possible to add some logic to this config, such as:
{
   “foo”: “{{widget[‘bar’].selected.title}}”,
   “bar”: {
        “{{#if vars.isPremium}}: “Premium”,
        “{{#else}}”: “Regular”
   },
   “baz”: {
        “{{#each vars.items as item}}”: {
               “id”: “{{item.id}}”,
               “name”: “{{item.name}}”
         }
   }
}
This approach allows you to configure complex editors like these:
Another great aspect of this API is that the integration code remains the same - meaning that in order to switch between editors, you just load another JSON file!
4. Dynamic Image API
This is a Web API that allows one to generate images dynamically from a template, where we can replace/modify some layers based on user input or internal logic requests. This API provides you with the ability to dynamically generate product mockups based on different options as well as generate realistic product previews, impose ready designs on print sheets, add print marks, or create calendar grids and tables.
What you can do with this API:
- Programmatically hide design elements
- Replace images (both local images and by direct URLs)
- Replace text and text styles (font, size, and color)
- Insert images into a smart object
- Insert a PSD file into a smart object, and define custom parameters for this PSD file
- Select a layer from a group with predefined parameters
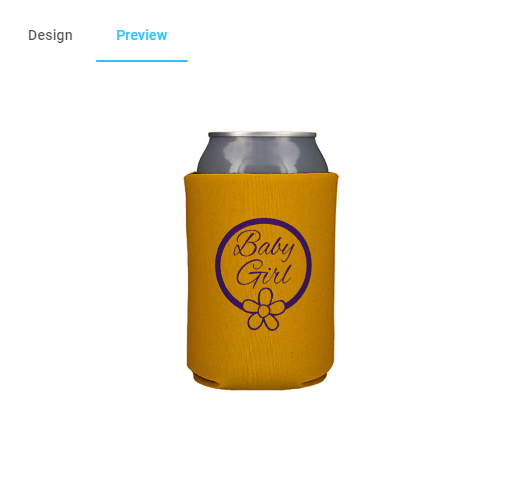
Example: Generate a realistic product preview
Let’s say that you have a PSD file with a group layer and you want to make one of the group elements visible. Picture something like this:
You need to put this PSD file into a folder specified in the Dynamic Image settings and make the following call:
let response = await fetch(
     “url-to-dynamic-image-api”,
     {
          “method”: “POST”,
          body: JSON.stringify({
             “template”: “psd-file-name.psd”,
             “format”: “jpg”,
             “data”: {
                  “Group 1”: {
                       “type”: “switch”,
                       “select”: “Layer 2”
                  }
             }
         })
     }
)
The final result will look like this:
Learn more about Dynamic Image API
5. Personalization API
This API provides you with the ability to create and render personalized designs automatically without loading the editor. You may use it for variable data printing applications, generating template-based designs from data, or creating cross-selling images automatically.
What you can do with this API:
- Use IDML and PSD templates
- Replace images, text, or QR/barcode values
- Change style or color
- Render both PDF and JPEG
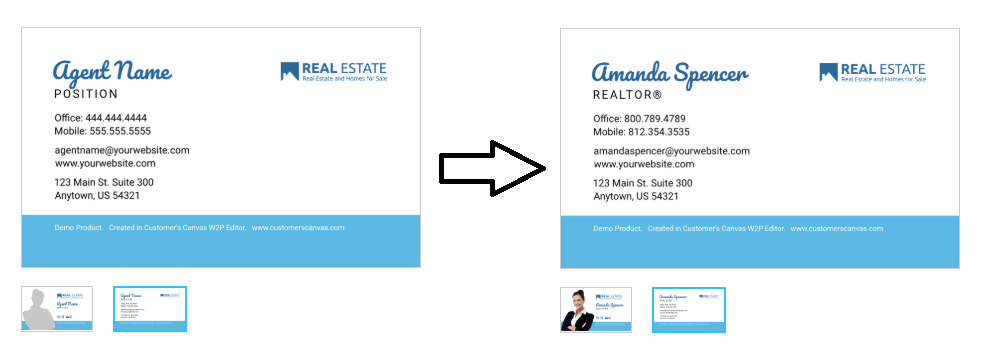
Example: Create a template-based design from data
Code:
let response = await fetch(
     “url-to-dynamic-image-api”,
     {
          “method”: “POST”,
          body: JSON.stringify({
            “productDefinitions”: [“6881260DF1149306BBB983FD0CD23AED”],
            “itemsData”: {
                “Placeholder”: {
                    “First Name”: “Amanda”,
                    “Last name”: “Spencer”,
                    “Position”: “Realtor”,
                    “Mobile”: “812.354.3535”,
                    “Office”: “800.789.4789”,
                    “Address1”: “123 Main St. Suite 300”,
                    “Address2”: “Anytownб US 54321”,
                    “Email”: “amandaspencer@yourwebsite.com”,
                    “Website”: “www.yourwebsite.com”
                },
                “Agent Photo”: {
                    “Image”: “public:real-estate/agent/amanda-spencer.png”
                }
         })
     }
)
The final result will look like this:
Learn more about Personalization API
6. Data Management API
Customer’s Canvas does not include any application to manage templates, artwork, fonts, etc. Instead, you just put them into appropriate folders on the server, and that’s it.
However, if you want to build your own control panel, you can use the API of the Customer’s Canvas storage system. You can do all standard CRUD operations with templates, states, or artwork galleries. It allows you to create your own admin panel or integrate it into an existing backend app.
Learn more about Data Management API
Combining APIs to implement a personalization workflow
The APIs described above provide you with a single powerful tool that you can use to implement almost any possible personalization workflow by combining them simultaneously. The following example describes how different APIs can be utilized to create such a workflow for variable data postcards.
First, you could create the design automatically using the Design Atoms API. Choose the postcard’s size, add image placeholders, and lock down certain layers to prevent unauthorized moving or changing. Then, add variable text or image fields using our Personalization API. To make the ordering process easier for your customers, create a multistep wizard with the UI Framework and use the Dynamic image API to add the online preview of the final result.
Power up your project with unlimited personalization capabilities using Customer’s Canvas APIs
Customer’s Canvas is a powerful tool flexible enough to fit almost any type of web-to-print project. What kind of customization scenario do you need for your project? Contact our sales team to discuss how this scenario can be implemented with Customer’s Canvas.