---
title: "Scalability of Customer's Canvas"
canonical: https://customerscanvas.com/docs/cc6/scalability.htm
archived: true
applies_to:
- product: "Customer's Canvas On-Premises"
- product: "Design Editor"
versions: ["6.15.0", "6.x (may differ)"]
---
**You’re viewing outdated documentation.** [View the latest Customer’s Canvas On-Premises documentation](https://customerscanvas.com/docs/on-premises/).
# Scalability of Customer's Canvas
**Applies to:** Customer's Canvas On-Premises; Design Editor 6.15.0, 6.x (may differ) · **Archived documentation**
On average, the standard server configuration of Xeon E3-1276 v3 with 16 Gb RAM and SSD allows you to support up to 100 concurrent users of Customer's Canvas. If you find that Customer's Canvas is slower than expected, then you can try to optimize the speed using the following three approaches:
1. Deploy Customer's Canvas on a load-balanced environment.
2. Adjust the website settings to eliminate cold-start delays.
3. Move Customer's Canvas from a server where your site is hosted to a separate one.
This article dwells on the implementation of the first two approaches.
## Deployment on a Load-balanced Environment
The load-balanced environment is a server architecture that allows for scaling system performance. Such an environment consists of two major parts:
1. A load balancer, accepting all requests to the web application and distributing them between application servers.
2. Application servers, hosting the application instances and processing requests redirected by the load balancer.
From the outside looking in, this setup appears as if the application were launched at one server since all user requests are sent to the load balancer, which has a single IP address. In the background, different requests are processed by different servers, which allows you to distribute the load and increase the processing speed.
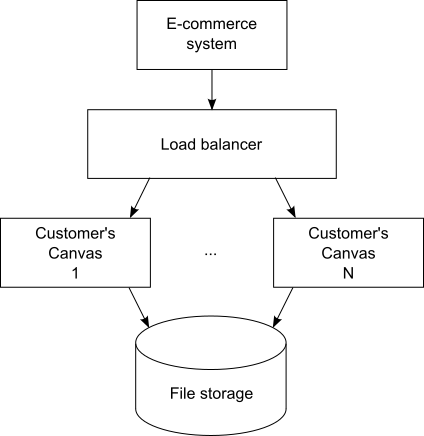
You can install Customer's Canvas in such an environment, but this requires some additional setup. Customer's Canvas requires all design templates, galleries, and user files to be located on the server where the editor is deployed. To get around this, you may need to set up network storage to store all the common files and link it to every Customer's Canvas instance deployed to application servers. This way, all instances work with the same version of files except for the local cache. All requests to Customer's Canvas's back end initiated by a user within a single session should be processed by the same application server as it needs access to files located in the server's local cache. You need to design your application in a way that the load balancer redirects all user requests within a single product editing session to the same application server.
Your load balancer may implement sharding, using your user's ID as a shard key. For example, if your user IDs are numeric values, then you can determine on which server the user should work, using the remainder of the integer division of the user ID by the number of servers (*shards*). This way, the remainder will correspond to the server number.
The following scheme illustrates this workflow.
**Note**
Every Customer's Canvas instance requires a separate license.
To apply this distributed structure:
1. Allocate a network server and make it available to all your application servers.
2. Create the `ProductTemplates`, `UserDataFolder`, and `PublicGalleryFolder` folders to store templates and images.
3. Install Customer's Canvas instances on application servers and link the folders to them using symbolic links.
4. Implement and configure your Load balancer to redirect users to a particular instance during a single session.
### Linking the Folders
A symbolic link (*symlink*) is a file system object that points to another file system object. To map a folder located in network storage to a local folder, you can run the **mklink** command on your application servers.
```
mklink /d C:\shared\PublicGalleryFolder \\server\CustomersCanvas\PublicGalleryFolder
```
After that, you need to specify such folders in the [AppSettings.config](https://customerscanvas.com/docs/cc6/appsettings-config.htm.md) file.
```xml
```
Note that you can organize [external storage for state files](https://customerscanvas.com/docs/cc6/webhooks-for-states.htm.md) and avoid storing these files in `UserDataFolder`. In this case, you need to implement a [controller](https://customerscanvas.com/docs/cc6/webhooks-for-states.htm.md) processing requests to push and pull state files.
Also, Customer's Canvas allows you to move fonts and color profiles to separate storage locations. In this case, you need to configure the corresponding folders in the [Aurigma.DesignAtoms.config](https://customerscanvas.com/docs/cc6/aurigma-designatoms-config.htm.md) file.
```xml
```
### Network Load Balancing
**Note**
Customer's Canvas requires the 50 MB/s access speed to the network storage.
Starting from version 4.2, Customer's Canvas requires either dedicated SQL Server or Azure SQL Database (the Standard tier).
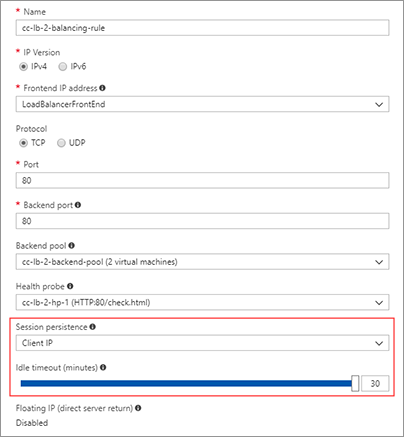
If you deploy Customer's Canvas to Microsoft Azure, you can use Azure Internal Load Balancer. In this case, set **Session persistence** to `Client IP` and **Idle timeout** to `30 minutes`.
If you deploy Customer's Canvas to your own servers, you can use the Network Load Balancing feature in Windows Server. In this case, set **Affinity** to `Single Affinity` and **Timeout** to `30 minutes` or more.
To enable proper URLs that link to proof images and high-resolution outputs, set the **AppUrl** parameter to your application server's address in `AppSettings.config`.
```xml
```
## Eliminating Cold-Start Delays on the Web Server
If there are no HTTP requests for a certain amount of time (the default is 20 minutes), then IIS suspends the application pool. After that, when a new request comes in, a startup delay is observed because the worker process needs to restart the application pool, load the .NET environment, compile and initialize your code, and finally serve the request. This is a so-called *cold start*.
To avoid the suspension of the Customer's Canvas application pool, perform the following steps:
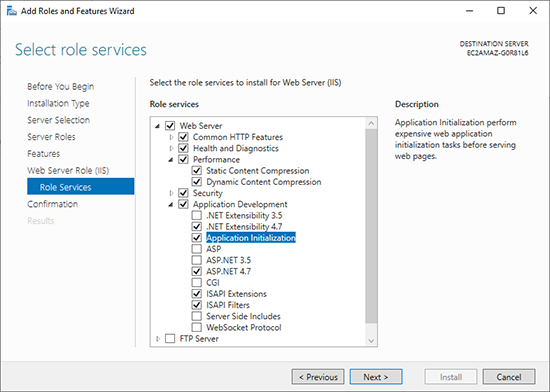
1. Install the Application Initialization role. In the **Add Roles and Feature Wizard** of Windows Server 2012 and higher, select the **Application Initialization** check box.
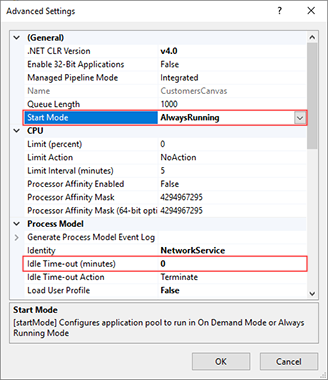
2. Enable the Always Running mode. In IIS Manager, right-click the Customer's Canvas application pool, and then click **Advanced Settings**. Set the **Start Mode** option to `AlwaysRunning` and **Idle Time-out (minutes)** to `0`.
In Windows Server 2012, you also need to set **Start Automatically** to `True`. Note, this setting was removed in Windows Server 2012 R2.
3. Enable the auto-start provider and application preload. You can perform this step through the `%WINDIR%\System32\inetsrv\config\applicationHost.config` file as follows:
1. Add the **<serviceAutoStartProviders>** element to the **<system.applicationHost>** node to register **CcAutoStartProvider**.
```xml
```
2. Locate the entry for the Customer's Canvas site under the **<sites>** node, enable the application preload, and register the auto-start provider for this site.
```xml
```
After you have done all these changes, type **iisreset** at the command prompt to restart IIS.
## See Also
### Manual
- [System Requirements](https://customerscanvas.com/docs/cc6/system-requirements.htm.md)
- [Web.config](https://customerscanvas.com/docs/cc6/web-config.htm.md)
- [Configuring the Cache](https://customerscanvas.com/docs/cc6/configuring-cache.htm.md)
- [Webhooks for State Files](https://customerscanvas.com/docs/cc6/webhooks-for-states.htm.md)
- [Troubleshooting](https://customerscanvas.com/docs/cc6/troubleshooting.htm.md)