---
title: "Troubleshooting"
canonical: https://customerscanvas.com/docs/cc6/troubleshooting.htm
archived: true
applies_to:
- product: "Customer's Canvas On-Premises"
- product: "Design Editor"
versions: ["6.15.0", "6.x (may differ)"]
---
**You’re viewing outdated documentation.** [View the latest Customer’s Canvas On-Premises documentation](https://customerscanvas.com/docs/on-premises/).
# Troubleshooting
**Applies to:** Customer's Canvas On-Premises; Design Editor 6.15.0, 6.x (may differ) · **Archived documentation**
If you face a problem while working with Customer's Canvas or setting it up, you can find a solution below. This topic covers the following areas:
- Compiling the source code
- Deploying to a Windows server
- Avoiding the cold start
- Upgrading Customer's Canvas
- Obtaining the diagnostic information
- Moving Customer's Canvas data folders to a network location
- Updating the public gallery
- Rendering problems
- Color Management
- Miscellaneous
## Compiling from Source Code
### Unsupported Project Error
Visual Studio shows the following **Unsupported** message when compiling the project.
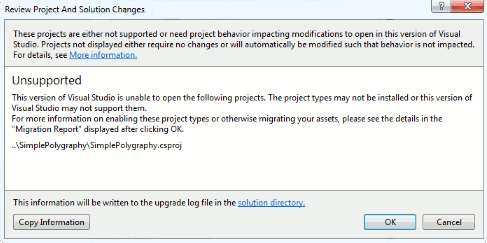
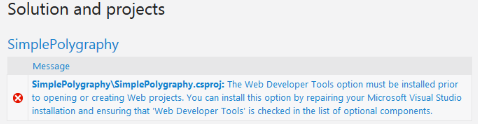
After you open the migration report which is displayed after the solution is loaded, you will most likely see the following message.
#### Solution
Start the repair process for your Microsoft Visual Studio, check the Web Developer Tools in the list of optional components, and finish repairing your IDE.
### NewtonSoft.Json Library Missing
When you compile the solution, Visual Studio complains that it cannot find `NewtonSoft.Json` or other libraries.
#### Solution
Check if the **Enable NuGet Package Restore** option is enabled in the solution.
### A Feature Supported Only in ECMAScript 6 Error
When you compile the solution, Visual Studio throws several errors saying that certain code works only with ECMAScript 6 or higher.

#### Solution
Update your [TypeScript↗](https://marketplace.visualstudio.com/items?itemName=TypeScriptTeam.typescript-382) to version 3.8.2.
### Bunch of TypeScript Errors
When you compile the solution, Visual Studio throws a bunch of TypeScript errors.
#### Solution
Check your TypeScript version:
- In Visual Studio 2015:
1. In Visual Studio, on the **Tools** menu, click **Extensions and Updates**.
2. In the **Installed Tools** list, click **TypeScript for Microsoft Visual Studio**.
3. Verify that the TypeScript version is 3.8.2.
- Starting from Visual Studio 2017 update 2:
- Verify that TypeScript 3.8.2 is available in **Tools** > **Options** > **Text Editor** > **JavaScript** > **IntelliSense**, in the **Use TypeScript version** list.
If you have a different version, install [TypeScript 3.8.2↗](https://marketplace.visualstudio.com/items?itemName=TypeScriptTeam.typescript-382).
## Deploying to a Windows Server
### A Problem with Deploying
Customer's Canvas launches on your development computer, but you are having trouble getting it deployed to a production Windows server.
#### Solution
Most likely, the prerequisites have not been met. Try to follow [the instructions for deploying](https://customerscanvas.com/docs/cc6/deploying-application-to-windows-server.htm.md) Customer's Canvas to your server; make sure that the following components are installed on your system:
- Microsoft .NET Framework 4.6.2 or higher.
- TypeScript 3.8.2.
- Microsoft Visual C++ Redistributable Packages:
- Starting from Customer's Canvas 4.3.0, you need to download [Microsoft Visual C++ 2017 Redistributable Package (x64)↗](https://go.microsoft.com/fwlink/?LinkId=746572)
- For Customer's Canvas 4.1.21 - 4.2.24, you need to download [Microsoft Visual C++ 2017 Redistributable Package (x86)↗](https://go.microsoft.com/fwlink/?LinkId=746571) and [Microsoft Visual C++ 2017 Redistributable Package (x64)↗](https://go.microsoft.com/fwlink/?LinkId=746572)
- If you use Customer's Canvas earlier than 4.1.21, you need [Visual C++ Redistributable Packages for Visual Studio 2013↗](http://www.microsoft.com/en-US/download/details.aspx?id=40784), both `vcredist_x64.exe` and `vcredist_x86.exe` files
### HTTP Error 403 or 404
You get an HTTP error 403 or 404.
#### Solution
Check that you put the correct site name in the **CcIframeApiScript** URL. Make sure that the site opens in the browser.
### No License Key Has Been Found Error
You get the **No license key has been found** server error.
#### Solution
The editor has checked `AppSettings.config`, `Aurigma.GraphicsMill.lic`, and the Windows Registry and has not found license keys. Register your license key as described in the [corresponding topic](https://customerscanvas.com/docs/cc6/registering-production-license-keys.htm.md).
### Mismatching License Keys
You get one of the following server errors:
- **Current domain doesn't match the applied license key** - if a request to the editor came from an unlicensed domain.
- **Hardware ID doesn't match the applied license key** - if hardware parameters encoded in this license key do not match your server hardware.
- **The required CustomersCanvas module hasn't been loaded** - if the `CustomersCanvas.Licensing.dll` assembly is corrupted.
#### Solution
Contact our [support team↗](http://www.aurigma.com/account/cases/add) to select a proper license type.
### Configuration Section Error
You get the following message while opening a page: "This configuration section cannot be used at this path".
#### Solution
Install the ASP.NET 4.5 feature for IIS. You can do this in the following way:
- On Windows 7 or 8:
1. Open **Control Panel**, choose **Programs and Features**, and then choose **Turn Windows features on or off**.
2. In the **Windows features** list, expand **Internet Information Services**, and then expand **World Wide Web Services**.
3. Expand **Application Development Features**, and select **ASP.NET 4.5**.
- On Windows Server 2008 and Windows Server 2008 R2:
1. Run **Server Manager**.
2. In the navigation pane, choose **Roles**, and then choose **Add Roles**.
3. In the **Before You Begin** window, click the **Next** button.
4. In the **Select Server Roles** window, select **Web Server (IIS)**, and then click **Next**, and then click **Next** again.
5. Expand **Application Development Features**, and select **ASP.NET 4.5**.
- On Windows Server 2012:
1. Run **Server Manager**.
2. In the navigation pane, choose **Dashboard**, and then choose **Add roles and features**.
3. In the **Add Roles and Features Wizard**, in the **Before You Begin** page, click the **Next** button.
4. On the **Select installation type** page, select role-based or feature-based installation, and then click the **Next** button.
5. On the **Select destination server** page, select a server from the server pool, select your server from the **Server Pool** list, and then click the **Next** button.
6. In the **Select Server Roles** window, expand **Web Server (IIS)**, and then expand **Application Development**, and select **ASP.NET 4.5**.
### Exception with HRESULT: 0x800A1390
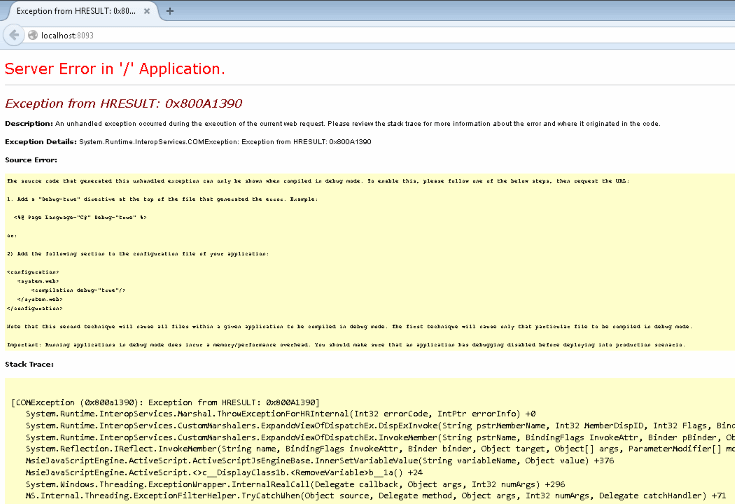
You get the following error while launching the project on your old computer (like Windows 7).
#### Solution
Upgrade Internet Explorer to the latest version on your server where the project runs. This is required even if your users open the application in different browsers on client computers because the IE engine is needed for LESS compilation on the server side.
### UnauthorizedAccessException
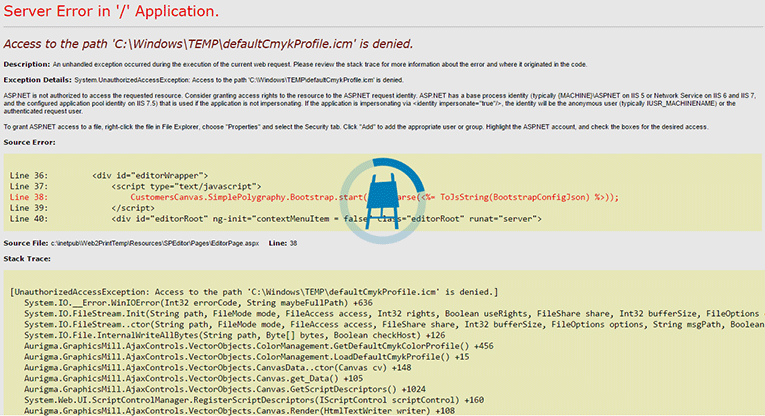
You get the following error while launching the project.
#### Solution
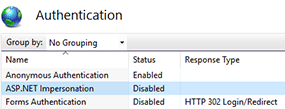
Disable ASP.NET impersonation:
1. In IIS Manager, click your site in the **Sites** list.
2. In the **Features View**, double-click **Authentication**.
3. In the **Actions pane**, click **Disable** to turn off ASP.NET Impersonation.
### Blocked Libs in Windows
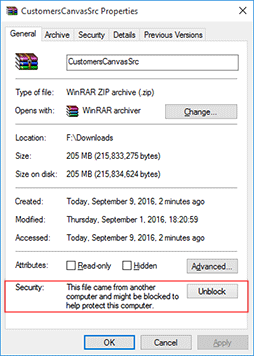
When you download files using web browsers or get them from email clients, Windows may lock them for security reasons. So, when you download the Customer's Canvas archive from our server and try to deploy it to your server, you may get such errors:

#### Solution
Unlock the archive by clicking the **Unblock** button in the **Properties** window.
## Avoiding the Cold Start
### Application Pool Suspension
It takes too long to start working with Customer's Canvas.
#### Solution
To avoid the suspension of the Customer's Canvas application pool, perform the following:
1. Install the Application Initialization role. In Windows Server 2012 and higher, in the **Add Roles and Feature Wizard**, select the **Application Initialization** check box.
2. In IIS Manager, right-click the Customer's Canvas application pool, and then click **Advanced Settings**. Set the **Start Mode** option to **AlwaysRunning** and **Idle Time-out (minutes)** to **0**.
3. On the left pane of IIS Manager, in the **Sites** list, navigate to your Customer's Canvas application. Right-click the application node and select **Manage Application** > **Advanced Settings**. Set **Preload Enabled** to **True**.
4. At the command prompt while running as an administrator, type **iisreset** to restart IIS.
For more details, refer to the [Scalability of Customer's Canvas](https://customerscanvas.com/docs/cc6/scalability.htm.md) topic.
## Upgrading Customer's Canvas
**Important**
To ensure a smooth transition to a new version of the Design Editor, follow [our step-by-step instructions](https://customerscanvas.com/docs/cc6/upgrading-customers-canvas.htm.md).
### Missing Preloader
When you upgrade to Customer's Canvas 4.0, the preloader does not appear in the Design Editor.
#### Solution
Customer's Canvas 4.0 introduces breaking changes in the preloader feature. Now, you set up this feature through the **preloader** object in [IConfiguration](https://customerscanvas.com/docs/cc6/customerscanvas.iframeapi.configuration.iconfiguration.htm.md) which enables the preloader by default. So, if you already customized the preloader and want to keep your implementation, please set the **enabled** property of the **preloader** object to `false` when migrating from any 3.x.x release to 4.x.
## Obtaining the Diagnostic Information
### Version Number
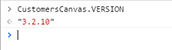
Updates for Customer's Canvas are regularly released. So, when you contact our support team, you may be asked about your editor version number. To get it, do the following:
1. Run Customer's Canvas in a browser.
2. Right-click in the editor area and then click **Inspect** (or **Inspect element**, depending on your browser) from the context menu.
3. Switch to the **Console** tab when the **Developer Tools** window opens.
4. Type in **CustomersCanvas.VERSION**.
### Server Logs
How can you find a root cause of an error? In the best-case scenario, it is shown in the **Developer Tools Console** or right in the editor's IFRAME where Customer's Canvas is supposed to be loaded.
If you are not sure what is causing the error, you need to find out where it is occurring: on the client or on the server side.
1. Open the **Developer Tools** (press **F12**).
2. Reproduce the error.
3. Switch to the **Network** tab.
If there is a failed HTTP request (it should be highlighted in red with a 50x code, like 500, 502, etc.), then the error is occurring on the server side. Otherwise, it is occurring on the client side, and it is most likely a JavaScript error.
To analyze the server side error, select the failed request on the **Network** tab and then switch to the **Response** (**Preview**) tab. The response contains either a descriptive message or a text like "An error has occurred". In the latter case, you should analyze logs on your server. Customer's Canvas provides two types of such logs:
- A text file logged by **NLog**. You can find it in the `~\Resources\Logs\All.log` file.
- XML files logged by **Elmah**. They are `~\Resources\Logs\*.xml`.
If you face an error while integrating or debugging Customer's Canvas, check the Elmah's files first. Consider the `All.log` file as an auxiliary, you can refer to it if you think that Elmah does not include some messages or the logs it saves are too complicated.
If an error occurs while running Customer's Canvas, both of these logs can be useful for our support team.
You can get the Elmah's logs through a web interface. Usually, the Elmah's interface is available only on your server, so do the following to check them:
1. Log in to the server through RDP.
2. Type **<editor\_url>/elmah.axd** in your browser address bar. Here, **<editor\_url>** is a URL of the Customer's Canvas editor with the **localhost** domain. For example, **localhost:65001/Users/6F96A9FF-8B86-D011-B42D-00CF424964FF/SimplePolygraphy/Elmah.axd**.
If you find it difficult to log in through RDP every time, you can get web access to the interface as [Elmah wiki↗](http://elmah.github.io/help/) describes. To enable web access, set the **allowRemoteAccess** attribute to `"true"` in the `web.config` file.
```xml
```
**Note**
Allowing the remote access to your server is not secure, so it is recommended only for development computers.
Also, you can set up your site so that it provides detailed ASP.NET errors - not just "An error has occurred" - to both your local host and remote clients. To perform this, set the **mode** attribute of **customErrors** to `"Off"` in `web.config`. By default, this attribute is **RemoteOnly** and shows custom errors to the remote clients and ASP.NET errors to the local host only.
```xml
```
**Note**
Providing ASP.NET errors to remote clients can be insecure, so it is recommended only for debugging purposes.
## Moving Customer's Canvas Data Folders to Another Location
You may want to change the location of data folders in Customer's Canvas, like the Gallery, Templates, or Cache. To implement this, you need to change these folders in `AppSettings.config`, `Aurigma.DesignAtoms.config`, and `FileCache.config` as the following example shows.
```xml
```
For more details, see the [Scalability of Customer's Canvas](https://customerscanvas.com/docs/cc6/scalability.htm.md) topic.
If you receive the **Could not find a part of path** message after you moved the data folders to a network location, set up correct permissions for them. A user account, under which Customer's Canvas runs in ASP.NET/IIS, must have the read/write access to the remote folders. Also, check the solution for the issue with copied content.
## Updating Public Gallery
### Big Images Are Not Uploaded
You successfully upload small files but cannot upload big images to your server. Also, you may be unable to upload files which names contain spaces.
#### Solution
It might be a problem with IIS server configuration. Check the **Maximum allowed content length**: in IIS Manager, double-click **Request Filtering**, and then click **Edit Feature Settings**.
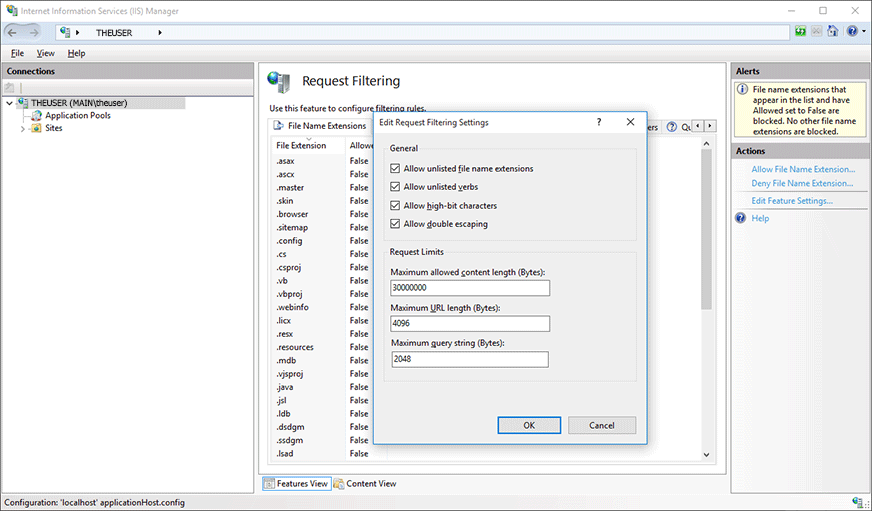
The default value is almost 30MB, which may not be enough, so set a bigger value. Also, make sure that the **Allow double escaping** option is enabled to download files which names contain a space character.
### Copied Content Does Not Show in the Editor
You copy fonts or images to your server through a file manager, but they do not show in Customer's Canvas.
#### Solution
1. **Recycle the application pool (or restart IIS)**. In IIS Manager, do the following:
1. Open the **Application Pools** list.
2. Select your application pool.
3. Click **Recycle**.
2. If you copy a whole folder, then additionally set the **NETWORK SERVICE** group with **Full control** permissions to the folder. For more details, refer to [Deploying Customer's Canvas to Windows Servers](https://customerscanvas.com/docs/cc6/deploying-application-to-windows-server.htm.md).
## Rendering Problems
### Stretched Text Strings in Customer's Canvas
A text rendered in Customer's Canvas looks blurred, unlike the same string with the same font settings in Adobe Photoshop.
#### Solution
Check if scaling is applied to the text:
1. Select the text layer in Photoshop.
2. Check the **Info** tab.
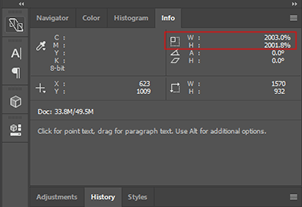
In this case, set a bigger font size instead of scaling the text.
### Faded Hi-res Outputs in PDF
The hi-res output looks faded if your design contains transparent raster layers above vector layers.
#### Solution
Enable the rasterization of vector layers in `Aurigma.DesignAtoms.config` by using the [PdfHiResRasterizeVectorLayers](https://customerscanvas.com/docs/cc6/aurigma-designatoms-config.htm.md) parameter.
```xml
```
## Color Management
### Colors on the Canvas Do Not Match Colors in the Photoshop Template
You created a template, but colors on the canvas look different from colors in Photoshop.
#### Solution
Customer's Canvas applies [color management](https://customerscanvas.com/docs/cc6/color-management.htm.md) on the canvas as well as to the hi-res outputs. This web-to-print editor uses profiles embedded in templates as source color profiles to render graphics on the canvas. If there are no color profiles in a template, then a default profile will be used depending on the color space:
- SWOP (Coated) 20%, GCR, Medium profile for CMYK
- sRGB IEC61966-2.1 profile for RGB
- Dot Gain 30% profile for Grayscale
These profiles are also used as default destination profiles for rendering hi-res outputs when you don't specify profiles in `~/Configuration/Aurigma.DesignAtoms.config`. To avoid color space conversions, you can both design your templates in Photoshop and edit them in Customer's Canvas by using the destination color profile:
1. In Photoshop, assign a profile that is compatible with your printing equipment (click **Edit** > **Assign profile**).
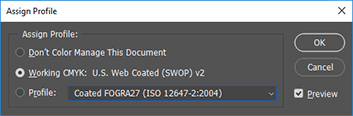
2. In Customer's Canvas, specify the same color profile in the `Aurigma.DesignAtoms.config` file. For example, you can specify a CMYK profile as follows:
```xml
```
3. If you don't need to include color profiles in hi-res output files, set the **PdfRenderDeviceProfileEnabled** parameter to `"True"`.
```xml
```
For more details, you can refer to the [Color Management in Customer's Canvas](https://customerscanvas.com/docs/cc6/color-management.htm.md) topic.
### CMYK Colors in a Hi-res Output Do Not Match the PSD Template
You set a CMYK profile in a PSD template, but hi-res output colors look different from colors in the template.
#### Solution
Customer's Canvas uses color profiles from PSD templates only as source profiles. The default color profile for the CMYK color space is SWOP (Coated), 20%, GCR, Medium. So, if you set the **hiResOutputColorSpace** property to **CMYK** but did not set your profile in `~/Configuration/Aurigma.DesignAtoms.config`, then the colors may differ. To set up a color space for hi-res outputs (destination colors):
1. Specify the same CMYK profile as for PSD templates. The destination colors are set up in the `Aurigma.DesignAtoms.config` file. The following example shows how you can specify the CMYK profile.
```xml
```
2. Set the **hiResOutputColorSpace** property of the [rendering](https://customerscanvas.com/docs/cc6/configuring-high-resolution-and-proof-images.htm.md) configuration object to **CMYK**.
```
configuration = {
rendering: {
hiResOutputColorSpace: "CMYK",
hiResOutputFileFormat: "PDF",
hiResOutputDpi: 300
}
};
```
For more details, refer to the [Configuring High Resolution and Proof Images](https://customerscanvas.com/docs/cc6/configuring-high-resolution-and-proof-images.htm.md) topic.
## Miscellaneous
### Customer's Canvas does not load in Firefox
The editor loads in any browser but Firefox. At the same time, no messages show.
#### Solution
Check if the IFRAME element containing the editor has the **display:none** property. In this case, Customer's Canvas cannot load because of the Gecko engine implementation. So, set the **display** property to **block** to load it correctly.
### A product loads too slowly
It takes much time to open a product when you load the editor like this:
```
CustomersCanvas.IframeApi.loadEditor(iframe, productDefinition, config);
```
And then populate the product with user data:
```
editor.loadUserInfo(data);
```
#### Solution
The **loadUserInfo** method is time-consuming. To improve the load time, we recommend that you pass the **data** applied in this method right into [loadEditor](https://customerscanvas.com/docs/cc6/working-with-user-data.htm.md) with **autoLoadUserInfo** enabled.
```
config.userInfo = data;
config.autoLoadUserInfo = true;
CustomersCanvas.IframeApi.loadEditor(iframe, productDefinition, config);
```
### The editor's font list contains unspecified fonts
You [specify fonts](https://customerscanvas.com/docs/cc6/custom-fonts.htm.md) for the editor, but the font picker displays more fonts.
#### Solution
In `~/Configuration/AppSettings.config`, check values of the [SubstitutionFontPostScriptName](https://customerscanvas.com/docs/cc6/appsettings-config.htm.md) and [DefaultFontPostScriptName](https://customerscanvas.com/docs/cc6/appsettings-config.htm.md) parameters. Customer's Canvas adds these fonts to the list. If these parameters have incorrect Postscript names, then **Arial** is added by default.
Also, the font picker automatically displays fonts used in your product templates.
### Web API methods return the 405 Method Not Allowed error
When you use PUT or DELETE requests, you may obtain the 405 Method Not Allowed error. At the same time, POST and GET requests may work properly.
#### Solution
You can disable WebDAV in the `web.config` file. Add the following code to the **<system.webServer>** node.
```xml
```
Alternatively, you can remove the **WebDAV Publishing** role from your server.
## See Also
### Manual
- [Deploying Customer's Canvas to Windows Servers](https://customerscanvas.com/docs/cc6/deploying-application-to-windows-server.htm.md)
- [Configuring High Resolution and Proof Images](https://customerscanvas.com/docs/cc6/configuring-high-resolution-and-proof-images.htm.md)
- [Web.config](https://customerscanvas.com/docs/cc6/web-config.htm.md)