

Direct mail
Some products may require the personalization of every printed copy, for example, when you are preparing letters and pre-addressed envelopes for mass mailings (a so-called mail merge, direct mail marketing), creating wedding invitations, or printing business cards in a corporate style.
For example, you are building a marketing campaign, where you have a catalog of such products as postcards, letters, and invitations. For this campaign, you select one or more products and one or more mailing lists. Then, you select templates for the products, and may want to customize these templates with static design elements and variable fields, like text, images, or barcodes. You may want to generate preview images on a small sample of addresses.
This article provides an overview of how this scenario can be implemented with Customer's Canvas.
General idea
To implement direct mail marketing, a customer creates a campaign and adds templates to it. Customer's Canvas allows you to arrange templates into folders by category as well as create product variants based on these templates. The customer then selects a template, personalizes it as necessary, provides a data set to be applied, previews the design with a data sample, and proceeds to checkout if the result looks good.
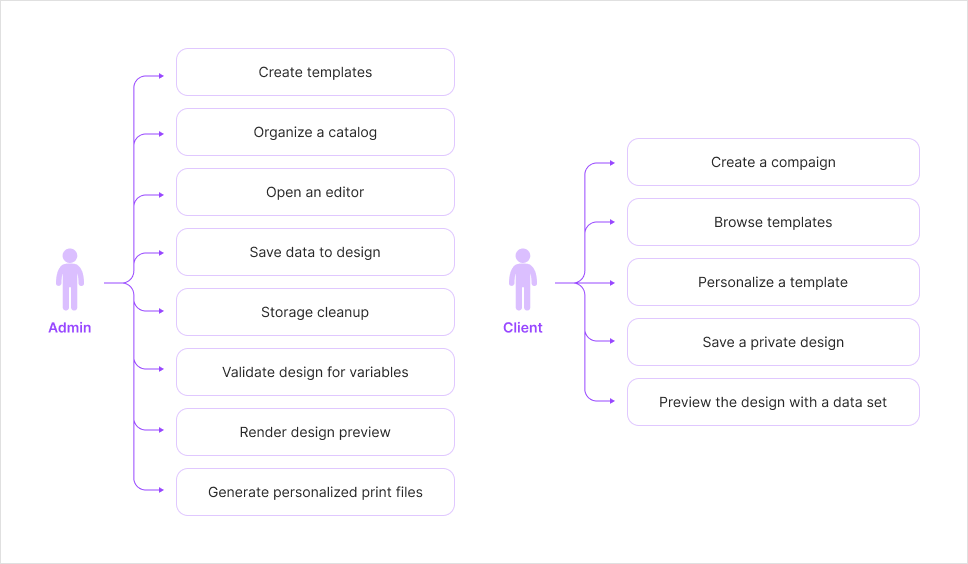
Let's split this process into steps.
Roadmap for direct mail
1. Pre-designing variable templates
A template is a basic public design file for rendering. Customer's Canvas supports templates created in Adobe Photoshop, Adobe InDesign, and the Customer's Canvas Template Editor. You can add variable fields such as text placeholders, image placeholders, and barcode placeholders to these templates.
For details, refer to Pre-designing variable templates and Specifying paths for variable images.
2. Organizing a catalog
Upload your templates to your Customer's Canvas tenant and organize them into folders in the Assets > Designs section to make it easy to navigate them. For example, you may create the following hierarchy:
- Products (e.g., postcards, letters, invitations, ...)
- Options (e.g., size, material, ...)
- Variants (combinations of all option values with assigned SKUs)
- Options (e.g., size, material, ...)
This hierarchy fits the PIM products. Using this approach, you can easier manage designs, enable price support, and link product variants in Customer's Canvas with products in your application using SKUs.
When creating products, select valuable options to define product variants, and in this case, a template will represent a product variant design. For more details, refer to the PIM topic.
3. Personalizing templates
After the customer selects a template, open an editor so that the customer can personalize it. For example, you can use the Design Editor. In your tenant, an instance of this editor is installed by default.
For details about opening products for editing and initializing the editor, refer to Opening products for editing and Starting personalization session.
4. Preview design with data
When the customer finishes the personalization, you can display a design preview with applied data sets on the approval page. You can use different strategies for data substitution, for example, displaying the first and the last records of the data set, or some corner cases such as the longest field values.
For details, refer to Previewing variable data designs.
5. Adding a dataset
When the customer finishes editing a template and clicks Save, the personalization results are saved to the private user's storage as a private state file. A state file not only defines design elements but also may contain a data sample that will be applied to this design.
For details, refer to Adding a dataset.
6. Rendering designs
For rendering, create a pipeline with a render-vdp-hires task and create a project based on this pipeline. Once the project is created, the rendering job begins immediately.
For details, refer to Starting print file rendering.
7. Cleaning up private assets
Since this task involves a large flow of data and assets, you need a cleanup procedure for the storage. You can either rely on the retention policy implemented in BackOffice or clean up the assets on your own.
According to the default retention policy in BackOffice, once a day, a background task that finds and deletes outdated assets for all tenants with EnableAssetsRetention set to true is performed on the backend. Assets are considered outdated if both of the following conditions are met:
RetentionPolicyis set toDefault.LastAccessTimeis earlier than theAssetsRetentionPeriodInDaysdefined in the tenant settings.
To run this task through the API, use the endpoint POST /api/storage/v1/tenants/{id}/clean-up. You can also clean up the assets manually or write scripts for that.