Getting started with Dynamic Image
- 7 minutes to read
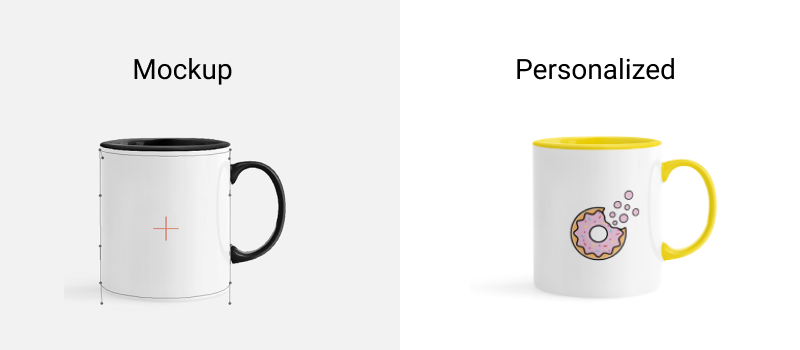
Imagine that you are building an e-commerce store that sells personalized mugs. End-users will be able to choose a design of a product or even customize it. Besides that, your store will offer mugs with C-shaped handles of different colors, that can also be personalized. During this tutorial, we'll build a code example that creates a preview image of these mugs.
Prerequisites
Before we start building the code, you'll need:
- A PSD mockup upon which we'll apply the image;
- A design file that will be drawn on this mockup;
- An account with Customer's Canvas and a Dynamic Image URL. If you don't have one yet, contact our support team.
Preparing a PSD mockup
You can use the PSD mockup file that we've prepared for this tutorial. Click here to download it. You can also follow the recommendations in the PSD Files topic to create one by yourself. To render mockups, they must be uploaded to the asset storage.
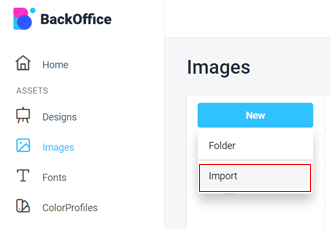
After you have logged into your Customer's Canvas instance, in the main menu, click Images > New > Import. Then, select your PSD file (for example, preview-mockup-mug-left.psd) and click Open.
Preparing a design file
During this tutorial, we'll render the mockup with a custom design on it. We'll take this design using a URL that should return an image in the JPEG or PNG format. You can place a static file at this URL or a service that generates images. For the purposes of our tutorial, we'll use the image from the Picsum.Photos service, but it's also possible to use your image.
Dynamic Image URL
To make requests to the Dynamic Image API, you need to obtain the URL of the Application. The Dynamic Image URL looks as follows:
https://cc-apps.aurigma.net/{tenantId}/dynamic-image/{version}
If you're not sure of your tenantId or version, you can contact our support team.
How the Dynamic Image works
Getting a product preview in the Dynamic Image is a quite simple task. You only need to make an HTTP request to the Rendering endpoint. In the request payload, you must pass at least a PSD image ID and the type of the output image. Also, you may want to apply personalization data to this file.
The easiest way to determine an image ID is to find it in the Images section, right-click its thumbnail, click Properties, and copy the ID.
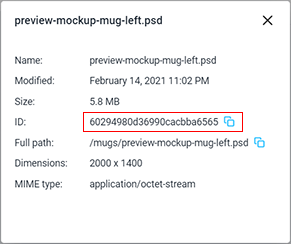
As an alternative, you may specify a full path to the image in Asset Storage, including the slash in the beginning, e.g. /folder/my-mockup.psd.
Tip
In some scenarios, it is more convenient to use the ID but it may be better to use full names in other situations. The benefit of using IDs is that even if you move a PSD file between folders, the ID won't change. On the other hand, full names allow loading PSD files based on some naming conventions, for example, if you want to use a product SKU as a mockup name.
Note
When using a stand-alone application not included in BackOffice, you can specify a relative path to the template, which will be combined with the path specified in the TemplatePath parameter in AppSettings.config. For example, if TemplatePath is "c:\inetpub\mockups", then specifying the /folder/my-mockup.psd template, Dynamic Image will refer to c:\inetpub\mockups\folder\my-mockup.psd.
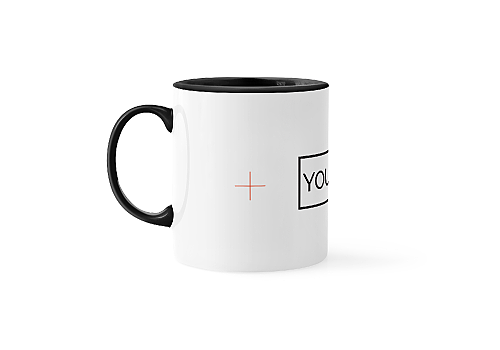
The minimal possible rendering request
Here, you can see the minimal request that creates the PSD preview without any changes.
POST https://<your-dynamic-image-instance>/api/rendering/preview
{
    'template': '/mugs/preview-mockup-mug-left.psd',
    'format': 'png'
}
It will return a URL to a rendered image, similar to this one:
https://<your-dynamic-image-instance>/api/download/?file=6191D97FD6D484C220755B53333598B8.png
Change the Shape layer color
Now, let's try to change the handle color. To do this, add a data object to the request. The keys of this object are the layer names, while the values are the commands of different types.
Tip
If your PSD file contains groups, you may access the items in a group by adding its name to a key separated by a double backslash, like GroupName\\LayerName.
Layers included in Smart Objects are also supported. If a Smart Object contains ungrouped layers, you can personalize a single layer through "SmartObjectName\\LayerName". You can also replace the whole Smart Object by specifying property names as "SmartObjectName".
Each command is an object containing a type property such as shape, image, psd, switch, etc. and additional properties containing your personalization data. For example, to recolor a Shape Layer named Handle, you should send a shape command and send over its color, as follows:
POST https://<your-dynamic-image-instance>/api/rendering/preview
{
    "template": "/mugs/preview-mockup-mug-left.psd",
    "format": "png",
    "data": {
        "Handle": {
            "type": "shape",
            "color": "#686343"
        }
    }
}

Insert an image into a Smart Object
To insert an image from a URL to a Smart Object, or an Image Item called Design, you need to send another command - image along with this URL:
POST https://<your-dynamic-image-instance>/api/rendering/preview
{
    "template": "/mugs/preview-mockup-mug-left.psd",
    "format": "png",
    "data": {
        "Handle": {
            "type": "shape",
            "color": "#686343"
        },
        "Design": {
            "type": "image",
            "url": "https://picsum.photos/seed/picsum/1200/400"
        }
    }
}

Now that we've learned the basic principles of the Dynamic Image, let's take a look at the code example.
Code example
For brevity, this tutorial contains the code that you can run from the command line. In a web app, you will need to call similar code in a controller.
Copy the following script to a file, for example, dynamic-image.py.
import requests
# Provide a request payload.
payload = {
    'template': '/mugs/preview-mockup-mug-left.psd',
    'format': 'png',
    'data': {
        'Design\\Left': {
            'type': 'image',
            'image': 'https://picsum.photos/id/425/1200/600',
            'resizeMode': 'fill'
        },
        'Handle': {
            'type': 'shape',
            'color': '#686343'
        }
    }
}
# Make a request.
r = requests.post('https://<your-dynamic-image-instance>/api/rendering/preview', json = payload)
if  r.status_code == 200:
    # Print a link to the personalized preview image.
    print (r.json())
Install the Requests library. To do so, type the following in the command prompt.
$ pip install requests
Replace the placeholder <your-dynamic-image-instance> with the correct Dynamic Image base URL. Then, run the script:
$ python dynamic-image.py