HTTP Compression
- 4 minutes to read
HTTP compression, if accepted by a user browser, can significantly reduce traffic from your server. There are two types of compression offered by IIS: static content compression and dynamic content compression. If the static compression is enabled, then IIS will compress static content and save it to the cache folder. If the dynamic compression is enabled, IIS will compress content each time a client requests it, since the dynamic content is created depending on a client request and because of it changes often.
Enabling HTTP Compression in IIS
We recommend you to enable both types of compression; you can do this in the following way:
Open Internet Information Services (IIS) Manager.
In the Connections pane, select your Customer's Canvas application.
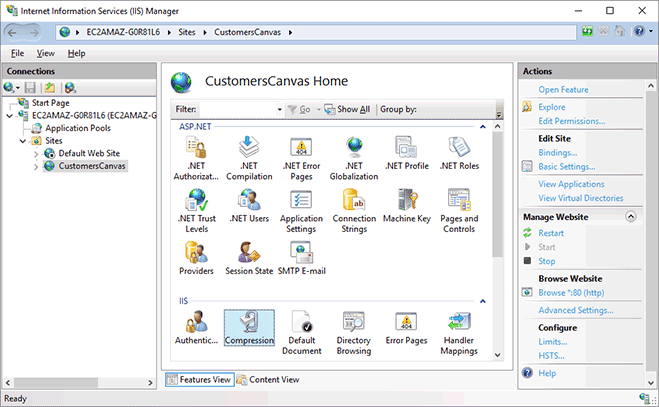
In the Features View of the application's home page, double-click Compression and enable both static and dynamic content compression.
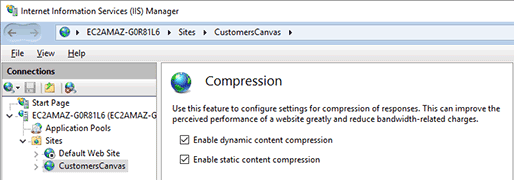
If static or dynamic compression is not installed on your server (the related option is disabled in IIS manager), you can install it like it is described below:
- Install HTTP compression in Windows Server 2012 or higher.
- Install HTTP compression in Windows 8 or Windows 8.1.
- Install HTTP compression in Windows Server 2008 or Windows Server 2008 R2.
- Install HTTP compression in Windows Vista or Windows 7.
Configuring HTTP Compression
Note
If a user browser cannot handle compressed content, it will receive uncompressed content, even if compression is enabled on the server side.
You can change all HTTP compression configurations globally for the entire server in the <httpCompression> section of your %Windir%\system32\inetsrv\config\applicationHost.config file. This section may look as follows:
<httpCompression
        directory="%SystemDrive%\inetpub\temp\IIS Temporary Compressed Files">

    <scheme name="br" dll="%ProgramFiles%\IIS\IIS Compression\iisbrotli.dll" />
    <scheme name="gzip" dll="%ProgramFiles%\IIS\IIS Compression\iiszlib.dll" />

    <dynamicTypes>
        <add mimeType="text/*" enabled="true" />
        <add mimeType="message/*" enabled="true" />
        <add mimeType="application/javascript" enabled="true" />
        <add mimeType="application/wasm" enabled="true" />
        <add mimeType="image/svg+xml" enabled="true" />
        <add mimeType="*/*" enabled="false" />
    </dynamicTypes>

    <staticTypes>
        <add mimeType="text/*" enabled="true" />
        <add mimeType="message/*" enabled="true" />
        <add mimeType="application/javascript" enabled="true" />
        <add mimeType="application/wasm" enabled="true" />
        <add mimeType="image/svg+xml" enabled="true" />
        <add mimeType="*/*" enabled="false" />
    </staticTypes>

</httpCompression>
Here is an overview of some parameters:
directoryspecifies the directory where compressed versions of static files are temporarily stored and cached.schemespecifies the compression scheme (Gzip or Deflate), wherenameis the name of the scheme anddllis the path to the compression library. We strongly recommend you to use GZIP, which is the default scheme.dynamicTypesandstaticTypessections configure which files should be compressed. If you are going to change the default configuration, take into consideration that some files, like JPG and PNG images, are already compressed, so there is no use to configure the server to compress them.
Since the Design Editor uses TextWhizzJS WebAssembly for the WYSIWYG text engine, compression for the application/wasm MIME type is enabled in both dynamic and static sections:
<add mimeType="application/wasm" enabled="true" />
You can verify if compression is working as follows:
- In Google Chrome, open Dev Tools and load the Design Editor.
- Click the Network tab and select Use large request rows.
- Filter wasm requests and verify that the transferred size of TextWhizzJS.wasm is less than the resource size.

Installing HTTP Compression in IIS
Windows Server 2012 and Higher
Run Server Manager.
In Server Manager, click the Manage menu, and then click Add Roles and Features.
In the Add Roles and Features wizard, click Next. Select the installation type and click Next. Select the destination server and click Next.
On the Server Roles page, expand Web Server (IIS), expand Web Server, expand Performance, and then select Static Content Compression and/or Dynamic Content Compression. Click Next.
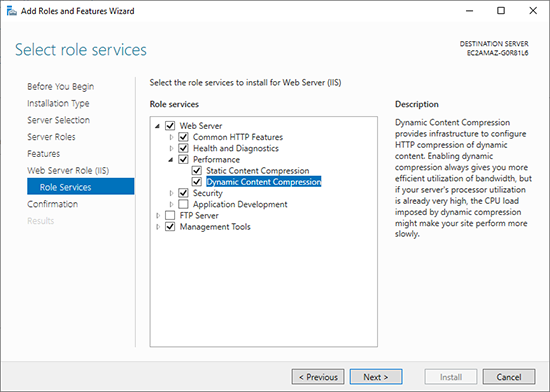
On the Select features page, click Next.
On the Confirm installation selections page, click Install.
On the Results page, click Close.
Windows 8 or Windows 8.1
Open Control Panel.
In Control Panel, click Programs and Features, and then click Turn Windows features on or off.
Expand Internet Information Services, expand World Wide Web Services, expand Performance Features, and then select Dynamic Content Compression and/or Static Content Compression.
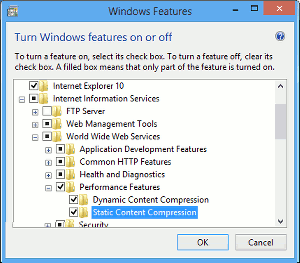
Click OK.
Click Close.
Windows Server 2008 or Windows Server 2008 R2
Run Server Manager.
In the Server Manager hierarchy pane, expand Roles, and then click Web Server (IIS).
In the Web Server (IIS) pane, scroll to the Role Services section, and then click Add Role Services.
On the Select Role Services page of the Add Role Services Wizard, select Dynamic Content Compression if you want to install dynamic compression and Static Content Compression if you want to install static compression, and then click Next.
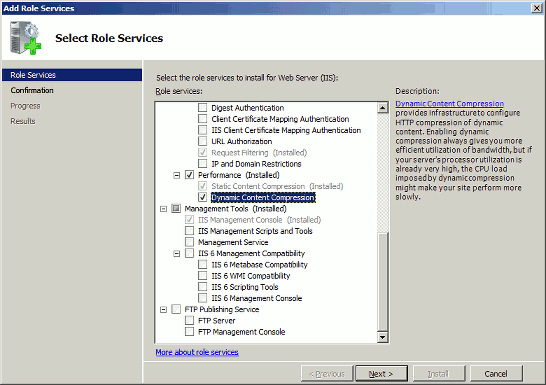
On the Confirm Installation Selections page, click Install.
On the Results page, click Close.
Windows Vista or Windows 7
Open Control Panel.
In Control Panel, click Programs and Features, and then click Turn Windows Features on or off.
Expand Internet Information Services, then World Wide Web Services, then Performance Features.
Select Http Compression Dynamic if you want to install dynamic compression and Static Content Compression if you want to install static compression.
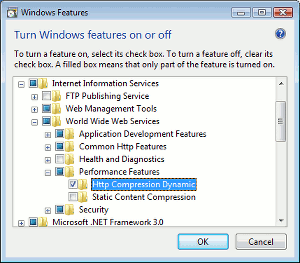
Click OK.