Setting markers outside of templates
- 4-5 minutes to read
The Design Editor allows you to manage permissions for each design element by using markers. Markers, for example, specify whether the user is allowed to move, resize, or change the element or not. To set up permissions, you can add markers to names of design elements in Photoshop and InDesign.
Adding a few markers to a template is quite a simple task but, in some cases, this may be inconvenient. For example, when you create many similar templates with the same layers and would like to have the same permissions for them. Also, you may want to change permissions without editing templates in Photoshop or InDesign. For these cases, the Design Editor provides an alternative way to set up markers through external JSON files. The Design Editor reads such files if they are in the same folder and have the same name as the corresponding template.
Although this topic contains examples of PSD templates, you can also apply this approach to IDML templates.
Permissions in the JSON Format
Let us assume that we have the StickerBoy.psd template. This template contains two layers: Name and Sticker. Using the <LC> marker, we can disallow changing and manipulating the Sticker layer.
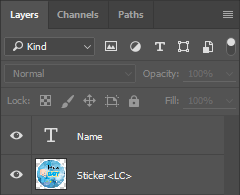
Let us see how to create the JSON version of this marker. To do it, we just need to create a file with the same name as the PSD template and the JSON extension in the ~\assets\designs\ folder. For this example, we will create the StickerBoy.json file.
The format of such files is as follows:
{
    "frames": {
        "<layerName>": {
            "<permissionName>": <permissionValue>
        }
    }
}
Here, the frames object is a container for PSD template layers. It can contain as many layers and layer groups as you need. <layerName> is the PSD layer name omitting markers. Every marker has an equivalent <permissionName> property in JSON. You can find all available permission names and values in the templateConfigSchema.json file, which is the JSON-schema that you should stick to. This file is generated in the ~\assets\designs\ and ~\assets\mockups\ folders when you run the Design Editor.
For the described example, the JSON file has the following content.
{
    "frames": {
        "Sticker": {
            "locked": true
        }
    }
}
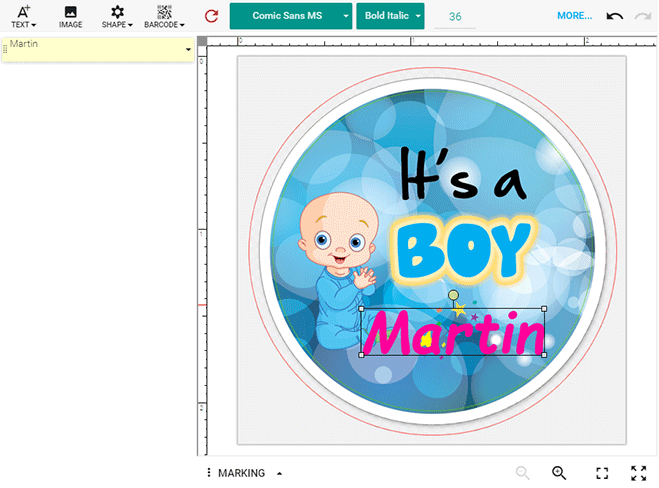
As a result, when you open the template in the Design Editor, the Object Inspector contains only the Name layer, which is the only layer allowed for editing, and Sticker is locked and hidden.
Important
The JSON permissions override corresponding markers.
You can apply both approaches - using markers and permissions - at the same time. For example, you can name a PSD layer as FirstLayer <LC> and then unlock this layer using the following permission.
{
    "frames": {
        "FirstLayer": {
            "locked": false
        }
    }
}
Image Placeholders
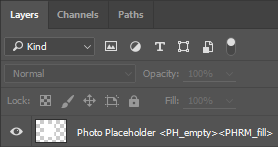
Let us consider a more complicated example. For some design elements, like image placeholders, markers are not simple boolean switches but they may accept enumeration values. So, the image placeholders may accept Normal, Empty, or Stub. Let us, for example, define an empty placeholder in the Photo Placeholder layer for encouraging users to select photos. Create the following photo.json file.
{
    "frames": {
        "Photo Placeholder": {
            "placeholder": true,
            "placeholderType": "Empty",
            "placeholderResizeMode": "Fill"
        }
    }
}
Note that one <PH> marker consists of two JSON permissions here:
- placeholder defines whether this item is a placeholder.
- placeholderType defines the placeholder type.
The previous definition for using permissions corresponds to the following marker group.
Groups
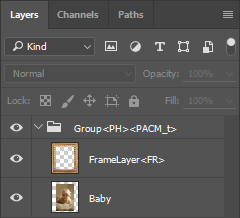
For some use cases, the Design Editor requires a group of layers to be defined in a template. For example, when you add a frame to an image, you need a group containing two layers - a layer with the frame and a layer with the image. This group should be defined as a placeholder.
You can define JSON permissions for such layer groups as well as for a single layer. They differ in that they include the frames object containing the layers.
You can specify this in the JSON format or use markers in Photoshop.
{
    "frames": {
        "Group": {
            "placeholder": true,
            "isCoverMode": true,
            "frames": {
                "FrameLayer": {
                    "frame": true
                }
            }
        }
    }
}
Visibility
You may want to hide some design elements from the resulting files. To do so, use the visualizationPermissions with the noPrint and noShow properties.
For example, if you don't want to include the Name layer to the print file and preview image, define the following permissions.
{
    "$schema": "templateConfigSchema.json",
    "frames": {
        "Name": {
            "visualizationPermissions": {
               "noPrint": true,
               "noShow": true
            }
        }
    }
}
The JSON Validation
Validation is one of the important advantages of managing permissions through JSON files.
When adding markers to layer names in Photoshop, you have to prepare templates with a correct set of markers. There is not any one tool to automatically check whether the markers are correct or not. So, if you do not achieve expected results with the defined markers, you should double-check the layer names in your template. At the same time, there are a number of tools to verify JSON files. For example, Visual Studio 2013 allows for validating JSON files against a specific schema starting from Update 4. You need to specify templateConfigSchema.json in the Schema Address Bar.

Thus, defining permissions in the JSON format in Visual Studio, you can:
List parameters and complete words.

Validate the file format.
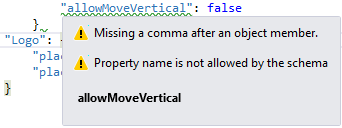
You can enable the JSON validation through Tools > Options > Text Editor > JSON > Advanced.
Also, you can apply this schema for the validation using online resources or command-line tools.