Installing Design Editor
- 4-5 minutes to read
Although Design Editor is an ASP.NET application and requires an ASP.NET environment, you can integrate it into almost any system, no matter what platform it is built on. If you are using LAMP, Ruby on Rails, or anything else, you can still use this Design Editor. The only ASP.NET platform you need to take care of is your hosting: you host Design Editor in an ASP.NET environment and implement it into a product personalization page on your site using as little as the <iframe> tag.
This topic describes how to deploy Design Editor to Windows Server 2016 or Windows Server 2019. There are also a few words on the distribution package, application parameters, and using the Web API.
Prerequisites
You must install the Design Editor on a server that meets the System requirements. If you are installing this application to a clean Windows Server, make sure you have installed the following components:
- IIS installed with ASP.NET 4.5 or higher (server roles .NET Extensibility 4.5 and ASP.NET 4.5).
- Microsoft .NET Framework 4.8 or higher.
- Both Microsoft Visual C++ Redistributable Package x86 (latest supported) and Microsoft Visual C++ Redistributable Package x64 (latest supported)
Note
Future updates to this application may require a newer version of the Visual C++ Redistributable. If you encounter errors after updating, ensure you have the latest supported version installed from the official Microsoft website.
Distribution Package
You can download a distribution package from your account. The Design Editor package represents a web application and data files in the DesignEditor.zip archive:
- assets - such assets as designs, mockups, fonts, color profiles, etc.
- de-<version-number> - the Design Editor application.
- LicenseManager - a utility to register Customer's Canvas.
- userdata - user products and images.
This structure allows you to easily upgrade Design Editor or use multiple instances running at the same time. Another point when data files are located outside the application folder, they cannot be downloaded directly from a webserver.
Deployment to IIS
Deployment of Design Editor to IIS can be done as follows:
In the File Explorer, navigate to the web root directory (for example, D:\inetpub) and create a new site's folder under it, for example, design-editor.
Warning
Although the web root directory is usually located on drive
C:, we recommend creating it on any non-system drive.Unzip the content of DesignEditor.zip to this folder (D:\inetpub\design-editor).
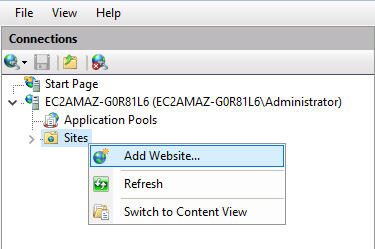
Open the IIS manager.
In the IIS manager, create a new site (right-click Sites and then click Add Website).
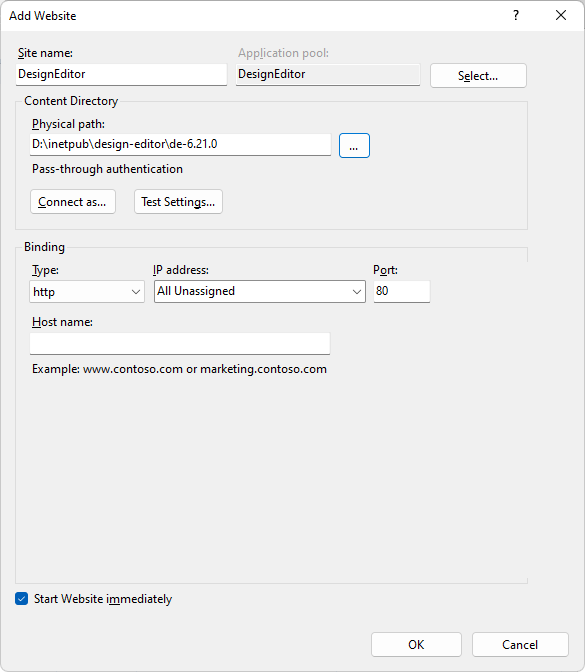
Enter the Site name (DesignEditor) and its Physical path (D:\inetpub\design-editor\de-<version-number>) and click OK.
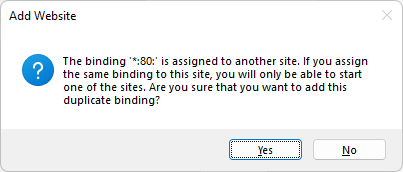
If you get the binding error shown in the following screenshot, then stop any other site that uses port 80. For example, Default Web Site uses this port by default, so it must be stopped.
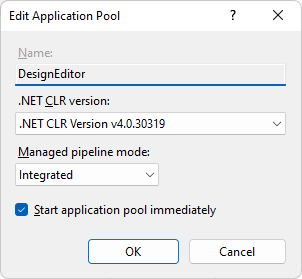
In IIS Manager, find the DesignEditor application pool in the list of Application Pools, right-click this pool, click Basic Settings, select .Net CLR Version v4, set the Integrated pipeline mode, and click OK.
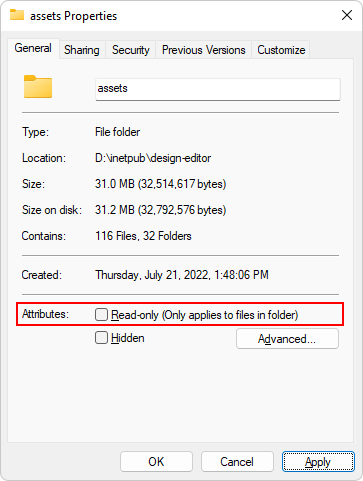
Set up permissions for the D:\inetpub\design-editor\assets folder:
Open the File Explorer, browse to D:\inetpub\design-editor, right-click the assets folder, and click Properties. On the General tab, uncheck Read-only, then click Apply.
On the Security tab, click Edit, then click Add. Type in
IIS AppPool\DesignEditor, click Check Names, and after it finds the account (the account's name should become underlined: DesignEditor), click OK.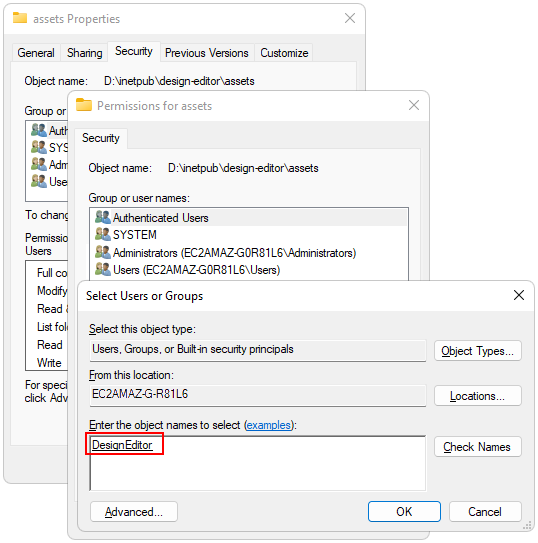
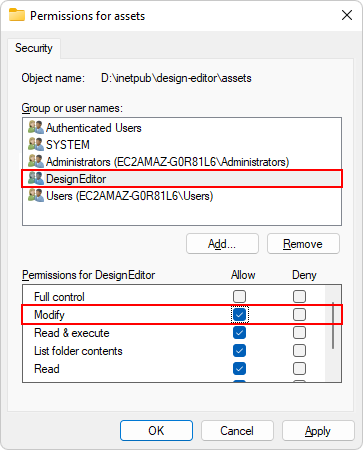
Select the Modify permission and click OK two more times.
Similarly to the previous step, set up the Modify permissions for the D:\inetpub\design-editor\userdata, D:\inetpub\design-editor\de-<version-number>\App_Data, and C:\Windows\Temp folders (if the App_Data subfolder doesn't exist, create it first).
Register your license key.
In the D:\inetpub\design-editor\LicenseManager folder, run LicenseManager.exe.
Obtain an activation code and register your license key.
Browse the DesignEditor site: right-click the site name, click Manage Website, and click Browse. You should see a page displaying a sample product in the Design Editor.
Configuring the Application
If you have unzipped the application, assets, and user files to the default location as described in the previous section, you can skip changing paths to the assets. Otherwise, you must specify their location in configuration files.
For example, let's assume that you need to install several Customer's Canvas applications and you implement the following hierarchy:
D:\inetpub\
        \customerscanvas\
                \apps\
                        \design-editor\
                                \6.20.7
                                \6.21.0
                                ...
                        \dynamic-image\
                                \0.8.2
                                \0.15.11
                                ...
                        \preflight-tool\
                                \1.5.2
                                \1.21.0
                                ...
                \data\
                        \assets\
                                \designs
                                \fonts
                                ...
                        \userdata\
In this case, you must find and change the Design Editor's settings in the following config files:
AppSettings.config (under the design-editor subfolder)
<!-- Paths -->
<add key="DesignFolder" value="..\..\..\data\assets\designs" />
<add key="MockupFolder" value="..\..\..\data\assets\mockups" />
<add key="WatermarkFolder" value="..\..\..\data\assets\helpers" />
<add key="DesignImagesFolder" value="..\..\..\data\assets\helpers" />
<add key="PublicGalleryFolder" value="..\..\..\data\assets\images" />
<add key="UserDataFolder" value="..\..\..\data\userdata" />
Aurigma.DesignAtoms.config (under the design-editor subfolder)
<!-- Path -->
<add key="FontDirectory" value="..\..\..\data\assets\fonts" />
<add key="ColorProfilesDirectory" value="..\..\..\data\assets\ColorProfiles" />
If your basic site and the Design Editor run on different domains, you must specify your site domain in AppSettings.config, in CorsAllowOriginDomains, to disallow unauthorized access to the web-to-print editor from other domains.
<appSettings>
    <add key="CorsAllowOriginDomains" value="http://example.com" />
</appSettings>
Running HTTPS service
Since the Design Editor Web API works based on the HTTPS requests, you need to perform the following actions:
- Set up an HTTPS service in IIS. For example, you can follow the steps described in setting up an HTTPS service.
- Make sure that you have a valid SSL-certificate for your domain, for example, Google Chrome shows this icon for invalid certificates:
 . If you have an invalid one, install a new SSL web server certificate (you can refer to installing a certificate).