Folding lines and spines
- 5 minutes to read
In this topic, we are talking about folding lines and spines. Folding lines are the lines which the resulting product is folded along. They are visible at the design time on the canvas and proof images but not printed on the hi-res output. Folding lines are extremely useful in such products as leaflets and booklets, which are fulfilled on a single page and then folded. These lines allow users to make designs optimized for folds, for example, they may prevent you from mistakenly inserting an image at a crease where it is not supposed to be.
Spines are used on book cover designs to highlight the area where the book spine is located. Spines, like folding lines, are displayed only at the design time and not printed on the hi-res output.
Folding Lines
Any folding line is an object implementing the IFoldingLine interface, which provides the following properties:
| Name | Description | Default value | Possible values |
|---|---|---|---|
| isVertical | defines whether the folding line is vertical. If true, then the line is vertical, otherwise, it is horizontal. |
true |
boolean |
| margin | defines an absolute or relative location of the folding line on the product in points or percent. For vertical lines, it defines the x-axis offset from the left edge. For horizontal lines, it defines the y-axis offset from the top edge of the product. To set the relative offset in percent, add the percent sign to the number. See the picture for details. | "50%" |
string |
| bleed | sets an offset in points for the folding line depending on its orientation. It is a top/bottom offset for the vertical line and a left/right offset for the horizontal line. See the picture for details. | 0 |
float |
| pen | an object configuring the outline of the folding line. The parameters are: width is the line width, dashStep is the dash step in pixels, color is the main color, and altColor is the alternate color. |
{ |
object |
You can specify several folding lines for each page of a product, or for all pages of a product. To set up default folding lines that will be displayed on all pages of a product, use the ISurfacesFromFolder interface.
The following snippet adds a folding line and a safety line to the first (and the only) page of the invitation.
productDefinition = {
    surfaces: [ {
        foldingLines: [ { isVertical: false, bleed: 10, pen: {color: "green"} } ],
        printAreas: [ {
            designFile: "invitation",
            safetyLines: [ { name: "bleed", margin: 10, color: "rgba(255,0,0,1)", altColor:"rgba(255,255,255,0)" } ]
        } ]
    } ]
};
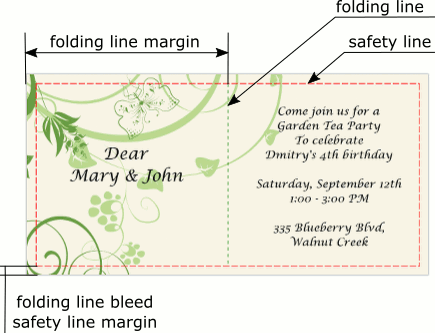
In this snippet, we use the bleed property to combine folding lines with safety lines. The following image shows the result on the invitation and illustrates bleed and margin values.
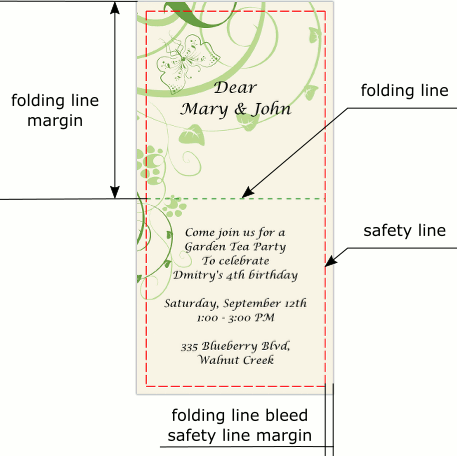
For a vertical folding line, the bleed and the margin are as follows:
The following snippet sets up a vertical folding line and a safety line shown in this image.
productDefinition = {
    surfaces: [ {
        foldingLines: [ { bleed: 10, pen: {color: "green"} } ],
        printAreas: [ {
            designFile: "invitationVertical",
            safetyLines: [ { name: "bleed", margin: 10, color: "rgba(255,0,0,1)", altColor:"rgba(255,255,255,0)" } ]
        } ]
    } ]
};
When your product has folding lines, you may want to flip the background image along these lines. To perform this, use the IBgFoldingModeParams interface.

The following snippet sets up a vertical folding line and flips the background.
productDefinition = {
    surfaces: [ {
        printAreas: [ {
            designFile: "invitationVertical",
            safetyLines: [ { name: "bleed", margin: 10, color: "rgba(255,0,0,1)", altColor:"rgba(255,255,255,0)" } ]
        } ],
        foldingLines: [ { bleed: 10, pen: {color: "green"} } ],
        bgFoldingMode: {
            enabled: true,
            flip: {
                enabled: true,
                order: "Odd"
            }
        }
    } ]
};
Spines
Spines are configured a similar way to folding lines; any spine object should implement the ISpine interface. There are several parameters in addition to the ones we have already discussed in this topic.
| Name | Description | Default value | Possible values |
|---|---|---|---|
| width | spine width in points | 10 |
float |
| margin | defines an absolute or relative location of the spine on the product in points or percent. For the vertical spine, it defines the x-axis offset from the left edge to the center of the spine. For horizontal lines, it defines the y-axis offset from the top edge to the center of the spine. To set the relative offset in percent, add the percent sign to the number. See the picture for details. | "50%" |
string |
| fill color | spine fill color | "darkGray" |
string |
You can also specify several spines for each page of a product, or for all pages of a product. To set up default spines that will be displayed on all pages of a product, use the ISurfacesFromFolder interface.
The following snippet adds a spine and a safety line to the first (and the only) side of a book cover.
productDefinition = {
    surfaces: [ {
        spines: [ { width:20, bleed: 10, pen: {color: "green"}, fillColor: "lightGreen" } ],
        printAreas: [ {
            designFile: "bookVertical",
            safetyLines: [ { name: "bleed", margin: 10, color: "rgba(255,0,0,1)", altColor:"rgba(255,255,255,0)" } ]
        } ]
    } ]
};
In this snippet, we use the bleed property to combine a spine with a safety line. The following image shows the result on the book cover and illustrates bleed and margin values.
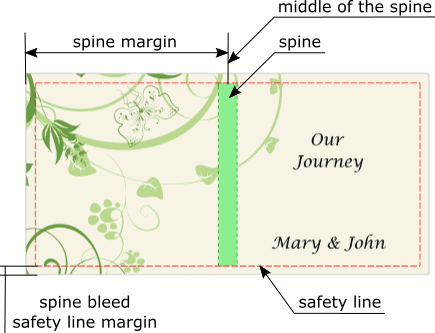
For a horizontal spine, the bleed and margin are as follows:
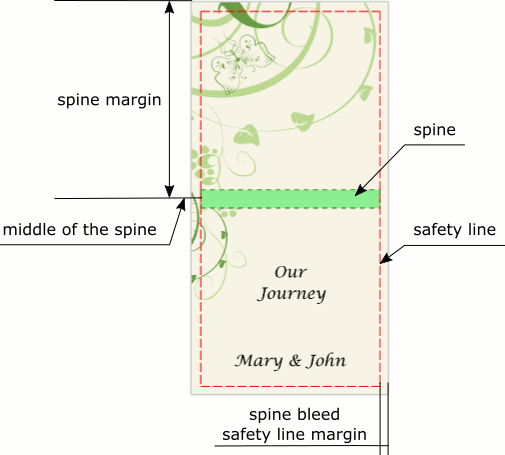
The following snippet sets up a horizontal spine and a safety line shown in this image.
productDefinition = {
    surfaces: [ {
        spines: [ { isVertical: false, width: 20, bleed: 10, pen: {color: "green"}, fillColor: "lightGreen" } ],
        printAreas: [ {
            designFile: "book",
            safetyLines: [ { name: "bleed", margin: 10, color: "rgba(255,0,0,1)", altColor:"rgba(255,255,255,0)" } ]
        } ]
    } ]
};
Proof Images
By default, Design Editor displays both spines and folding lines on proof images. To disable them, you can set the spineAndFoldingLinesEnabled parameter to false through IProofImage.
productDefinition = {
    surfaces: [ {
        foldingLines: [ { isVertical: false, bleed: 8, pen: {color: "green"} } ],
        printAreas: [ {
            designFile: "invitation"
        } ],
        proofImage: {
            spineAndFoldingLinesEnabled: false
        }
    } ]
};
Also, you can disallow spines and folding lines on proof images using proofImageSpineAndFoldingLinesEnabled through the IRenderingProperty interface or in clientConfig.json.
configuration = {
    rendering: {
        proofImageSpineAndFoldingLinesEnabled: false
    }
}
The spineAndFoldingLinesEnabled parameter has higher priority than proofImageSpineAndFoldingLinesEnabled.