Post Press Finishing Layers
- Last updated on July 31, 2024
- •
- 7-8 minutes to read
Every product page in the Design Editor — a surface — contains one or more print areas. Print areas, in turn, include containers for design elements. There are three basic containers: Background, Main, and Foreground. By default, when you add design elements to a product, they appear in the Main container.
In addition to basic containers, you can enable channel containers through either Photoshop templates, InDesign templates, or product definitions to design print embellishments in the editor. Design Editor supports two types of such containers: spot colors and textures. The type of channel container defines how a print embellishment appears on the canvas and proof images. The Texture type applies an image to design elements in the channel, whereas the SpotColor type applies a fill color to the design elements.
In the Design Editor, these containers appear as tabs of the Object Inspector.
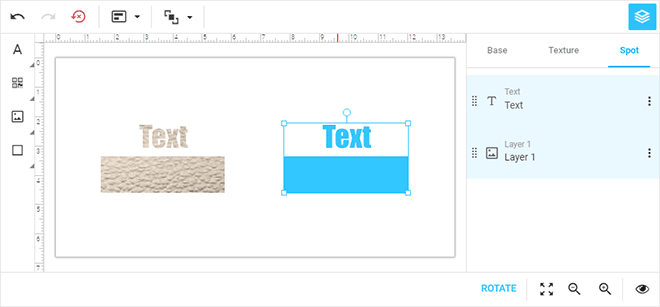
This topic describes how you can design print embellishments in the Design Editor.
Defining Channel Containers
Photoshop Templates
The Design Editor supports spot channels defined in Photoshop templates. Graphics added to spot channels in Photoshop appear as raster images on the canvas, as well as in hi-res outputs. In the Design Editor, you can add design elements to these channels and edit them in the vector format.
To create a spot channel in Photoshop:
Click the Menu icon in the Channels palette and then click New spot channel.
Click the color box, select a color, set Solidity to
100%, and click Ok.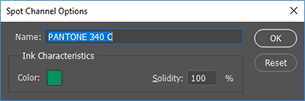
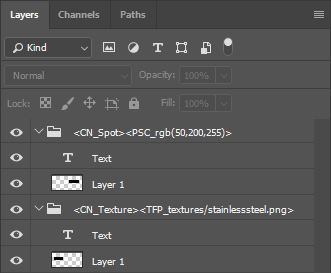
Photoshop templates allow you to provide an initial set of design elements in a channel container. For example, to add an image on which you want a texture to appear, you can create a layer group, add the image to this group, and specify the following markers in the group name:
<CN_Texture><TFP_textures/stainlesssteel.png>
The value of <CN> defines the name of the container and its tab in the Object Inspector. To create a channel container for a Pantone color, you can apply the following markers to the layer group name:
<CN_Spot><PSC_rgb(50,200,255)>
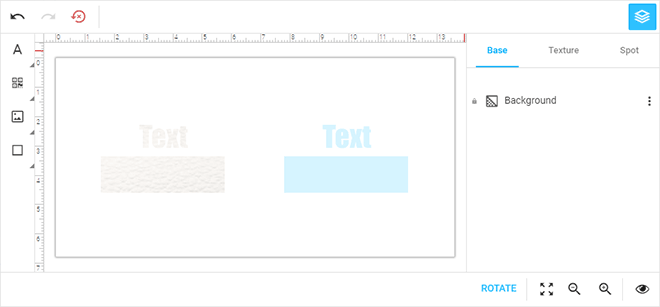
To define a product displayed at the beginning of this topic, create the following layer groups in a PSD template:
If a template has design elements only in channel containers, then the default containers won't be created and the Base tab will not appear in the editor. When you load templates with the ISurfaceTemplate.useSpecifiedContainersOnly parameter set to true, then only the specified containers will load, and the Background, Main, and Foreground containers will not be created.
const productDefinition = {
    surfaces: [{
        name: "Channels",
        printAreas: [{
            designFile: "channels"
        }],
        useSpecifiedContainersOnly: true
    }]
};
InDesign Templates
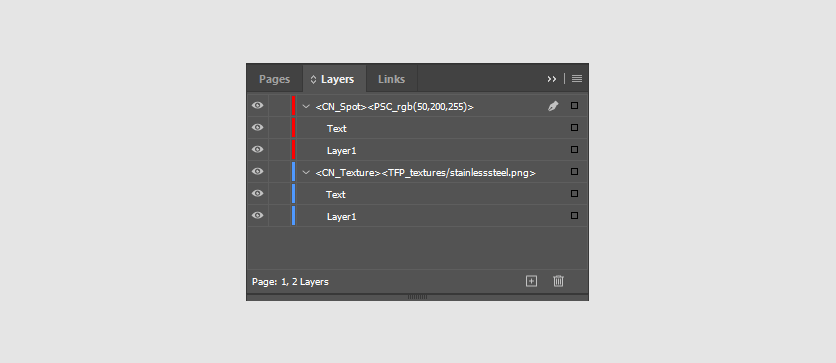
The Design Editor also imports channel containers defined in InDesign templates.
In InDesign, you don't need to created groups of design elements to make them a container. Instead, create elements you need in a layer, and specify the markers in the layer name.
To define a product displayed at the beginning of this topic, create two layers in your IDML template and add the following markers to their names:
<CN_Texture><TFP_textures/stainlesssteel.png>
<CN_Spot><PSC_rgb(50,200,255)>
This is how the resulting layer list may look like:
Product Definitions
You can also configure channel containers in a product definition. To use solid colors and textures, you can define them in the containers array as follows:
const productDefinition = {
    surfaces: [{
        printAreas: [{
            // A product template postcard.psd.
            designFile: "postcard",
            containers: [
                // A container for elements decorated with embossing.
                {
                    name: "Embossment",
                    type: "texture",
                    // An image path, relative to the folder ..\assets\helpers.
                    texture: "textures/embossed-paper.jpg",
                    // A channel caption in the Object Inspector.
                    // Expects a translated string for the EMBOSS key in translations.json.
                    translationKey: "ObjectInspector.EMBOSS"
                },
                // A container for elements colored with "PANTONE 185 C".
                {
                    name: "PANTONE 185 C",
                    type: "spotColor",
                    // A color for displaying channel elements on the canvas.
                    previewColor: "rgba(255,0,0,1)"
                }
            ]
        }]
    }]
};
In this example, we define a product based on a postcard template and provide two channel containers for print embellishments. The Embossment and PANTONE 185 C containers are created empty so that your users can add elements to these containers through the Toolbox. You may want to apply the Pantone color combined with the embellishment to a design element. In this case, you need to add this element to both containers.
You can also create single spot containers through the ISurfaceDefinition interface. To do so, define your containers and set useSpecifiedContainersOnly to true, and only spot containers defined in IDML or PSD templates will be created in a product, without the default containers main, background, and foreground.
const productDefinition = {
    surfaces: [{
        width: 720,
        height: 504,
        containers: [
            // A container for elements colored with "PANTONE 185 C".
            {
                name: "PANTONE 185 C",
                type: "spotColor",
                // A color for displaying channel elements on the canvas.
                previewColor: "rgba(255,0,0,1)"
            }
        ],
        useSpecifiedContainersOnly: true
    }]
};
Configuring the User Interface
The Object Inspector displays separate tabs for channel containers. The main product design appears on the Base tab. This tab includes the Background, Main, and Foreground containers. Other tabs include channel containers. To add design elements to a channel, click the corresponding tab and add items to the canvas through the Toolbox.
When you edit the main design on the Base tab, graphics in channel containers will appear transparent on the canvas.
However, you can set up this default appearance with the canvas.inactiveContainerTransparencyEnabled and canvas.inactiveContainerTransparencyLevel properties. The latter property defines how transparent inactive containers should be, and its value is in the range [0, 1]. If 0, the content of inactive containers becomes completely opaque. If 1, it becomes 100% transparent.
To define a tab name, you can specify it in either the
Channel containers may have a custom Toolbox configuration. In clientConfig.json, you can specify buttons for a single channel container in the containerToolboxes object of the Toolbox widget.
{
    "widgets": {
        "Toolbox": {
            "buttons": [ "Text", "Image" ],
            "containerToolboxes": {
                "Foil": {
                    "buttons": [ "Line", "Rectangle", "Ellipse" ]
                }
            }
        }
    }
}
Here, we define two buttons for adding plain text and images to the Main container and three buttons for adding shapes to the Foil container.
If you need to display the embellishments in read-only mode, you can hide the container tabs in the Object Inspector using the containerTabsEnabled property.
{
    "widgets": {
        "ObjectInspector": {
            "containerTabsEnabled": false
        }
    }
}
Rendering the Channel Containers
The Design Editor renders channel containers in black-and-white by default. They appear on separate pages in PDF output files and in separate files in other formats. Channel containers are printed in the order they appear in the Object Inspector, with the rightmost container printed as the topmost layer.
You can configure the rendering of channel containers in clientConfig.json as follows:
{
    "rendering": {
        "hiResOutputFileFormat": "PDF",
        "hiResOutputChannelContainersToSeparateFiles": false,
        "hiResOutputChannelContainersRenderEmptyPage": true
    }
}
Here, hiResOutputChannelContainersToSeparateFiles defines whether channel containers will be rendered in the same PDF output file as the basic design or in separate PDF files. When channel containers are printed to the same PDF file, the hiResOutputChannelContainersRenderEmptyPage allows you to add empty pages for print areas without channel containers.
You can also specify the color to be rendered in output files by using the <COC> marker in your template. For example, <COC_rgb(255,255,0)> will enable the yellow color to render these containers.
Manipulating the Channel Containers
You can add channel containers to a product at runtime by using the IFrame API. You can also delete channel containers and change their appearance or order. These methods do not affect the basic containers Background, Main, and Foreground if any. The numbering of the indexes starts from zero. If these methods accept indexes as input parameters and the base containers are present, then the index values must be greater than two.
Adding a Channel Container to a Product
To add a new container to your product at the end of the container collection, you can use the PrintArea.addContainer method.
product.currentSurface.printAreas[0]
    .addContainer({
        name: "Foil",
        type: "texture",
        texture: "silverFoil.jpg"
    });
Inserting a Channel Container into a Product
To insert a container into a container collection, use the PrintArea.insertContainer method. The second parameter is the index of the new container in the container collection.
product.currentSurface.printAreas[0]
    .insertContainer({
        name: "PANTONE 185 C",
        type: "spotColor",
        previewColor: "rgba(255,0,0,1)"
    }, 4);
Replacing the Channel Containers
Since the order of rendering the product depends on the order of the channel containers, you may need to change this order. To perform this, you can pass indexes of two containers to be replaced to the PrintArea.moveContainer method.
product.currentSurface.printAreas[0].moveContainer(5, 4);
Getting the Channel Containers
To retrieve all channel containers, you can use PrintArea.getContainers. This method returns an array of containers including Background, Main, and Foreground. To get a container by its name, use the PrintArea.getContainer method.
var container = product.currentSurface.printAreas[0].getContainer("Foil");
Removing the Channel Containers
To remove a channel container, use the PrintArea.removeContainer method.
product.currentSurface.printAreas[0].removeContainer(3);
Changing the Appearance in the Editor
The Container.update method allows you to specify another color or texture image for a channel container. The type of the container remains unchanged.
product.currentSurface.printAreas[0].getContainers()[3]
    .update({
        texture: "silver-texture.jpg"
    });