Installing Preflight
- 4 minutes to read
You can contact our support team to get the Preflight Tool. This distribution package contains the front-end and back-end components. When you unzip this application, you can find the following files and folders:
- LicenseManager - a utility to register Customer's Canvas.
- PreflightBackend - the back end.
- PreflightClient - the front end.
- readme.md - instructions to get started.
Prerequisites
The following components are required to deploy this application to a Windows Server:
- IIS installed with ASP.NET 4.5 or higher (server roles .NET Extensibility 4.5 and ASP.NET 4.5).
- Microsoft .NET Framework 4.8 or higher.
- Both Microsoft Visual C++ Redistributable Package x86 (latest supported) and Microsoft Visual C++ Redistributable Package x64 (latest supported).
Deploying the Back End to IIS
Deployment of the Preflight Tool to IIS can be done as follows:
In the File Explorer, navigate to the web root directory (for example, D:\inetpub) and create a new site's folder under it, for example, preflight-tool.
Warning
Although the web root directory is usually located on drive
C:, we recommend creating it on any non-system drive.Unzip the content of PreflightBackend to this folder (D:\inetpub\preflight-tool).
Open the IIS manager.
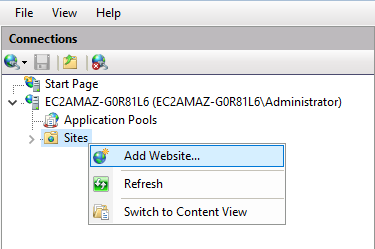
In the IIS manager, create a new site (right-click Sites and then click Add Website).
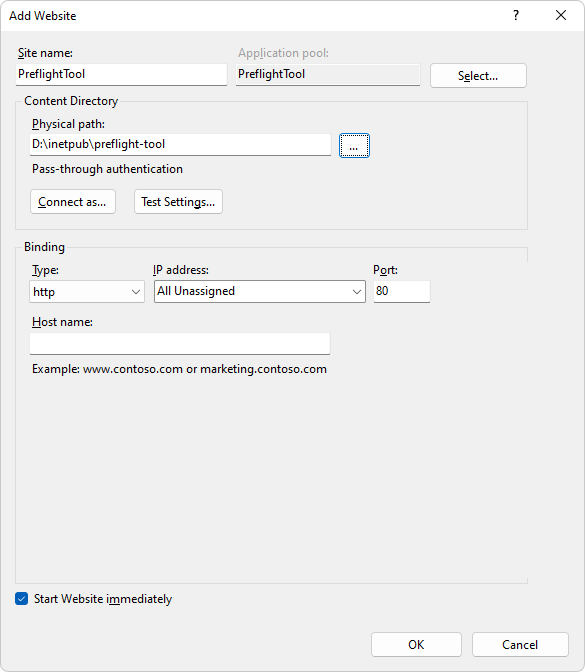
Enter the Site name (PreflightTool) and its Physical path (D:\inetpub\preflight-tool) and click OK.
If you get the binding error shown in the following screenshot, then stop any other site that uses port
80. For example, Default Web Site uses this port by default, so it must be stopped.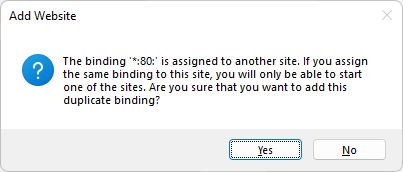
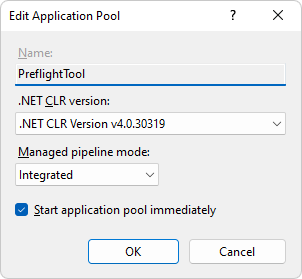
In IIS Manager, find the PreflightTool application pool in the list of Application Pools, right-click this pool, click Basic Settings, select .Net CLR Version v4, set the Integrated pipeline mode, and click OK.
Deploying the Front End
In the PreflightClient folder, you can find:
- ui-framework - the front-end engine.
- config.json - the preflight configuration.
- index.html - the demo page.
Note
The Preflight Tool works with UI Framework 4.5.0 and higher.
Although this distribution package includes the UI Framework library, you can use its latest version from CDN or npm.
You can deploy the front end to either a separate server or the same server where your back end runs. If you want both components to be deployed on a single server, unzip the content of PreflightClient to the D:\inetpub\preflight-tool folder. The application structure will look as follows:
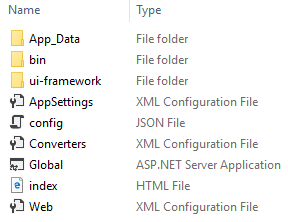
To start working with the Preflight Tool, you need to set up the security permissions. If you deployed both front end and back end to the D:\inetpub\preflight-tool folder, set up permissions as follows:
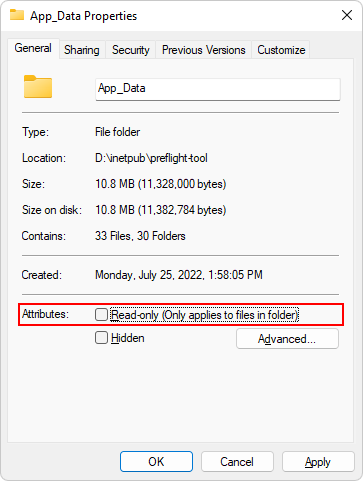
Open the File Explorer, browse to D:\inetpub\preflight-tool, right-click App_Data, and click Properties. On the General tab, uncheck Read-only, then click Apply.
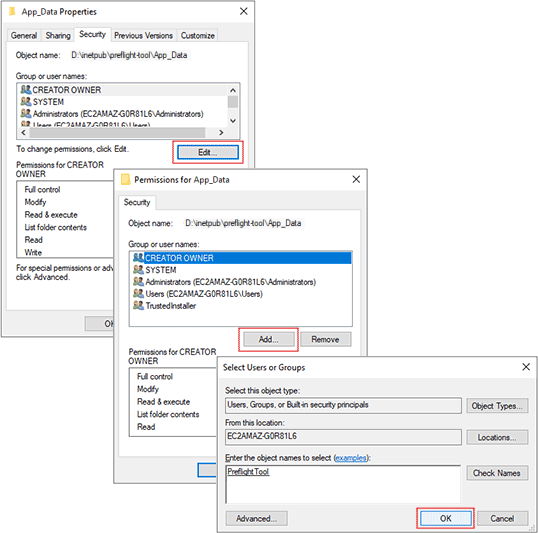
On the Security tab, click Edit, then click Add. Type in IIS AppPool\PreflightTool, click Check Names, and after it finds the account (the account's name should be underlined: PreflightTool), click OK.
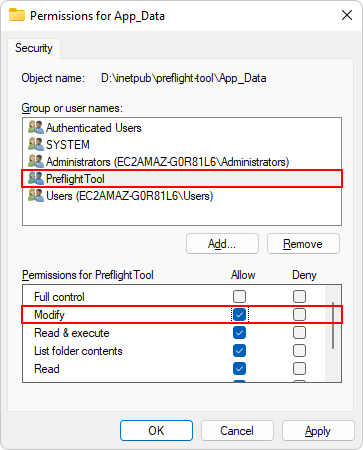
Select the Modify permission and click OK two more times.
Running the Preflight Tool
This example represents a fragment of index.html and demonstrates how you can use the Preflight Tool in your application.
<!-- A container for the Preflight Tool. -->
<main class="main">
  <div class="editor-parent" id="editor-parent"></div>
</main>

<script type="module">
  // The link to the UI Framework included into the distribution package.
  import moduleLoader from "./ui-framework/4.23.15/moduleLoader.js";
  document.addEventListener('DOMContentLoaded', async () => {

    // See https://customerscanvas.com/dev/ui-framework/overview.html for the syntax explanation and widget reference.
    const product = {
      "id": 0,
      "sku": "DEFAULT-002",
      "name": "Demo",
      "description": "",
      "price": 0.16,
      "options": [],
      "attributes": []
    };

    // The configuration of the Preflight Tool.
    const config = await moduleLoader.loadJson("./config.json");
    // The address of your back end. It's an empty string or "./" when the back end and front end are deployed on the same server.
    config.vars.backendUrl = "";

    // Loading an ecommerceDriver and a multistep editor.
    const driverImportData = await moduleLoader.dynamicImport("ecommerceDriver", "./ui-framework/4.23.15/drivers/default-driver.js");
    const editorImportData = await moduleLoader.dynamicImportDefault("editor", "./ui-framework/4.23.15/editor.js");

    const editor = editorImportData.editor;
    const driver = driverImportData.ecommerceDriver;

    // Settings of the editor.
    const settings = { customersCanvasBaseUrl: "_" };
    const quantity = 1;
    const user = { id: "test-user" };

    // The driver initialization: a product definition, an editor instance,
    // config, data returned by the editor, item quantity (if needed).
    const ecommerce = await driver.init(product, editor, config, settings, null, quantity, user);

    // Display the editor in the specified DIV element.
    ecommerce.products.current.renderEditor(document.getElementById("editor-parent"));

    // Subscribe to an event that will be called when the user finishes editing.
    ecommerce.cart.onSubmitted.subscribe(data => {
      alert('Open console to see URLs to the preview images and print files');
      // Links to previews and hi-res outputs.
      data.lineItems.forEach(function(order) {
        console.log("Print files: ", order.downloadUrls);
        console.log("Previews: ", order.images);
      });
    });

  });
</script>
In this example, we load the configuration of the Preflight Tool from the config.json file. Note that you can define this configuration as a variable in JavaScript code or read it from your database if needed.
In moduleLoader, driverImportData, and editorImportData, we use UI Framework scripts included in this distribution package. You can also use the scripts from Azure CDN, for example:
import moduleLoader from "https://staticjs-aurigma.azureedge.net/ui-framework/latest/moduleLoader.js"
Note
When you deploy the front end to a separate server, you must also specify a back-end URL in the config.vars.backendUrl variable, for example:
// The address of your preflight server.
config.vars.backendUrl = "https://pt.example.com";