InDesign templates
- Last updated on December 29, 2023
- •
- 5 minutes to read
Customer's Canvas can import designs created in InDesign. It does not support 100% of InDesign features, so when you creating templates for Customer's Canvas using InDesign, you need to keep all Customer's Canvas capabilities and conventions in mind. Often after you receive an IDML file from your designer, you will have to edit and preprocess it before importing it to the Design Editor. This article explains how to do this.
Valid InDesign templates
Customer's Canvas supports only the IDML file format. If you have a design in the INDD format, convert the file to the IDML format. The INDD file won't be uploaded.
The editor works with one-page and multipage templates containing images, texts, and shapes. Although the Design Editor supports RGB, CMYK, and Grayscale color spaces, it is recommended to stick to the same color space in a single frame. The Design Editor does not support templates containing such master items as page numbers, footers, etc.
Images
The web-to-print editor supports embedded and linked images. You can use both raster and vector graphics in your templates. The Design Editor loads image frames as image items by default. If you want them to act as placeholders, add the <PH> marker to the image name.
You can create image placeholders of arbitrary forms by using frames from a free shape and placing images into these frames. To define how images inserted into the placeholders should be resized, you can enable Auto-Fit and use the following frame fitting options:
- Fit Content to Frame or Fit Content Proportionally to enable the Fit mode.
- Fill Frame Proportionally to enable the Fill mode.
- None to enable the Original mode.
The Design Editor supports scale, move, and rotate transforms. Other transforms are ignored.
It is recommended to embed all images used in the document. Although it is technically possible to load linked images, you have to put it to the right places when uploading an IDML file, so embedding those images will simplify things a lot.
Shapes
The Design Editor allows you to work with any shape that you created in InDesign. When importing shapes, the Design Editor applies a solid stroke and solid fill to them.
Fancy, rounded, or other corner types are not applied. When you import these shapes into the editor, they will have normal corners.
Text
You can use both text in frames and text on type paths. Text on a path appears on the canvas with default formatting.
Text in text frames supports multi-column layouts. However, when you change the column number in the Design Editor, the text frame becomes a rectangular box, and the gutter resets to the default value of 10pt. Therefore, we recommend that you disable changing the columns for non-rectangular text by using the <TACCC> marker. The Design Editor only supports copyfitting by using the corresponding markers.
Groups
The Design Editor allows you to both maintain groups of design elements and ungroup them when importing InDesign templates. The FlattenGroups parameter defines this behaviour. If this parameter is True, the Design Editor parses grouped elements one by one and splits a group into separate objects on the canvas and in the Object Inspector. By default, this patameter is False, which allows you to keep the design elements grouped. You can also add the <GR> or <GR_f> marker to the group name to define how that group should be imported.
As an alternative, you can paste the group of design elements into a frame in your IDML template if you want them to appear as a single image in the Design Editor.
Now, let us try to create an InDesign template that is compatible with Customer's Canvas.
Creating your first template
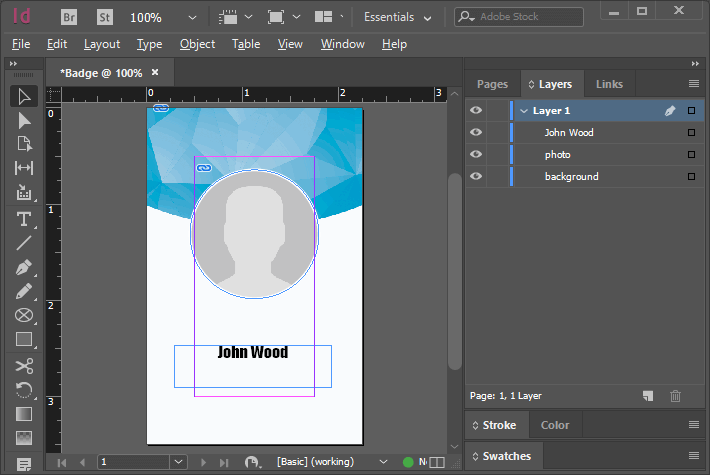
Let us imagine that we want to create a template for a badge. The size of this badge is 3.5x2.25 inches, and to keep it simple, it comprises three elements: a background image, a name, and a photo. In InDesign, perform the following steps:
- Create a new document. On the File menu, click New > Document and specify the size of 3.5x2.25 inches and the portrait orientation.
- Add a background image. On the File menu, click Place.
- Add an image frame. On the Tools panel, select an Ellipse Frame Tool and draw an ellipse.
- Add a photo. For example, drag it from the Windows File Explorer to the ellipse frame.
- Add a name. On the Tools panel, click the Type Tool, and drag to create a bounding rectangle, then enter the name.
As a result, you should get something like this:

Managing the behavior of design elements
You may want to manage the template's behavior in the web-to-print designer, for example, by disabling transforms of some design elements or locking the position of others. Since Adobe InDesign does not provide this type of formatting, we have created a system of so-called markers - special symbols which you add to an element name and are used by the Design Editor to manage permissions for each design element. You can find details on the syntax of the markers and a complete list of them in the Markers topic.
Let us configure this template to disallow changing the background and enable copyfitting for the text element. This exercise gives you an idea of how to work with the markers.
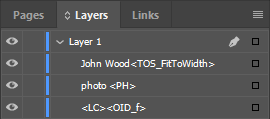
To mark the background as a non-editable image, select the appropriate element name on the Layers tab in InDesign and add <LC><OID_f> to it. There is no difference in what position you place the marker - at the beginning of the name, in the end, or somewhere inside a line. Moreover, you may leave only the marker if you like.
You can enable copyfitting in a similar way. Double-click the text layer name and add the <TOS_FitToWidth> marker to fit text to the width of its bounding rectangle.
As a result, the Layers tab looks as follows:

Now if you upload the modified template to the server, you see that the background disappears from the list of editable objects and long names fit the box width.