Barcode placeholders
- 4 minutes to read
When you create product templates, which are intended to be printed as machine-readable data, it is important to be able to specify the area into which the barcode will be inserted. The Design Editor allows for creating not only the barcodes themselves but also placeholders for them, in templates and during the editing process. This topic describes how you can do this.
Creating Barcode Placeholders
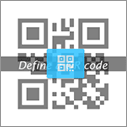
To add a barcode placeholder to your template, you should add an image and add the <BPH> marker to its name. When you open this template in the Design Editor, it may look as follows:

To define the content of barcode placeholders, click the Edit barcode button or double-click the barcode. When barcodes are added, they fit their placeholders.
Configuring Placeholder Manipulation Capabilities
In addition to the <BPH> marker, you can set markers that limit interactions between users and placeholders by locking the size and position of design elements:
<MAMH_f>- disallows moving the placeholder horizontally.<MAMV_f>- disallows moving the placeholder vertically.<MAD_f>- disallows deleting.<MAR_f>- disallows rotating.<MRC>- disallows resizing.
To ensure that the user cannot move, delete, rotate, or resize the placeholder, combine the <BPH> marker with the following set:
<MAMH_f><MAMV_f><MAD_f><MAR_f><MRC>

As an alternative to markers, you can define permissions in a JSON file with the same name as your template name. For example, the following definition leads to the same result as the markers from the previous picture.
{
    "frames": {
        "QR code": {
            "placeholder": true,
            "placeholderType": "Stub",
            "barcodePlaceholderType": "QR_CODE",
            "manipulationPermissions": {
                "allowMoveHorizontal": false,
                "allowMoveVertical": false,
                "allowDelete": false,
                "allowRotate": false,
                "resizeGrips": {
                    "edge": false,
                    "corner": []
                }
            }
        },
        "Bg": {
            "frontendPermissions": {
                "displayInObjectInspector": false
            },
            "background": true
        }
    }
}
Important
The barcode type separator in templates and JSON files is different. In templates, use a hyphen: <BPH_QR-CODE>. In JSON files, use an underscore: "barcodePlaceholderType": "QR_CODE".
Encouraging Users to Define Barcodes
A barcode placeholder represents a stub placeholder, so it won't appear in the hi-res output unless the user defines the barcode content. You can set up the stub message encouraging users to define the content for barcode placeholders. For example, add the following definition to clientConfig.json to display the message Define a QR code with the corresponding font.
{
    "stubImages": {
        "barcode": {
            "text": "Define a QR code",
            "postScriptName": "LucidaSans-Italic"
        }
    }
}
After that, placeholders appear on the canvas as follows:
Changing the Type of Barcode Placeholders
When you define a barcode placeholder in your template, you can specify a barcode type as a value of the <BPH> marker. The Design Editor allows for using the following types of barcodes:
- QR Code corresponding to
<BPH_QR-CODE>or simply<BPH>. - European Article Number 8 corresponding to
<BPH_EAN-8>. - European Article Number 13 corresponding to
<BPH_EAN-13>. - Universal Product Code A corresponding to
<BPH_UPC-A>. - Universal Product Code E corresponding to
<BPH_UPC-E>. - Code 128 corresponding to
<BPH_CODE-128>. - Data matrix corresponding to
<BPH_Data-matrix>. - Intelligent Mail barcode corresponding to
<BPH_IMB>.
QR codes may represent either a URL, a phone number, or a vCard.
You can allow your users to change barcode types in the editor through the Top Toolbar. To enable the Change barcode type button in both the simple and advanced editing modes, add the <BACT> marker to the placeholder name.
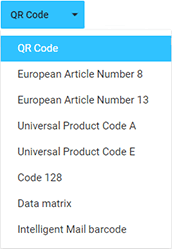
Adding Predefined Barcodes from the Toolbox
When you need to specify the area and position as well as the barcode content for barcodes that users can add to the canvas, use another approach and predefine barcode buttons in the Toolbox. Such buttons have the customBarcode action and the itemConfig object defining the content, position, permissions, and other properties for a barcode. The following example enables two buttons in the Toolbox: the first one opens the standard Qr code dialog box, while the second button adds a predefined QR code to the lower-right corner of the canvas.
{
    "widgets": {
        "Toolbox": {
            "buttons": [
                "QrCode",
                {
                    "action": "customBarcode",
                    "iconClass": "cc-icon-qr-code",

                    "itemConfig": {
                        "barcodeContent": {
                            "barcodeFormat": "QR_CODE",
                            "barcodeSubType": "Phone",
                            "phone": "+15551234567"
                        },
                        "width": "20%",
                        "location": {
                            "originX": "right",
                            "originY": "bottom",
                            "x": "97%",
                            "y": "95%"
                        },
                        "barcodePermissions": {
                            "allowChangeBarcodeContent": false
                        },
                        "manipulationPermissions": {
                            "allowMoveHorizontal": false,
                            "allowMoveVertical": false,
                            "allowDelete": false,
                            "resizeGrips": {
                                "edge": false,
                                "corner": []
                            }
                        }
                    }
                }
            ]
        }
    }
}
This predefined QR code takes 20% of the product width, disallows user manipulations, and represents the phone number 1-555-123-4567.
Populating Barcodes with Predefined Data
The Design Editor provides two approaches for populating barcode placeholders. First, you can assign the content to barcodes through the Load user info feature at runtime or when the editor loads. In the following example, you can see how to specify a phone number in the QR code layer.
// Define the content.
var userInfo = {
    "QR code": {
        "BarcodeFormat": "QR_CODE",
        "BarcodeSubType": "Phone",
        "Phone": "+15551231234"
    }
};
var editor = null;
...
// Load the web-to-print editor.
CustomersCanvas.IframeApi.loadEditor(iframe, product, configuration)
.then(function (e) {
    editor = e;
});
...
// Populate the product with user data.
editor.loadUserInfo(userInfo);
You can also use the Personalization Web API to specify the content of barcode placeholders.