Rendering preview mockups
- Last updated on January 13, 2025
- •
- 11 minutes to read
You can create previews based on mockups imported into Customer's Canvas from Adobe Photoshop. This may be useful for such scenarios as creating galleries of product images described in the Mockup-based product images topic and during the design personalization. In this topic, you can learn how to implement this.
Using the API
This guide assumes that you are familiar with the principles of using the Customer's Canvas API. If not, we recommend reviewing these articles first.
- API Reference - for an API overview and information about supported API Client libraries
- C# API Client - for a guide on integrating the C# API Client library to your .NET app
Before starting, ensure that your app has credentials to make API calls:
- In your tenant, navigate to Settings > External apps and register your app.
- In your app, implement the authentication as explained in the Authentication in Customer's Canvas Hub article.
Your application passes the product ID or SKU defined in your system to Customer's Canvas.
Using this product data, Customer's Canvas finds the product by ID, searches for an option by SKU, and retrieves all linked preview mockups. For each product mockup, use the Design Atoms API to render a preview of the mockup with a design.
Searching for mockups
Before rendering a preview, you first need to know the mockup ID. Customer's Canvas provides several ways to do this through the UI and API.
BackOffice UI
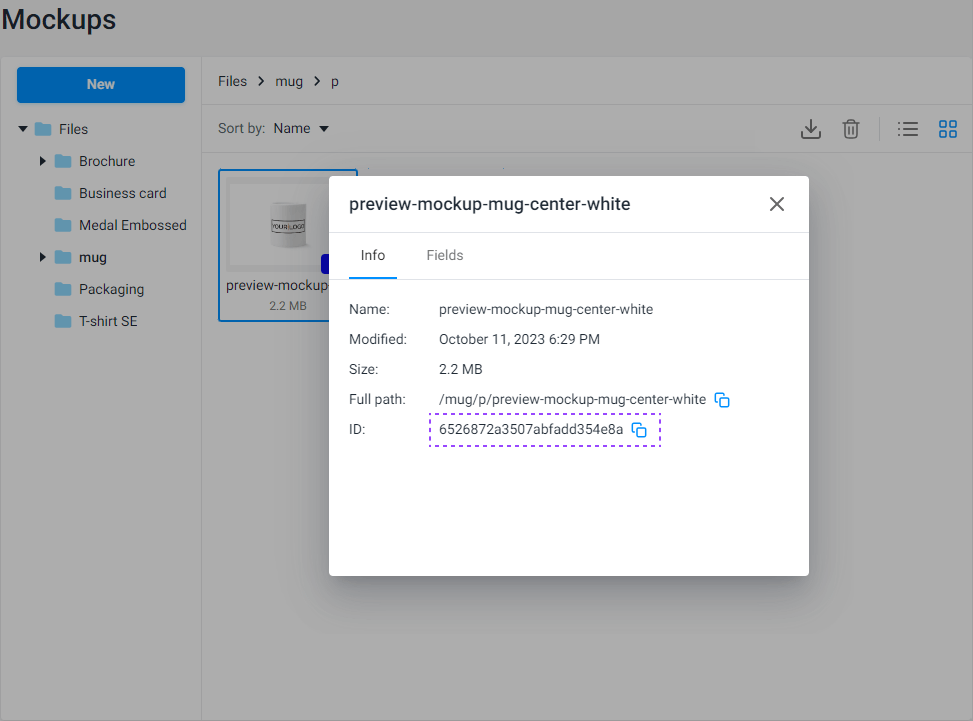
You can view mockup IDs in your BackOffice tenant: navigate to the Mockups section, right-click a mockup, click Properties, and copy the ID.
Asset Storage API
Another approach is to find mockup IDs through the Mockups API. This API provides CRUD operations on mockups in a tenant.
Let's look at how to get a list of mockups and filter this list by product. For example, this request will return a list of mockups for products filtered by the mug name in your tenant. Since your app credentials are bound to your tenant, you can skip passing your tenant ID.
curl -X \
  GET "https://api.customerscanvashub.com/api/storage/v1/mockups?search=mug" \
  -H  "accept: text/plain" \
  -H  "Authorization: Bearer <TOKEN>"
Associated assets
Getting the entire product config
The Customer's Canvas APIs allow you to retrieve the entire configuration of PIM products defined in a tenant. To get details about all mockups associated with product variants, use the endpoint GET /api/storefront/v1/products/{id}/variant-mockups with no restrictions on variants. Its response will contain all the variants, and you will be able to implement a search through them and quickly switch between them in your app.
For example, this is how you can get URLs that link to all mockups of a product with ID 42.
curl -X \
  GET "https://api.customerscanvashub.com/api/storefront/v1/products/42/variant-mockups" \
  -H  "accept: text/plain" \
  -H  "Authorization: Bearer <TOKEN>"
Instead of gathering all options, variants, and mockups in a single request and to process them in your app, you can send several requests to receive data in portions and process them as needed. This workflow will go through the following steps:
Finding a product by SKU
To filter products by SKU, you can use the endpoint GET /api/storefront/v1/products with the query parameter sku. Let's assume that your product in Customer's Canvas has SKU mug-012:
curl -X \
  GET "https://api.customerscanvashub.com/api/storefront/v1/products?sku=mug-012" \
  -H  "accept: text/plain" \
  -H  "Authorization: Bearer <TOKEN>"
Finding products by reference
You specify these references through the user interface on the Links tab of a product in BackOffice.
To find a product by reference linking to a product in your system, use the endpoint GET /api/storefront/v1/product-references and pass the identifiers of your storefront and reference. Let's assume that your product reference is "mug-12", and the storefront ID for your app is 10045. In this case, the request will look as follows:
curl -X \
  GET "https://api.customerscanvashub.com/api/storefront/v1/product-references/ext/mug-12/product?storefrontId=10045" \
  -H  "accept: text/plain" \
  -H  "Authorization: Bearer <TOKEN>"
Getting product options
The Storefront API allows you to retrieve an option list of a single product using the endpoint GET /api/storefront/v1/products/{id}/options. For example, you can get options of product 42 as follows:
curl -X \
  GET "https://api.customerscanvashub.com/api/storefront/v1/products/42/options" \
  -H  "accept: text/plain" \
  -H  "Authorization: Bearer <TOKEN>"
Getting variants for option values
After you have retrieved an option list, you can get product variants corresponding to these options.
A single product in your e-commerce system may have many options available to users. As a result, Customer's Canvas will create product variants that match all the possible combinations of option values. You can get this bunch of products by product ID through the GET /api/storefront/v1/products/{id}/variants. For example, if your productId is 42:
curl -X \
  GET "https://api.customerscanvashub.com/api/storefront/v1/products/42/variants" \
  -H  "accept: text/plain" \
  -H  "Authorization: Bearer <TOKEN>"
To limit the variant list, you can apply an option value filter to the list. This filter is a string representing a JSON object, where the key is an option identifier, and the value is one or more comma-separated identifiers of option values. You can find these identifiers in the response of GET /api/storefront/v1/products/{id}/options. For example, to filter variants by an option with ID 18894 and its value with ID 67221, use the following object:
{
  "18894": "67221"
}
Next, pass this filter as a query parameter in a GET request or as a parameter of the corresponding client method.
curl -X \
  GET "https://api.customerscanvashub.com/api/storefront/v1/products/42/variants?options=%7B%2218894%22%3A%20%2267221%22%7D" \
  -H  "accept: text/plain" \
  -H  "Authorization: Bearer <TOKEN>"
Getting mockups for a variant
After you have received the product variants, you will need to get assets for them to create your product gallery by using the endpoint GET /api/storefront/v1/products/{id}/variant-mockups.
For example, this is how you can get URLs that link to mockups of a single product variant with ID 687078. Here, the product ID is 42.
The request to get URLs that link to mockups:
curl -X \
  GET "https://api.customerscanvashub.com/api/storefront/v1/products/42/variant-mockups?productVariantId=687078" \
  -H  "accept: text/plain" \
  -H  "Authorization: Bearer <TOKEN>"
Rendering mockups
After you have received the product mockups, you can render them with the designs or other images by using an ID if they are in your tenant storage, as well as through their URL. To do so, use the endpoint POST /api/atoms/v1/designs/render-preview.
In the body, this request expects a JSON object with the asset identifiers and rendering settings in the following format:
{
  "imageUrl": "string",  // for example, "https://placekitten.com/800/500"
  "imageId": "string",   // for example, "65129fb5222f24bf460bca69"
  "ownerId": "string",   // for example, "6527afc635b52bfadd355226"
  "mockupId": "string",  // for example, "642e293dc46d098d64514607"
  "renderingConfig": {
    "width": 800,
    "height": 500,
    "fileFormat": "Jpeg",
    "fitMode": "Fit"
  }
}
This is how you can make a request.
curl -X \
POST "https://api.customerscanvashub.com/api/atoms/v1/images/render-image-preview" \
-H  "accept: application/octet-stream" \
-H  "Content-Type: application/json" \
-H  "Authorization: Bearer <TOKEN>" \
-d '{
  "imageId": "62da700abb25c5477797d9cb",
  "mockupId": "642e293dc46d098d64514607",
  "renderingConfig": {
    "fileFormat": "Jpeg"
  }
}'
The resulting image will be passed as a stream.
Rendering settings
In the renderingConfig, you can specify the following settings:
widthis the image preview width, in pixels.heightis the image preview height, in pixels.fileFormatis the image preview file format, eitherJpegorPng. The default value isPng.fitModeis the mode describing how the image will be inserted into the placeholder in one of the following ways:Fituses the width and height to specify a rectangle the image is inscribed into.Shrinkis the same asFit, but it resizes the image only if resize dimensions are smaller than image dimensions. This is the default value.Resizeuses the width and height to specify dimensions of the image after a resize without maintaining its proportions.Fillproportionally resizes and crops the image. First, the image is resized so that the given rectangle is inscribed into the resized image. After that, the rectangle is centered on the resized image, and the image is cropped by the rectangle bounds.
Now, let's learn how you can pass assets to this endpoint.
External artworks
You can pass a link to an image from the Internet in the request body, for example:
{
  "imageUrl": "https://placekitten.com/800/500",
  "mockupId": "642e293dc46d098d64514607",
  "renderingConfig": {
    "width": 800,
    "height": 800,
    "fitMode": "Fit"
  }
}
Artwork from a public gallery
When you store prints in Assets > Images in your tenant, then you can use them through their ID, for example:
{
  "imageId": "62da700abb25c5477797d9cb",
  "mockupId": "642e293dc46d098d64514607",
  "renderingConfig": {
    "width": 800,
    "height": 800,
    "fileFormat": "Jpeg"
  }
}
Artworks uploaded by end users
A user can only upload images to private storage associated with this user. "Private" means it has an owner and a special access policy.
To implement this scenario, you need to create a user session as described in the Registering customers topic, upload private images through the endpoint POST /api/storage/v1/private-images, and then pass the imageId and ownerId to render the mockups. The request body may look as follows:
{
  "imageId": "65129fb5222f24bf460bca69",
  "ownerId": "6527afc635b52bfadd355226",
  "mockupId": "642e293dc46d098d64514607",
  "renderingConfig": {
    "width": 500,
    "height": 500
  }
}
Private designs
Another use case when you may need to render a product preview is displaying a mockup with a design personalized in Customer's Canvas. Here, you will need the endpoint POST /api/atoms/v1/designs/render-preview.
This endpoint uses a similar JSON object in its body and supports variable data to be applied to the design.
{
  "designId": "string",  // for example, "64f97dd555334834ede11817"
  "ownerId": "string",   // for example, "John.Wood"
  "mockupId": "string",  // for example, "642e293dc46d098d64514607"
  "renderingConfig": {
    "surfaceIndex": 0,
    "width": 800,
    "height": 500,
    "fileFormat": "Jpeg"
  },
  "variableData": [
    {
      "name": "string",  // for example, "job title"
      "value": "string", // for example, "junior copywriter"
      "type": "string"   // one of "Text", "InString", "ImagePlaceholder", or "Image"
    }
  ]
}
For the personalized design, you need to pass the following data:
designId- an ID of a private state file created during the personalization.mockupId- an ID of the mockup to be rendered.ownerId- an ID of the user who personalized the design and owns this private state file.