Personalize mockups
- 13 minutes to read
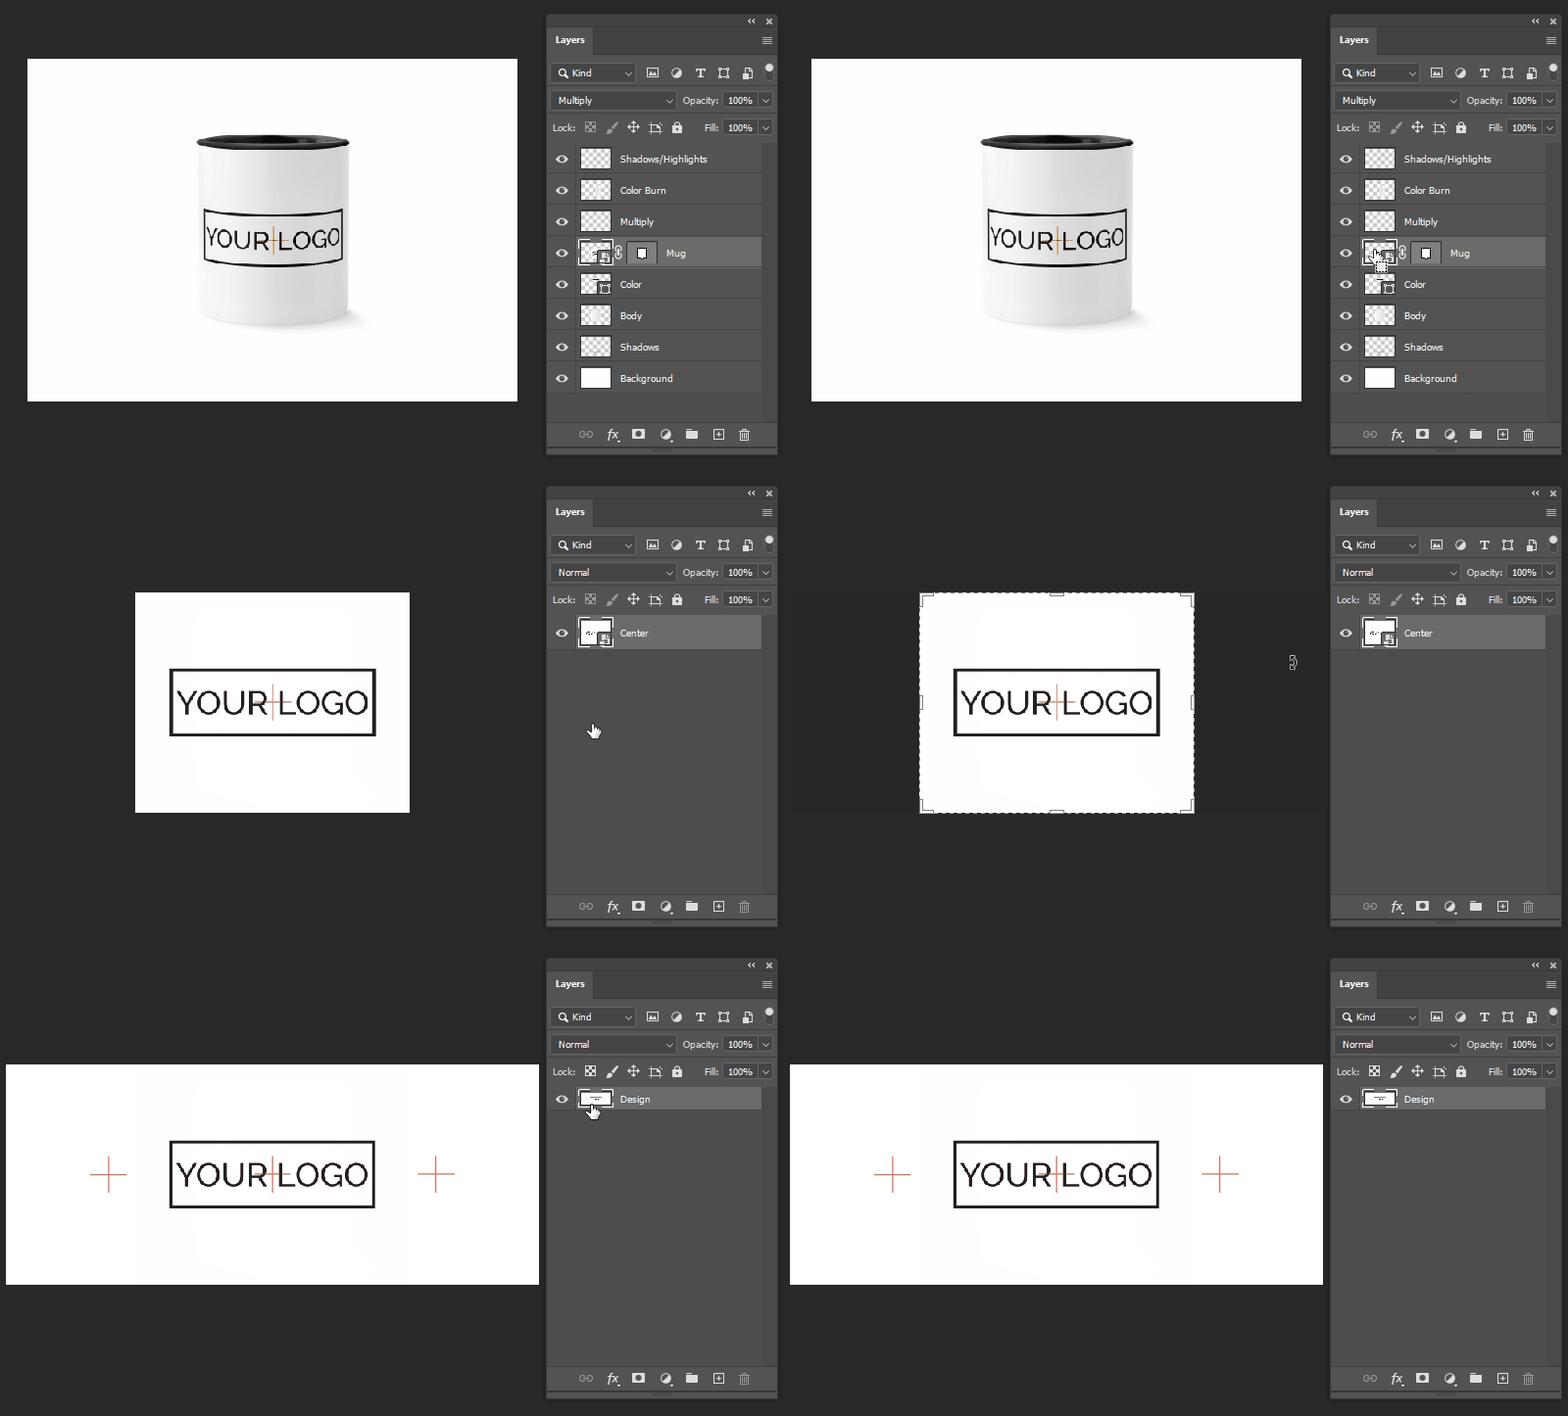
One of the most popular tasks that can be solved by the Dynamic Image is creating images of personalized products. First, you make a photorealistic design of your product, such as a mug, T-shirt, or magnet. Then, you use the Dynamic Image to apply this image to the design, replace layers, and more.
In the Getting Started article, we have already covered the basic operations for creating a personalized mockup. Here, we'll see all the possibilities provided by the Dynamic Image to perform this task.
We'll assume that you are familiar with creating mockups in Photoshop, uploading them to Customer's Canvas, and the capabilities and limitations of the Dynamic Image. Before you proceed with personalizing your mockups, we recommend you first explore the Getting Started article. Now, let's dwell on the following topics:
- Personalizing mockups by using commands
- Getting the layer list
- Configuring the image output
- Multiple mockups in a single request
Personalizing mockups by using commands
As you learned from the Getting Started article, we send different commands to the Rendering endpoint to modify the image. Let's look at all the commands that you may find useful for this task.
General command structure
To tell the Dynamic Image how to personalize a PSD file, you send a JSON object to the rendering endpoint. The keys of this object are the layer names, while the values are the JSON objects describing the commands you want to apply to these layers. These objects always contain a required property type, which defines the command type - image, shape, switch, text, and others. Other properties of the command depend on its type. We will take a more detailed look at them below.
You can send multiple commands at once in a single request. Here is an example of what this might look like:
POST https://<your-dynamic-image-instance>/api/rendering/preview
{
    "template": "preview-mockup.psd",
    "data: {
        "Layer 1": {
            "type": "image",
            "image": "https://picsum.photos/700/400"
        },
        "Layer 2": {
            "type": "text",
            "text": "Dynamic Image Rocks!"
        }
    }
}
If the specified layer is not present in the PSD file, the command will be ignored.
Note
These commands can be sent to layers of a certain type. For example, you can't send the Shape command to an Image Layer, or send the Image command to a Shape Layer.
Layer names
When specifying the command keys, consider how the Dynamic Image handles them. There are a few things to keep in mind:
- Use a backslash to refer to a layer in a group (don't forget about escaping it by a double backslash in JSON or JavaScript!), for example:
{ "GroupName\\LayerName": { … } } - Use a backslash to refer to a layer in a Smart Object, for example:
{ "SmartObjectName\\InnerObjectName": { … } } - Avoid using backslashes in layer names in your PSD mockups.
- When using the Dynamic Image with Customer's Canvas templates, you can omit markers in the command names. For example, if the layer name is
Layer 1<LC>, then you can refer to it as eitherLayer 1<LC>orLayer 1.
Managing layer visibility
All commands also support the visible property, which allows you to hide any layer as follows:
{
    …
    "data" {
        "Layer 1": {
            "visible": false
        }
    }
}
Tip
You may omit the command type when you are setting visible to false.
Image
Replacing images
The image command allows you to replace images and Smart Objects in your PSD files. You can use images from your public gallery and the Internet. For example, if your gallery contains a rose.jpg image in the flowers folder, you can use it as the Background layer as follows:
{
    …
    "data": {
        "Background": {
            "type": "image",
            "image": "/flowers/rose.jpg"
        }
    }
}
You may also use the images in some external sources by specifying a link in the url property, for example:
{
    …
    "data": {
        "Design": {
            "type": "image",
            "url": "https://picsum.photos/seed/picsum/1200/400"
        }
    }
}
This command only works if you apply it to an Image Layer or a Smart Object.
Fit or Fill
When replacing images, the image is resized in accordance to the layer size. If the aspect ratio of the layer and the inserted image do not match, the following properties control the resizing behavior:
resizeMode-fit(default) |fill- either fits the image to the layer or fills the layer and trims the parts of the image that go beyond the layer bounds.alignment- iffit, you can define whether to display the center of the image or align it to an edge.
For example:
{
   "type": "image",
   "image": "…",
   "resizeMode": "fit",
   "alignment": {
      "horizontal": "center", // "left" | "right" | "center"
      "vertical": "center" // "top" | "bottom" | "center"
   }
}
Transforming images
When you insert an image into a Smart Object, all its transformations are applied to the image. However, when inserting images into an image layer, you may want to rotate or flip it. There is a transform property for this.
{
   "type": "image",
   "image": "…",
   "transform": {
      "rotate": 90,
      "flip": "horizontal" // "vertical", "horizontal", "both", "none"
   }
}
Displaying a part of an image
When you need to display part of an image, for example, to cut off the bleed zone, then you should use a vector mask in your PSD file to hide the unnecessary part of the image.
Sometimes a mask isn't enough. For example, if you need a 360-degree print on a mug, you can only see part of the design in preview images. In this case, you should use a nested Smart Object with the size of the entire design inside the Smart Object which acts as a "viewport".

Let's assume that we have created a Smart Object called Visible Design Portion in the mockup and another Smart Object called Full Design within it. In this case, we can insert our image into this nested Smart Object by using the following command key:
{
    "Visible Design Portion\\Full Design": { … }
}
Shape
You can personalize vector shapes by changing their fill color. For example, let's assume that you print a product on color paper and have a catalog of 16 different colors. In this case, you can only create one PSD file with a Shape Layer and change the paper color on the fly to avoid creating 16 variations of PSD files for each color.
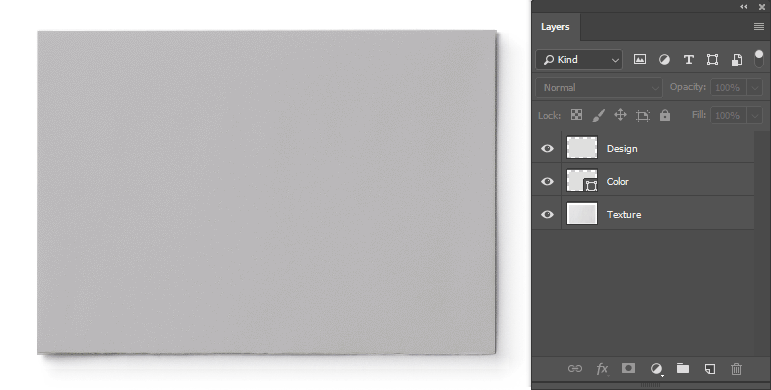
Let's take a look at the following mockup (you can download it here).

Here, we created a raster background layer with a texture and a shape to apply colors to this layer. To create such recolored mockups, you should apply Blending Modes to the layer that overlays the shape layer. In this example, we use the Multiply blend mode.
Now, you can pass the following command to change the paper color:
{
    …
    "data" {
        "Color": {
            "type": "shape",
            "color": "#F9E79F"
        }
    }
}
Note
You can only send this command to a Shape Layer.
Switch
To display the product material, it is not always enough to change colors. For example, the material may have a specific texture, like Kraft paper, or a multicolor pattern, like camouflage fabric.
In this case, you can draw all the variants of your product in all colors, and combine them into a group. Then, you can use the special command Switch to specify which elements in this group you want to make visible. The rest will be automatically hidden.
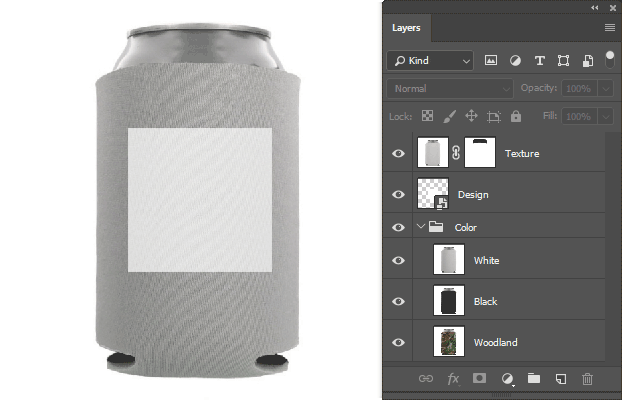
Let's take a look at the following mockup (you can download it here).

You can display the Woodland layer on the preview as follows:
{
    …
    "data": {
        "Color": {
            "type": "switch",
            "select": "Woodland"
        }
    }
}
This command is sent to the Group Item Color. The select property must contain the name of an element in this group that you want to display.
Anything can be used as a group element, including other personalization data. For instance, if we return to the example with the fabric types, most of the colors can probably be repainted, but some other options, such as Woodland camouflage, can be drawn entirely.
In the group that you will change using the Switch command, create three elements:
- A vector shape.
- Two raster images.
To send personalization data to an active group item, you can use an additional data parameter as follows:
{
    …
    "data": {
        "Group Name": {
            "type": "switch",
            "select": "Colored Fabric",
            "data": {
                "type": "shape",
                "color": "#F9E79F"
            }
        }
    }
}
You can set up nesting of any depth, for example, by embedding another group inside, modified by your Switch command.
You can use this technique not only to visualize the material, but also for displaying additional accessories, selecting the size of the print area, and more.
Text
Mockups rarely contain text that you would like to display. However, there are scenarios where you would like to have Text Layers on the design and update this information dynamically. For example:
- Display product sizes in inches.
- Show some labels like Sale, the discount amount, and more.
- Add a variable watermark on this image.
You can implement these scenarios with the Text command.
{
    …
    "data": {
        "Width": {
            "type": "text",
            "text": "2.5″"
        },
        "Height": {
            "type": "text",
            "text": "1″"
        }
    }
}
This command also allows you to change the font settings, text, and style:
{
    …
    "data": {
        "Message": {
            "type": "text",
            "text": "10% OFF",
            "color": "rgba(203, 67, 53, 0.75)",
            "postScriptName": "Roboto-Regular",
            "size": 24,
            "fauxItalic": false,
            "fauxBold": true,
            "stroke": {
                "color": "#ffffff",
                "width": 2
            }
        }
    }
}
Getting the layer list
As you can see from the previous section, a PSD file can have multiple personalized layers of different types, some of which may have a rather complex structure. You may wonder how to organize your code to make it possible to work with different PSD files.
In simple cases, all your PSD files look the same and you follow certain conventions. For example, all mockups you create may always contain the same layers, like Front Design, Back Design, Material, etc. In this scenario, you can just hardcode the layer names in your code and it will work fine.
However, if the structure of your PSD files is diverse, you may want to build a form generator or at least check which layers exist in a PSD file and which do not. To do this, you can use the Information endpoint.
POST https://<your-dynamic-image-instance>/api/information/template
{
    'template': '/mug-mockup.psd'
}
If this file contains a text layer and an image layer, this request may return the following list of layers.
{
    "size": {
        "width": 800,
        "height": 640
    },
    "layers": [
       {
         "name": "Photo",
         "type": "Image"
       },
       {
         "name": "Label",
         "type": "Text"
       }
   ]
}
Based on this data, you can determine what exactly you can pass within a request to personalize the mockup.
Sometimes, you need more information than the layer name and its type. To get a more detailed description of a PSD file, add the fullInfo property with the true value:
POST https://<your-dynamic-image-instance>/api/information/template
{
    "template": "/budge.psd",
    "fullInfo": true
}
As a result, you will receive much more verbose structure containing the full information about a layer. This is an example of a response containing the information for a couple of text layers, an image, and a shape.
{
  "layers": [
    {
      "data": {
        "color": { "a": 255, "b": 255, "g": 255, "r": 255, "isTransparent": false, "colorSpace": 16777216, "channelCount": 4, … },
        "fauxBold": false,
        "fauxItalic": false,
        "font": "TrebuchetMS",
        "justification": 0,
        "rectangle": { "location": { "isEmpty": false, "x": 93, "y": 86 }, "size": "559, 56", "x": 93, "y": 86, "width": 559, "height": 56, … },
        "size": 18,
        "text": "Print Conference",
        "underline": false
      },
      "locked": false,
      "name": "Conference",
      "type": "Text"
    },
    {
      "data": { "text": "Name", "font": "Impact", "size": 30, … },
      "locked": false,
      "name": "Name",
      "type": "Text"
    },
    {
      "data": {
        "rectangle": { "location": {"isEmpty": false, "x": 71, "y": 256}, "size": "266, 256", "x": 71, "y": 256, "width": 266, "height": 256, … }
      },
      "locked": false,
      "name": "Photo",
      "type": "Image"
    },
    {
      "data": {
        "borderColor": { "a": 255, "b": 149, "g": 149, "r": 149, "isTransparent": false, "colorSpace": 16777216, "channelCount": 4, … },
        "borderWidth": 0.24,
        "color": { "a": 255, "b": 107, "g": 107, "r": 141, "isTransparent": false, "colorSpace": 16777216, "channelCount": 4, … },
        "rectangle": { "location": {"isEmpty": true, "x": 0, "y": 0}, "size": "1100, 641", "x": 0, "y": 0, "width": 1100, "height": 641, … }
      },
      "locked": false,
      "name": "Background",
      "type": "Shape"
    }
  ]
}
Configuring the image output
In the previous sections, we focused on how to personalize the image. Now, let's discuss how to configure the output image.
File type
In the Getting Started article, you learned that the format property defines the output file type.
POST https://<your-dynamic-image-instance>/api/rendering/preview
{
    "template": "…",
    "format": "png",
    "data": { … }
}
In addition to png, you can render jpeg files. In the latter case, you can adjust the jpegQuality (from 0 through 100).
POST https://<your-dynamic-image-instance>/api/rendering/preview
{
    "template": "…",
    "format": "jpeg",
    "jpegQuality": 75,
    "data": { … }
}
Size
By default, the Dynamic Image renders a preview of 800x800 pixels. You can also request a different preview size with the size property.
POST https://<your-dynamic-image-instance>/api/rendering/preview
{
    "template": "…",
    "format": "jpeg",
    "size": {
        "width": 1200,
        "height": 1600
    },
    "data": { … }
}
Tip
The size of the output file strongly affects the rendering speed. Do not request a larger image than you really need.
Sharpen results
When resizing images, you may get a blurry result. To correct this problem, enable the unsharp mask effect for the output image. To do so, use the unsharpMask property.
This property is a string, and you can define it as "(1.5, 0.75, 0.05)", where:
- The first value corresponds to the amount parameter.
- The second value corresponds to the radius parameter.
- The third value corresponds to the threshold parameter.
POST https://<your-dynamic-image-instance>/api/rendering/preview
{
    "template": "…",
    "unsharpMask": "(1.5, 0.75, 0.05)",
    "data": { … }
}
For more details on how an unsharp mask works, we recommend reading this article.
If you prefer to not impose any effect, just use false instead of a string.
POST https://<your-dynamic-image-instance>/api/rendering/preview
{
    "template": "…",
    "unsharpMask": false,
    "data": { … }
}
Caching results
By default, intermediate calculations and results are cached to speed up getting the preview images. If you want to force image generation to bypass the cache, pass the query parameter disableCache=true:
POST http://<your-dynamic-image-instance>/api/rendering/preview?disableCache=true
{
    …
}
Multiple mockups in a single request
Above, we described the process of rendering a single mockup. However, sometimes it is convenient to create several mockups at once in one request. For example:
- If you want to create a mockup of the same product from various perspectives, for example, a mug viewed from different sides.
- If you want to make an upsale in addition to the mug, show the same design, but on a bottle or a lunchbox.
- If you want to create an image of a product with several variations of the design at the same time.
To do this, instead of the ~/api/rendering/preview endpoint, you can send a request to ~/api/rendering/multipage/preview. It works in the same way, but in the request payload, you must pass an object containing the pages property, which is an array of the same objects that you pass to the request for the single rendering:
POST https://<your-dynamic-image-instance>/api/rendering/multipage/preview
{
    "pages": [
        {
            "template": "/mug-left.psd",
            "format": "jpeg",
            "data": { … }
        },
        {
            "template": "/mug-center.psd",
            "format": "png",
            "data": { … }
        },
        {
            "template": "/mug-left.psd",
            "format": "png",
            "data": { … }
        }
    ]
};
As a result, these three templates will be rendered within a request, and you will receive an array of URLs that may look as follows:
{
   "results": [
       {
           "url": "http://<your-instance-url>/api/results/download/?file=AA4A29399EC558951129149939092EE0.jpeg"
       },
       {
           "url": "http://<your-instance-url>/api/results/download/?file=838CE627275A7098509C1D8626D69FEE.png"
       },
       {
           "url": "http://<your-instance-url>/api/results/download/?file=C71143396DE51525457F1020170EB29D.png"
       }
   ]
}
Important
The more pages you send, the more time the Dynamic Image takes to process your request. If the response time is important, avoid requesting too many images at once.