Image manager
- 20 minutes to read
The image manager, so-called Asset Manager allows you to select images in the Design Editor. This widget supports public and user galleries. You can add images to your design from remote servers, social networking services, Depositphotos, Amazon S3, and Google Drive through API or direct URLs.
In this topic, you will learn how to configure the following asset sources:
- The private user gallery
- The public gallery
- Images from the Web through direct URLs
- Google Drive
- Amazon S3
- Facebook and Instagram
- Depositphotos
- Gallery of state files
The Asset Manager Overview
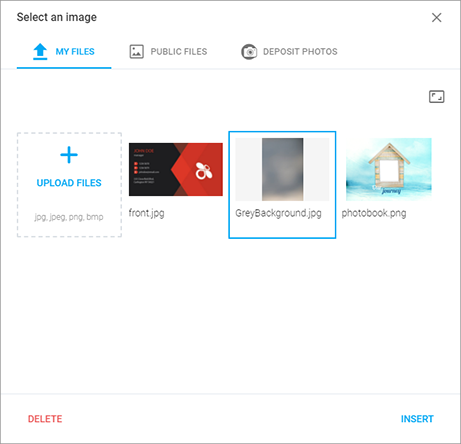
The Asset Manager appears when your users add new images to a product or replace previously added images. The following screenshot illustrates the user interface of this widget.
Defining Asset Sources
An asset source appears on a single tab of the Asset Manager. To add new tabs to the Asset Manager, you need to define your asset sources in clientConfig.json in the following objects:
assetSources- defines properties of your sources.AssetManager.tabs- configures the tabs of this widget.
Moreover, such remote sources as Google Drive, Amazon S3), and Instagram require additional parameters of HTTP requests. You can define them in the AssetSourcesConfig.json file.
Configuring the Sources
To define an asset source, you must specify its type. You can also specify other properties depending on this type. For example, let's look at how you can configure the private user gallery.
{
    "assetSources": {
        "My files": {
            "type": "PrivateSource",
            "allowedExtensions": [ "jpg", "png", "svg", "psd", "pdf" ],
            "actionMode": {
                "svg": "Clipart",
                "psd": "Group",
                "pdf": "Shape"
            }
        }
    }
}
Here, we use the PrivateSource type and allow for uploading images only in the following formats: jpg, png, svg, psd, and pdf.
By default, the Design Editor imports SVG and PDF graphics as vector images. They appear on the canvas as image elements. When you add PSD files to your product, their layers appear in the editor as separate objects. The actionMode property allows you to change this behavior and configure how SVG, PDF, and PSD graphics should be added - as vector or raster images, combinations of shapes, or groups of design elements.
Import of SVG Files
Important
If you design SVG files in Adobe Illustrator, save them using the Tiny SVG profile with the Preserve Illustrator Editing Capabilities option disabled. In other SVG editors, assign styles as path attributes, not through CSS.
If your file contains text objects, convert them to path objects.
For SVG graphics, you can use the vector, shape, group, and clipart modes.
In the shape mode, Design Editor combines paths, rectangles, ellipses, lines, text, and other vector shapes from an SVG file into one shape element. If you specify the fill and stroke colors for one of the shapes in the SVG file, these colors will be applied to the combined shape. If several elements have the fill and stroke colors, then the combined shape takes colors of the first element. To avoid any confusion in combining the shapes, you can merge them (Make a compound path in Illustrator) and apply the desired fill, stroke, and opacity to the resulting path before uploading. The Design Editor also eliminates raster fragments in this mode. To verify that the uploaded image on the canvas fully matches the graphics in the source file, you can use the shapeViolationsEnabled violation warning.
When you upload SVG as a vector image, it represents an image element on the canvas. This is the default mode.
The group mode allows you to import a set of SVG paths into the Design Editor as a group element. In the editor, you can ungroup paths if needed.
When you enable the clipart mode, imported SVG paths will represent a combination of multicolor shapes in a shape element. You can change the color of a single path in the editor.
Import of PDF Files
Note
When you upload a multipage PDF file, it appears in the Asset Manager on a page-by-page basis.
For PDF graphics, you can use the vector, shape, and group modes. They work in the same way as for SVG graphics.
Import of PSD Files
For PSD graphics, you can use the design, group, and merged.
In the design mode, a PSD file appears on the canvas as a set of layers. The Design Editor ignores PSD layers that have the <BG> or <FG> markers and places the rest of layers in the center of the canvas, keeping their relative position. If width or height of PSD files is bigger than the canvas size, then the editor fits the layers to the canvas size. This is the default mode.
The group mode allows you to import PSD layers as a group element.
When you enable the merged mode, PSD files appear as raster image elements.
Configuring the Tabs
Different asset sources may have different controls in their toolbars that enable searching, sorting, filtering, and more. For example, the My Files tab has only the Change view button, which allows your users to choose between the Fill and Fit preview modes.
You can disable the toolbar on a tab by using the toolbarEnabled property. If you want to hide asset names, set assetNameEnabled to false. To hide only file extensions, use extensionEnabled, for example:
{
  "widgets": {
    "AssetManager": {
      "defaultTabName": "Logos",
      "enabledBackgroundChange": "true",
      "tabs": [
        {
          "name": "Photos",
          "assetSourceInstance": "Public photos"
        },
        {
          "name": "Logos",
          "id": "public-logos",
          "assetSourceInstance": "Public logos",
          "controls": {
            "canDelete": false,
            "toolbarEnabled": false,
            "extensionEnabled": false,
            "multiSelectEnabled": false
          }
        }
      ]
    }
  }
}
When this widget has two or more tabs, you can use the defaultTabName property to specify which tab should appear when the Asset Manager opens. Although the Asset Manager allows you to select images for the background, you may want to disable this option and leave only the color selection. To do so, you can set enabledBackgroundChange to false.
By default, users can select multiple images by holding down Ctrl or Shift key and clicking images on a tab. You can also add the Select All button to the Asset Manager through selectAllButtonEnabled. If this property is true, your users can click this button to select all images in the asset source. If you need to disallow multiple image selection, set the multiSelectEnabled property to false.
You can apply different CSS styles to different tabs. To perform this, you can define an inline CSS style for a single tab and pass it into the editor. For example, apply a new style to a tab with ID public-logos as follows:
var config = {"inlineStyle": "#public-logos asset div.asset-bg {background-color: rgba(0, 0, 0, 0.2); background-image: none;}"};
var editor = await CustomersCanvas.IframeApi.loadEditor(document.getElementById("editorFrame"), product, config);
Note that if you have not defined an identifier for a tab, you can still refer to that tab using the default ID that represents the tab name in lowercase, with all spaces are replaced with "-". For example, the My Files tab has the my-files ID by default.
The Private Gallery
To enable the private user gallery, you need to specify a source of the PrivateSource type and a list of allowed extensions. Your users are only allowed to upload images of the listed types.
{
    "assetSources": {
        "My files": {
            "type": "PrivateSource",
            "allowedExtensions": [ "jpg", "jpeg", "png" ]
        }
    },
    "widgets": {
        "AssetManager": {
            "maxUploadFileSize": 2048000,
            "tabs": [{
                "name": "My files",
                "assetSourceInstance": "My files",
                "iconClassName": "cc-icon-uploadable"
            }]
        }
    }
}
The complete list of supported extensions is ["jpg", "jpeg", "png", "bmp", "gif", "tiff", "svg", "pdf", "ai", "psd"]. By default, the Asset Manager uploads files of any size. You can use the maxUploadFileSize property to limit the file size.
Users upload their images to the ..\userdata\<userId>\images\ folder by default. When you define the path property, the Design Editor creates a subfolder in this folder and saves uploaded images into this subfolder.
{
    "assetSources": {
        "My files": {
            "type": "PrivateSource",
            "allowedExtensions": [ "jpg", "jpeg", "png", "gif", "tif" ],
            "path": "order_4",
            "groupingByDateEnabled": true,
            "autoInsertUploadedFile": true,
            "overwrite": true
        }
    }
}
This configuration creates the ..\userdata\<userId>\images\order_4 folder. The Asset Manager will only display images from the order_4 subfolder and group them by date. To automatically close the Asset Manager and add images to the design as soon as they are uploaded, you can set autoInsertUploadedFile to true.
Note
Instead of opening the Asset Manager for selecting user images, you can enable a dialog box that opens when the user clicks the Select image button on the placeholder and closes as soon as the user selects an image. To do so, set autoImageUploadModeEnabled to true.
The Public Gallery
You can organize public assets in the ..\assets\images\ folder. To change the default location, you can specify your storage in ~/Configuration/AppSettings.config as follows:
<appSettings>
    <add key="PublicGalleryFolder" value="~/NewPublicGalleryFolder" />
</appSettings>
To enable the public gallery in the Asset Manager, you need to specify a source of the PublicSource type and a list of allowed extensions.
{
    "assetSources": {
        "Public Gallery": {
            "type": "PublicSource",
            "allowedExtensions": [ "jpg", "jpeg", "png", "gif", "svg" ],
            "actionMode": {
                "svg": "Clipart"
            }
        }
    },
    "widgets": {
        "AssetManager": {
            "tabs": [{
                "name": "Public files",
                "assetSourceInstance": "Public Gallery",
                "iconClassName": "cc-icon-add-image"
            }]
        }
    }
}
The Asset Manager supports the following extensions: "jpg", "jpeg", "png", "bmp", "gif", "tiff", "svg", "pdf", "ai", and "psd".
When you design a product and have a set of stock images prepared for such products, you may want to configure your public gallery on a per-product basis. In this case, you can list subfolders containing these images in the rootCategory object.
{
    "assetSources": {
        "Public Gallery": {
            "type": "PublicSource",
            "allowedExtensions": [ "jpg", "jpeg", "png", "gif" ],
            "rootCategory": {
                "name": "Logos",
                "categories": [
                    {
                        "name": "photos",
                        "categories": [{ "name": "buildings" }]
                    },
                    {
                        "name":  "shapes"
                    }
                ]
            }
        }
    }
}
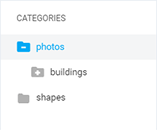
This configuration hides all folders in the source except for the specified subfolders in the Logos folder. As a result, you can see the following category tree.
Using another approach, you can hide a single subfolder in your public gallery by prefixing its name with [hidden]. To allow your users to select images from such a subfolder, you can use either the <IASF> marker in product templates or the itemConfig.allowedSubfolder property of Toolbox buttons. For example, if you want to hide the icons subfolder, rename it to [hidden]icons. After that, use the name of this subfolder without the prefix:
In product templates:
<IASF_/icons/>In the settings of design elements:
"Toolbox": {
    "buttons": [{
        "iconClass": "cc-icon-select-image-top-toolbar",
        "action": "CustomPlaceholder",
        "itemConfig": {
            "name": "Custom Placeholder",
            "allowedSubfolder": "icons",
            "allowedTabs": [ "Public files" ]
        }
    }]
}
When your assets form a complex hierarchy or are located on network drives, they can be quite slow to read.
To display such assets in the gallery faster, you can retrieve them level by level on demand. To do so, set the OnlyFirstLevelSubfoldersInitialization parameter to True in AppSettings.config. In this case, only the first-level elements will be read at initialization, and the rest will be explored on demand when the user navigates through the tree.
<appSettings>
    <add key="OnlyFirstLevelSubfoldersInitialization" value="True" />
</appSettings>
Images Through Direct URLs
The Asset Manager allows you to define images through direct URLs in MemorySource. Here, you need to specify links to both preview and source for every asset. The previews are low-resolution images that only appear in the gallery, whereas the sources appear on the canvas and are used for product rendering. You can define MemorySource as follows:
{
    "assetSources": {
        "External urls": {
            "type": "MemorySource",
            "rootCategory": {
                "assets": [
                    {
                        "title": "Black Cat",
                        "preview": "http://example.com/images/preview/cat2.jpg",
                        "source": "http://example.com/images/cat2.jpg"
                    },
                    {
                        "title": "White Cat",
                        "preview": "http://example.com/images/preview/cat44.jpg",
                        "source": "http://example.com/images/cat44.jpg"
                    }
                ]
            }
        }
    },
    "widgets": {
        "AssetManager": {
            "tabs": [{
                "name": "Gallery on external urls",
                "assetSourceInstance": "External urls",
                "iconClassName": "cc-icon-add-image"
            }]
        }
    }
}
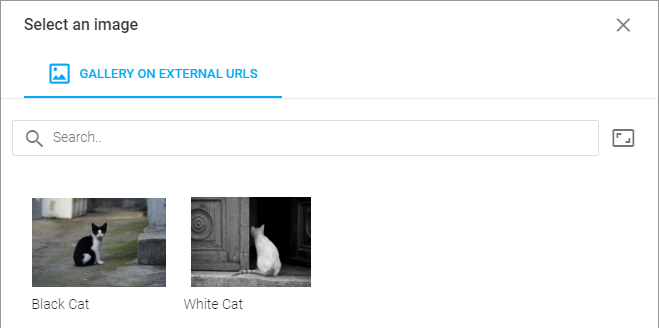
As a result, the Asset Manager displays a tab with two images.
You may want to group images into categories. In this case, include a categories array in the definition of your asset source. You can organize any category tree in the following way.
{
  "assetSources": {
    "External urls": {
      "type": "MemorySource",
      "rootCategory": {
        "assets": [
          {
            "title": "Black Cat",
            "preview": "http://example.com/images/preview/cat2.jpg",
            "source": "http://example.com/images/cat2.jpg"
          },
          {
            "title": "White Cat",
            "preview": "http://example.com/images/preview/cat44.jpg",
            "source": "http://example.com/images/cat44.jpg"
          }
        ],
        "categories": [
          {
            "name": "Sleeping Cats",
            "assets": [
              {
                "title": "Blanco",
                "preview": "http://example.com/images/preview/cat37.jpg",
                "source": "http://example.com/images/cat37.jpg"
              }
            ],
            "categories": [
              {
                "name": "Dreaming",
                "assets": [
                  {
                    "title": "Gato",
                    "preview": "http://example.com/images/preview/cat121.jpg",
                    "source": "http://example.com/images/cat121.jpg"
                  }
                ]
              }
            ]
          }
        ]
      }
    }
  }
}

To disable the All category, you can set the allCategoryEnabled property to false.
When other domains use CORS policy, you can use the crossOriginMode parameter to define how to request images: with or without the Access-Control-Allow-Origin header. If this parameter is not set or its value is "on", then the fetching of the image in done using crossOrigin = "anonymous". When crossOriginMode is "off", images are requested without the crossOrigin attribute.
"assetSources": {
  "[source]Nature": {
    "type": "MemorySource",
    "crossOriginMode": "on",
    "rootCategory": {
      ... // other parameters
}
The Google Drive Source
Before enabling Google Drive images, you need to integrate your Google Drive account with Design Editor and run the Google Drive web service.
General Parameters
You can set up the Asset Manager in the clientConfig.json file. This method configures an Asset Manager tab to display images from your Google Drive user account. For a service account, you need to pass such a configuration to loadEditor() at runtime. For example, you can specify a Google Drive source as follows:
{
    "assetSources": {
        "[source]Google Drive": {
            "type": "RemoteSource",
            "url": "https://gdws.example.com/",
            "rootFolder": {
                "show": true
            },
            "fileSortTypes": [
              {
                "asc": "createdTime",
                "title": {
                    "en": "Creation time",
                    "de": "Erstellungszeit"
                }
              },
              {
                "asc": "starred",
                "title": {
                    "en": "Starred",
                    "de": "Markiert"
                }
              }
            ],
            "requestParams": {
                "allowedItemOwnership": "all"
            }
        }
    },
    "widgets": {
        "AssetManager": {
            "tabs": [{
                "name": "Google Drive",
                "assetSourceInstance": "[source]Google Drive",
                "controls": { "assetNameEnabled": false }
            }]
        }
    }
}
Here, the RemoteSource type corresponds to such external sources as Google Drive. This asset source needs you to specify a URL of your API web service routed over HTTPS. For Google Drive, this property refers to the address where you set up the Google Drive web service.
In requestParams, you can specify allowedItemOwnership (either personal, shared, or all images). For service accounts, you can also specify a token generated by the getToken() method and corpora. The corpora property can be either user or domain. The first value allows you to browse images from a user's space. The domain value allows for browsing images shared with your corporate domain.
You can restrict access to images by specifying a subfolder name in the subfolder property. Alternatively, you can specify rootId, for example:
"rootId": "1hSCzgd25tVIB0pGI7EiEdrUVn5bfH2w0"
You can retrieve rootId through Google Drive APIs or right from the address bar of your browser.
fileSortTypes defines how your users can sort their images in the Asset Manager's gallery. You can specify the following options:
- createdTime
- folder
- modifiedByMeTime
- modifiedTime
- name
- name_natural
- quotaBytesUsed
- recency
- sharedWithMeTime
- starred
- viewedByMeTime
You need to define a title for a sorting option. To sort images in the ascending order, set one of the options to the asc key. To enable the descending order, set an option with the desc modifier to the desc key, for example, "desc": "createdTime desc".
To sort folders in the navigation tree, use the folderSortType property. For example, "folderSortType": "name_natural" results in the tree sorted by name, taking into account shared and personal folders.
To display the root folder of your asset storage on Google Drive, set the rootFolder.show property to true.
The result of the previous example may look as follows:
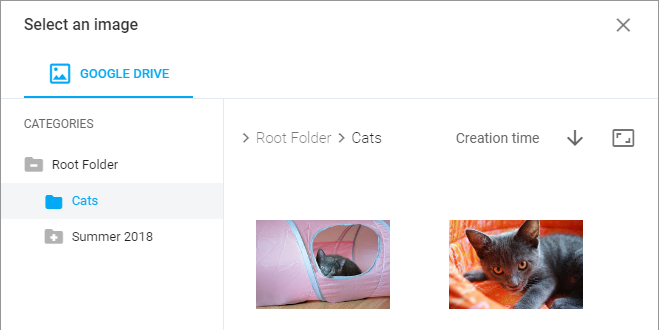
On this tab, your users can navigate through the folder tree and breadcrumbs.
Parameters of the Web API
The Design Editor does not require secret keys to render proof images. However, to render hi-res output files, you should specify hi-res secret keys for remote sources in the ~/Configuration/AssetSourcesConfig.json file. This file looks as follows:
{
    "[source]Google Drive": {
        "type": "RemoteSource",
        "hiResSecret": {
            "httpHeader": "X-GoogleDriveAPIKey",
            "secret": "UniqueSecurityKey"
        }
    }
}
In this file, object names (like "[source]Google Drive") correspond to the same names of asset sources in clientConfig.json. Here, httpHeader is a parameter of your request payload. To render the Google Drive images, you need to pass the X-GoogleDriveAPIKey parameter. The value of the secret property corresponds to the ApiSecurityKey value specified in the Web.config file when setting up the Google Drive web service.
The Amazon S3 Source
The Asset Manager allows your users to select images hosted on Amazon S3.
General Parameters
To enable the Amazon S3 Source, you first need to configure your S3 buckets and run a web service. After that, you can set up the general parameters in clientConfig.json.
{
    "assetSources": {
        "[source]AmazonS3": {
            "type": "RemoteSource",
            "url": "https://ws.example.com/",
            "key": "amazonS3",
            "uploadEnabled": true,
            "overwrite": true,
            "requestUploadUrl": true,
            "requestParams": {
                "allowedItemTypes": "all"
            },
            "folderSortType": "name",
            "fileSortTypes": [{
                "asc": "date",
                "desc": "date desc",
                "title": {
                    "en": "Date",
                    "de": "Erstelldatum"
                }
            }]
        }
    },
    "widgets": {
        "AssetManager": {
            "tabs": [{
                "name": "Amazon",
                "assetSourceInstance": "[source]AmazonS3"
            }]
        }
    }
}
For the RemoteSource, you must specify a URL of your API web service routed over HTTPS and a key - a unique identifier of this source.
The uploadEnabled property allows your users to upload their images to your S3 bucket.
To sort folders in the navigation tree, use the folderSortType property.
In the fileSortTypes array, define how your users can sort their images in the Asset Manager's gallery. You can specify the following options: name, date, and size. You need to define a title for a sorting option. To sort images in the ascending order, set one of the options to the asc key. To enable the descending order, set an option with the desc modifier to the desc key, for example, "size": "size desc".
Personal Parameters
In requestParams, you must pass a token and userId. You can generate a token for a single user ID through the Web API. Note that the userId represents the folder name in your S3 bucket.
const userId = '<userId>';
const token = '<userToken from GDWS>';
const config = {
    "assetSources": {
        "[source]AmazonS3": {
            "requestParams": {
                "token": token,
                "userId": userId
            }
        }
    }
};
var editor = await CustomersCanvas.IframeApi
                .loadEditor(iframe, product, config);
Parameters of the Web API
The Design Editor does not require secret keys to render proof images. However, to render hi-res output files, you should specify hi-res secret keys for remote sources in the ~/Configuration/AssetSourcesConfig.json file. This file looks as follows:
{
    "[source]AmazonS3": {
        "type": "RemoteSource",
        "hiResSecret": {
            "httpHeader": "X-GoogleDriveAPIKey",
            "secret": "UniqueSecurityKey"
        }
    }
}
In this file, the object name "[source]AmazonS3" corresponds to the asset source name defined in clientConfig.json. Here, httpHeader is a parameter of your request payload. To render images hosted on Amazon S3, you need to pass the X-GoogleDriveAPIKey header. The value of the secret property corresponds to the ApiSecurityKey value specified in the Web.config file when setting up the API web service.
Facebook and Instagram
Warning
Facebook is no longer supported. Use at your own risk.
You can allow your clients to select their Facebook and Instagram photos. These asset sources need you to obtain app-id and app-secret in your Facebook Developer Account. Note, you must create a Facebook app for both Facebook and Instagram. When configuring OAuth redirect URIs, use the following links depending on the social network:
Facebook:
https://example.com/Resources/SPEditor/Pages/SocialNetworkRedirect.htmlInstagram:
https://example.com/Resources/SPEditor/Pages/instagram-redirect.html
Here, replace example.com with the domain name where you deployed the Design Editor.
After you have configured your Facebook app, you can set up the Facebook and Instagram sources of the Asset Manager in clientConfig.json:
{
  "assetSources": {
    "[source]Facebook": {
      "type": "SocialNetworkSource",
      "network": "facebook",
      "apiKey": "123456789012345"
    },
    "[source]Instagram": {
      "type": "SocialNetworkSource",
      "network": "instagram",
      "apiKey": "888a44444a222222222a3333a1111111"
    }
  },
  "widgets": {
    "Toolbox": { "buttons": [ "Image" ] },
    "AssetManager": {
      "tabs": [
        {
          "name": "Facebook",
          "assetSourceInstance": "[source]Facebook"
        },
        {
          "name": "Instagram",
          "assetSourceInstance": "[source]Instagram"
        }
      ]
    }
  }
}
Here, the SocialNetworkSource type corresponds to both Facebook and Instagram. In the apiKey property, specify app-id obtained in your Facebook Developer Account.
Not to compromise the Instagram app-secret, specify this value in ~/Configuration/AssetSourcesConfig.json as follows:
{
    "[source]Instagram": {
        "type": "SocialNetworkSource",
        "secret": "{app-secret}"
    }
}
In this file, object names (for example, "[source]Instagram") must match the names of asset sources that you defined in clientConfig.json.
The Depositphotos Source
To browse images from Depositphotos, you need to define the DepositPhotos source. This source requires an apiKey provided by a manager after registering with Depositphotos to work through their API.
{
    "assetSources": {
        "[source]Deposit Photos": {
            "type": "DepositPhotos",
            "apiKey": "xxxxxxxxxxxxxxxxxxxxxxxxxxxxxxxxxxxxxxxx",
            "size": "L"
        }
    },
    "widgets": {
        "AssetManager": {
            "tabs": [{
                "name": "Deposit Photos",
                "assetSourceInstance": "[source]Deposit Photos",
                "iconClassName": "cc-icon-deposit-photos"
            }]
        }
    }
}
Here, the size property specifies the size of images returned by the Depositphotos API. The following sizes are available:
XL- the highest resolution uploaded by the contributor, say 6000x4000 pixels.DS- the Super size, which is twice as long and wide as the XL option at 300 DPI.L- the large size, when the longest side is reduced to 2000 px at 300 DPI.M- the medium size, when the longest side is reduced to 1000 px at 300 DPI.S- the small size, when the longest side is reduced to 500 px at 72 DPI.
To filter images when Depositphotos first opens, you can specify the startingQuery property, for example, "startingQuery": "cats". If this property is not specified, images are displayed by the most popular query.
The previous example enables the Deposit Photos tab in the Asset Manager.
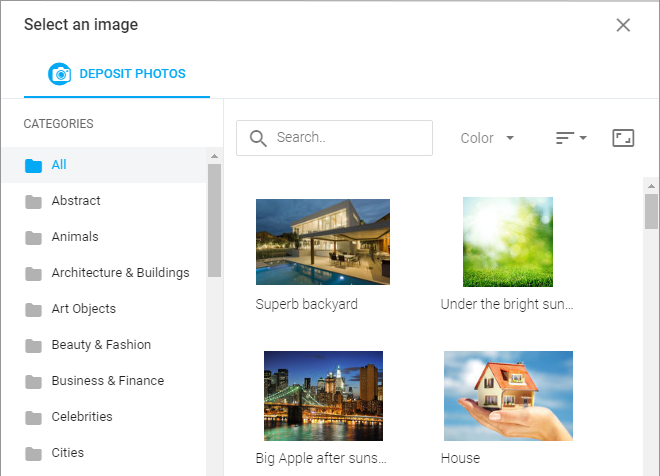
On this tab, your users can sort images by time, sales, or other options and filter images by color themes. The Depositphotos API provides these options automatically. If you want, you can hide the toolbar through the ITabConfig interface.
Integration with Depositphotos
Adding images from Depositphotos differs from other sources. Thus, the Asset Manager only shows previews of hi-res images uploaded by contributors. The previews have a watermark. After your users have added such images to their products, they have to purchase them. The total price, which your users confirm at checkout, will include the price of the added photos.
The procedure of replacing the previews with purchased images can be reduced to the following three steps:
- Authorization on Depositphotos
- Purchase of images
- Replacement of images
These steps should be implemented by a system that includes the Design Editor. For details, you can refer to the Integration with DepositPhotos topic.
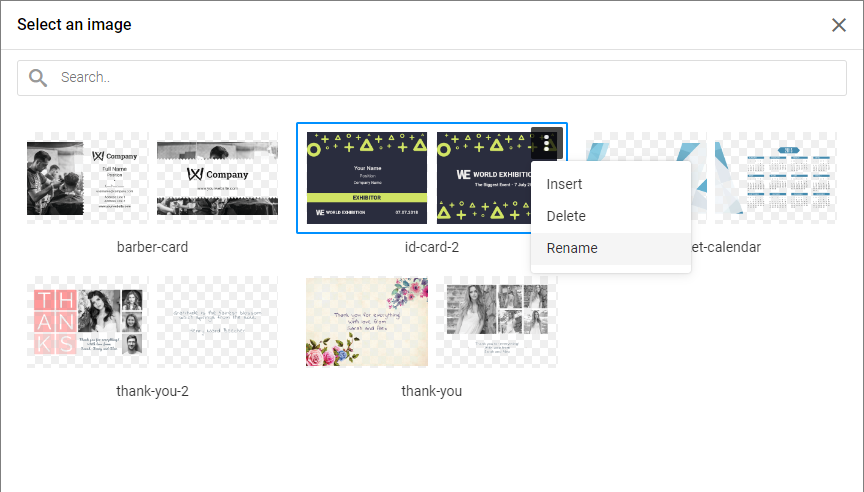
State Files
This asset source allows your customers to use their previously created design in a new product.
To display saved state files, you need to define the StatesSource. By default, this source only displays a preview image of the first page saved to a state file. For multipage products, and especially for two-page products, you may want to preview the first two pages at once. To do so, set the displayBackSidePreview property to true.
{
    "assetSources": {
        "States": {
            "type": "StatesSource",
            "displayBackSidePreview": true
        }
    },
    "widgets": {
        "AssetManager": {
            "tabs": [{
                "name": "Designs",
                "assetSourceInstance": "States",
                "iconClassName": "cc-icon-layout",
                "controls": {
                    "canRename": true,
                    "canDelete": true
                }
            }]
        },
        "Toolbox": {
            "buttons": [ "state" ]
        }
    }
}
When adding a tab with a gallery of state files, you can allow your users to rename and delete these files using the canRename and canDelete properties of the tab. If true, they add the Rename and Delete commands to the item menu.
Note
This source appears only if the Asset Manager opens from the Toolbox when the user clicks a button with the state action.
When the user opens a state file, the Design Editor will change the current product as follows:
- Clear all the pages.
- Insert design elements from the state file, starting from the first page.
- If the previously created design has more pages than the current product has, then ignore the extra pages.
- Navigate to the first page.
- Remain the size and safety lines of the current product.
- Fit design elements to print areas.