Facebook is no longer supported. Use at your own risk.
- 3 minutes to read
You can allow your clients to use their Instagram photos in customized print products. To enable this asset source in Customer's Canvas, you need to create a Facebook app and add Facebook Login and Instagram products to this app. After these products have been set up in your Facebook developer account, you can use the Instagram App ID in ~\Configuration\clientConfig.json. When integration is successful, you can see the corresponding tab in the Asset Manager:

This topic describes how you can set up the Instagram product.
Before you start, you need:
Instagram Basic Display
To create the Instagram source in the Asset Manager, configure Instagram Basic Display:
Open Facebook for Developers in a browser.
Log in to your Facebook account.
In the App Dashboard, scroll to the Add a Product section, find the Instagram product, and click Set Up.

Click Basic Display, scroll to the bottom of the page, then click Create New App.
In the form that appears, enter the Display Name of the app.
In Client OAuth Settings, specify your redirect link in Valid OAuth redirect URIs. The Redirect URI is formed by adding
Resources/SPEditor/Pages/instagram-redirect.htmlto the domain name where you deploy the Design Editor. For example:
http://example.com/Resources/SPEditor/Pages/instagram-redirect.htmlIf you use the cloud version of Design Editor, then your Redirect URI is as follows:
https://portal.customerscanvas.com/Users/xxxxxxxx-yyyy-xxxx-yyyy-xxxxxxxxxxxx/SimplePolygraphy/Resources/SPEditor/Pages/instagram-redirect.html
wherexxxxxxxx-yyyy-xxxx-yyyy-xxxxxxxxxxxxis the unique identifier of your Design Editor instance.In Deauthorize Callback URL, specify your URL that handles deauthorization notifications.
In Data Deletion Request URL, specify your URL that handles data deletion requests.
Click Save Changes.
Testing the App
To test your app before the review and switching to the live mode, you need to create an Instagram test user as follows:
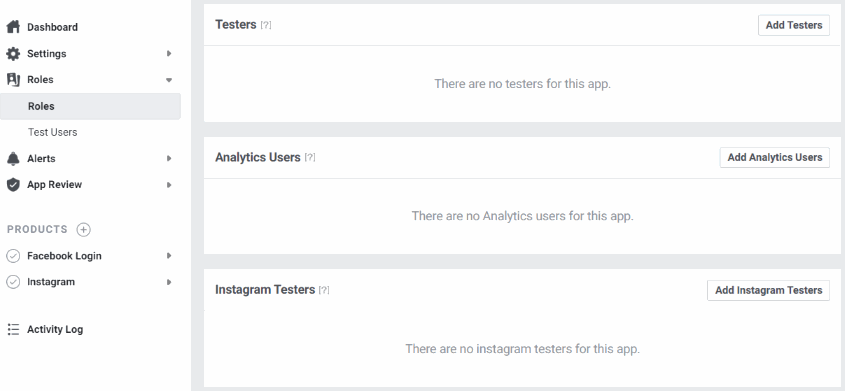
In the App Dashboard, click Roles > Roles, scroll to the Instagram Testers section, and click Add Instagram Testers.

In the form that appears, enter your Instagram account's username and click Submit to send an invitation.
Open www.instagram.com in a browser and sign into your Instagram account that you just invited.
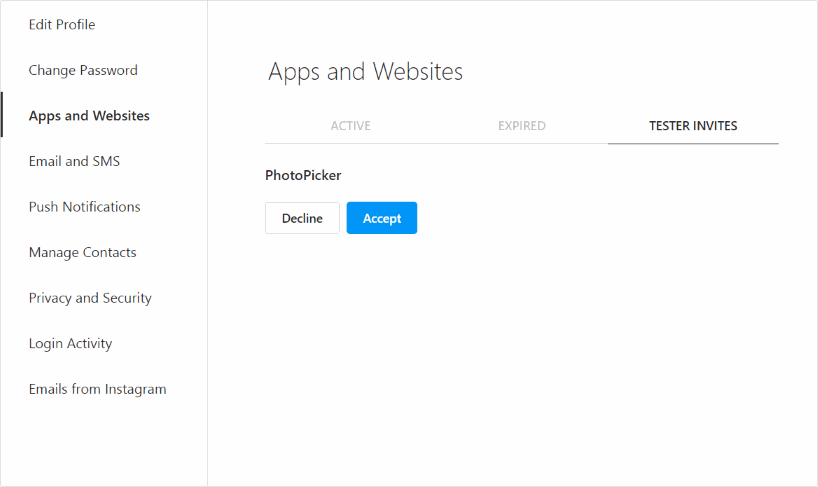
Navigate to Profile > Edit Profile > Apps and Websites > Tester Invites and click Accept.

You can now test this app in Design Editor. To enable the Instagram tab in the Asset Manager, copy your Instagram App ID from the Instagram product page and paste it into the clientConfig.json file as a value of the appKey property of the instagram asset source.
{
  "assetSources": {
    "[source]Instagram": {
      "type": "SocialNetworkSource",
      "network": "instagram",
      "apiKey": "123456789012345"
    }
  },
  "widgets": {
    "Toolbox": { "buttons": [ "Image" ] },
    "AssetManager": {
      "tabs": [
        {
          "name": "Instagram",
          "assetSourceInstance": "[source]Instagram"
        }
      ]
    }
  }
}
To avoid compromising the Instagram App Secret, specify this value in ~\Configuration\AssetSourcesConfig.json as follows:
{
    "[source]Instagram": {
        "type": "SocialNetworkSource",
        "secret": "888a44444a222222222a3333a1111111"
    }
}
After you have tested the app, you can submit if for review.
Submitting the App for Review
Before you can switch your app to the live mode, you must go through the app review.
In the Facebook integration topic, you may have already learned how to submit you application for General Review to get permission to read the photos a person has uploaded to Facebook.
To get permission to read an Instagram user's media, you must go through the Instagram review, which is independent of the general app review and requires specialized review steps.
Instagram Review
To submit for a product review, you must begin your submission from within the Instagram tab.
To get access to Instagram user photos, you need to request the instagram_graph_user_media permission.
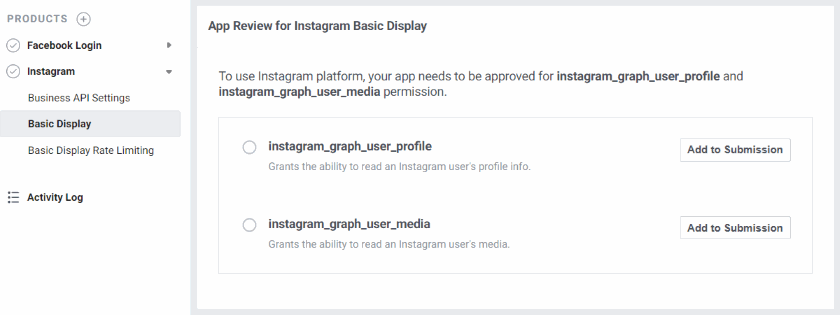
In the App Dashboard, click Instagram > Basic Display, scroll to the section App Review for Instagram Basic Display.

For both
instagram_graph_user_profileandinstagram_graph_user_media, click Add to Submission and describe how you're using the permission and demonstrate it in a screencast.Click Submit for Review.