Facebook is no longer supported. Use at your own risk.
- 2-3 minutes to read
You can allow your clients to use their Facebook photos in customized print products. To enable this asset source in Customer's Canvas, you need to create a Facebook app and add Facebook Login to this app. After this product has been set up in your Facebook developer account, you can use the Facebook App ID in ~\Configuration\clientConfig.json. When integration is successful, you can see the corresponding tab in the Asset Manager:

This topic describes how you can create a Facebook app and set up the Facebook product in this app. Also, you can find details on how to submit a Facebook App for review.
You can learn how to set up the Instagram product in your Facebook app in the corresponding topic.
Creating a Facebook App
To enable an asset source with Facebook photos, create a Facebook App:
Open Facebook for Developers in a browser.
Log in to your Facebook account.
Hover over My Apps, then click Create App.

In the dialog box that appears, select the application type: For Everything Else.
Type in your application name and contact email and click Create App ID.

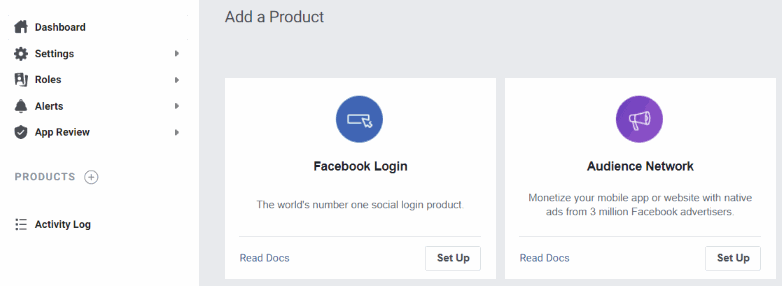
In the App Dashboard, scroll to the Add a Product section, find Facebook Login, and click Set Up.
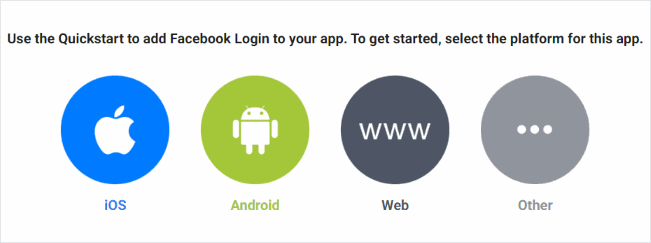
Select Web as the platform for the app.
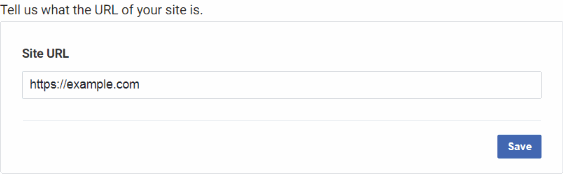
Type in your Site URL, and click Save.
In Settings of Facebook Login, specify your redirect link in Valid OAuth redirect URIs. The Redirect URI is formed by adding
Resources/SPEditor/Pages/SocialNetworkRedirect.htmlto the domain name where you deploy the Design Editor. For example:
http://example.com/Resources/SPEditor/Pages/SocialNetworkRedirect.html
If you use the cloud version of Design Editor, then your Redirect URI is as follows:
https://portal.customerscanvas.com/Users/xxxxxxxx-yyyy-xxxx-yyyy-xxxxxxxxxxxx/SimplePolygraphy/Resources/SPEditor/Pages/SocialNetworkRedirect.html
wherexxxxxxxx-yyyy-xxxx-yyyy-xxxxxxxxxxxxis the unique identifier of your Design Editor instance.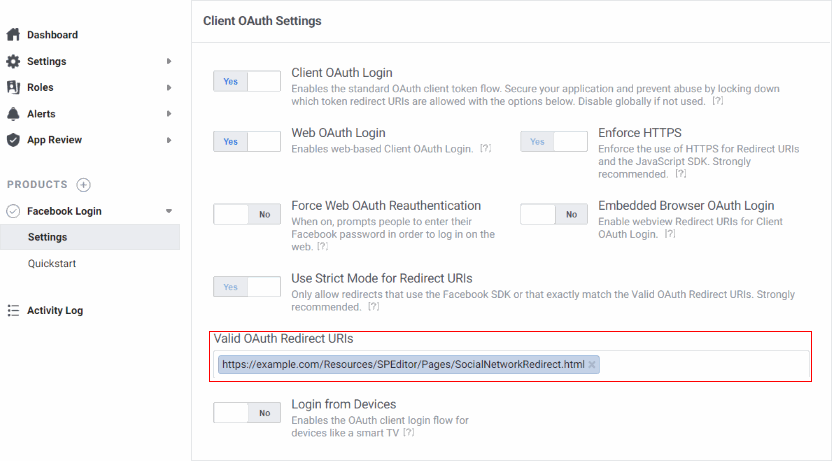
In the App Dashboard, click Settings > Basic and fill in the following fields:
- Privacy Policy URL:
https://customerscanvas.com/privacy-policy - App Icon
- Category:
Shopping - Business Use:
Support my own business
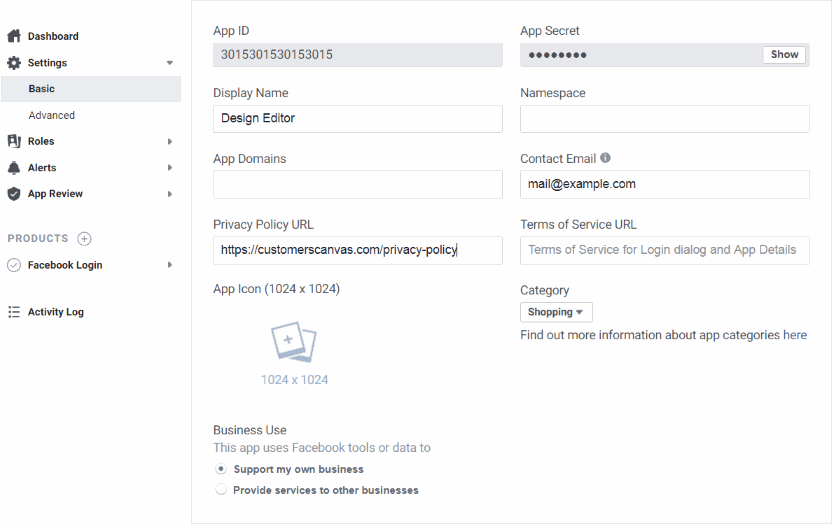
- Privacy Policy URL:
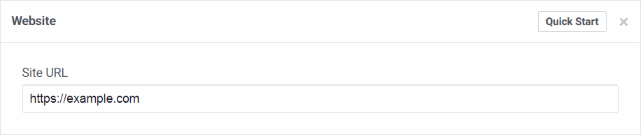
Scroll to the bottom of the page, click Add Platform, and select Website.
Type in your Site URL again and click Save Changes.
In the Advanced settings, scroll to Share Redirect Whitelist and turn on Allow Cross Domain Share Redirect.
After this step, you can test your app before submitting it for review. To define an asset source in the Asset Manager, you can use your App ID as a value of the appKey property.
{
  "assetSources": {
    "[source]Facebook": {
      "type": "SocialNetworkSource",
      "network": "facebook",
      "apiKey": "3015301530153015"
    }
  },
  "widgets": {
    "Toolbox": { "buttons": [ "Image" ] },
    "AssetManager": {
      "tabs": [
        {
          "name": "Facebook",
          "assetSourceInstance": "[source]Facebook"
        }
      ]
    },
    ...
  }
}
General Review
To get access to Facebook user photos, you must go through the general app review and request the user_photos permission.
In the App Dashboard, click App Review > Permissions and Features, scroll the list to
user_photos, click Request, and then click Continue.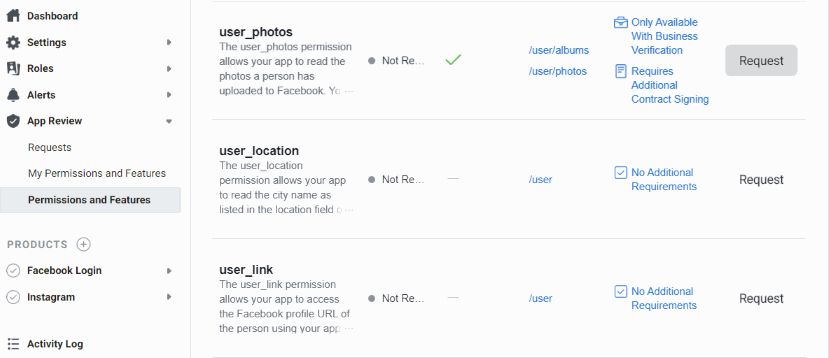
Note
The user_photos permission requires business verification.
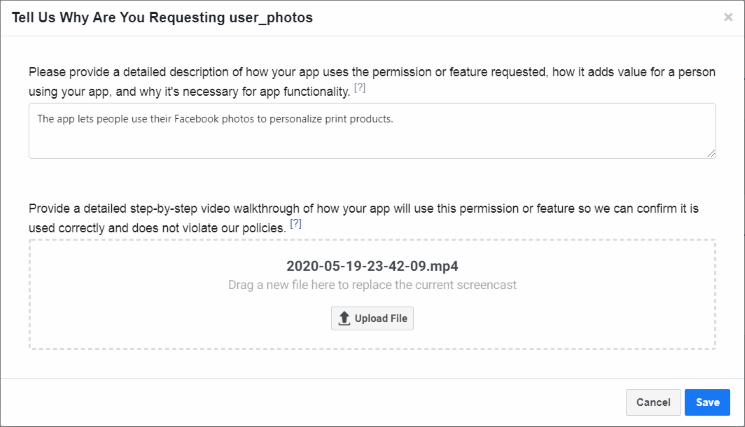
In the Request for App Review, provide verification details and describe how you'll use
user_photos.
Provide detailed step-by-step instructions for using user photos and click Save.
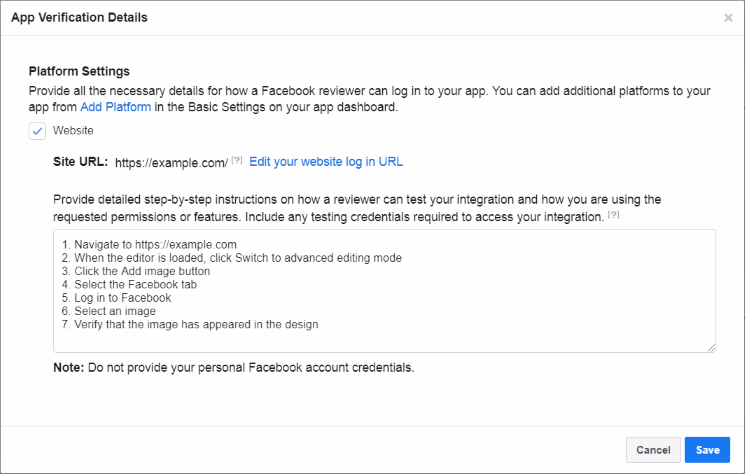
Describe how you're using user photos and demonstrate it in a screencast, which must be uploaded, and then click Save.
Click Submit for Review.