Cropping marks
- 2 minutes to read
No one wants a part of the graphics painstakingly designed by a customer to be suddenly cut off. For example, when you print many product copies on a single paper sheet, then it is not an easy task to cut off these copies both without white borders left and keeping the design intact. The Design Editor supports crop marks so that your personnel can identify bleed zones, where they can safely cut off printed products.
In the editor, you can enable safety lines to verify that all elements are fit the safety zone. To specify bleed zones where the printed page should be cut off, you can draw crop marks.
The following proof image illustrates how you can set up the safety lines and crop marks.
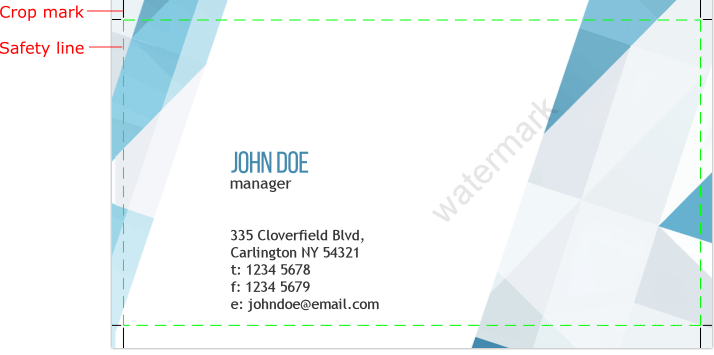
Crop marks are shown on both proof images and hi-resolution outputs.
You can set up crop marks by using the IProductDefinition interface. A JSON object defined by the ICropMark interface specifies crop marks. It defines margins, a style, and other parameters. The following example shows how you can set up both the safety lines and crop marks on proof images for all product surfaces.
let productDefinition = {
    defaultCropMarks: [{
        margin: {
            horizontal: 5,
            vertical: 10
        },
        length: {
            horizontal: 4,
            vertical: 9
        },
        color: "cmyk(0,1,1,0,1)",
        widthPx: 1
    }],
    defaultSafetyLines: [{
        margin: {
            horizontal: 5,
            vertical: 10
        },
        color: "rgba(0,255,0,1)",
        altColor: "rgba(255,255,255,0)",
        stepPx: 5,
        widthPx: 1
    }],
    surfaces: ["pocket_calendar", "pocket_calendar_back"]
};

let configuration = {
    rendering: {
        proofImageSafetyLinesEnabled: true
    }
};

CustomersCanvas.IframeApi.loadEditor(iframe, productDefinition, configuration);
Here, the defaultCropMarks object specifies crop marks for all product surfaces. It adjusts their appearance, width, and color. To define crop marks for a single surface, you should set up them in a print area definition.
let productDefinition = {
    surfaces: [{
        designFile: "pocket_calendar",
        cropMarks: [{
            margin: 10,
            color: "red"
        }]
    }]
};
Also, Design Editor allows for drawing additional page information like an order number, a file name, a date, and more.

To implement this, ICropMark provides the leftNotes, topNotes, rightNotes, and bottomNotes properties, which allow for printing notes on all four page sides. So, you can print different information on the left, right, and in the center of a note. Moreover, you can specify several strings for a note.
let productDefinition = {
    surfaces: [{
        designFile: "pocket_calendar",
        cropMarks: [{
            margin: 10,
            color: "black",
            bottomNotes: [
                { fontSize: 3, alignment: "Left", text: "File:", markMargin: 0.5 },
                { fontSize: 3, alignment: "Left", text: "pocket_calendar.psd", markMargin: 0.5, edgeMargin: 0.6 },
                { fontSize: 4, alignment: "Center", text: "March 1, 2017" }
            ]
        }]
    }]
};
Here, the markMargin property defines the space between the bleed mark and text, while edgeMargin defines the space between the bleed line and text. These properties are coefficients to the margin. Their default value is 0.3.