Getting started
- 5 minutes to read
The UI Framework represents a series of JavaScript applications, which allows you to integrate a multi-step editor to personalize and order your products. This topic describes how you can initialize and load the UI Framework configuration, enable the Design Editor, and obtain resulting data.
Important
If you are connecting your application to Customer's Canvas Hub, follow our StorefrontJS documentation. The instructions provided on this page will guide you through using the UI Framework when binding to Customer's Canvas Hub is not necessary.
UI Framework Installation
There are two ways to enable the UI Framework on your server: install it locally and use it from a CDN (Content Delivery Network).
Downloading the Package
You can download and install the package @aurigma/ui-framework by using npm.
npm install @aurigma/ui-framework
This package is already compiled and bundled, there is no need to re-build it.
If you don't want to install this package locally, you can use it from Azure CDN as described below.
Loading the UI Framework Configuration on a Page
Now, let's see how you can use the UI Framework in your application.
First, you must specify a DIV element which will be a container for the editor.
<div id="editor-container" class="editor-container">
</div>
The editor is loaded to the page by using the moduleLoader script, which allows you to dynamically import ES6 modules. When you embed your scripts into the HTML page, you can import the moduleLoader from Azure CDN as follows:
import moduleLoader from "https://staticjs-aurigma.azureedge.net/ui-framework/latest/moduleLoader.js";
const uiFrameworkBaseUrl = "https://staticjs-aurigma.azureedge.net/ui-framework/latest";
As an alternative, you can import the locally installed moduleLoader when building your scripts as follows:
import moduleLoader from "./node_modules/@aurigma/ui-framework/dist/moduleLoader.js";
const uiFrameworkBaseUrl = "./node_modules/@aurigma/ui-framework/dist";
You can use a variable for the location of modules, for example, uiFrameworkBaseUrl. Since the import keyword in JavaScript supports only string literals, you have to duplicate this URL there as well.
Providing an Editor Configuration
There are two JSON objects that you have to pass to the editor: a product and a config.
The product object contains a definition of a product from your e-commerce system. You can refer to Working with e-commerce driver for details.
const product = {
  id: 0,
  sku: "PRODUCT-001",
  name: "My Product",
  description: "This is a test product.",
  options: [],
  price: 1,
  attributes: []
};
The config describes the user interface and the behavior of the editor. The following example illustrates the simplest possible config, which has no real useful function but keeps the explanation brief. You can refer to Creating parametrized configs and other documentation articles to learn how to create more useful configs.
const config = {
  "showSteps": false,
  "widgets": [
    {
      "name": "hello",
      "type": "static-text",
      "params": {
        "text": "Hello world!"
      }
    }
  ],
  "steps": [
    {
      "name": "main",
      "mainPanel": {
        "name": "hello"
      }
    }
  ]
};
In these examples, we hardcode the product and config. In a real-life application, you should send the product object from the back end and create the editor config dynamically.
Initializing E-commerce Driver
After you have defined a product and a config, you should load an e-commerce driver and the editor modules and initialize them by using the driver.init method where you pass the product, config, and other data.
const driver = (await moduleLoader.dynamicImport("ecommerceDriver", `${uiFrameworkBaseUrl}/drivers/default-driver.js`)).ecommerceDriver;
const editor = (await moduleLoader.dynamicImportDefault("editor", `${uiFrameworkBaseUrl}/editor.js`)).editor;

const ecommerce = await driver.init(product, editor, config, /* settings */ { customersCanvasBaseUrl: "" },
                  /* restore data */ null, /*quantity*/ 1, /* user info*/ { id: 'test-user' });
After that, you can call the renderEditor to place the editor into the editor-container.
ecommerce.products.current.renderEditor(document.getElementById("editor-container"));
Now, if you open the resulting page in a browser, you can see the running multi-step editor.
Using Design Editor
Now, let's look at how you can configure the UI Framework to implement a use case that is widely applied in practice. For example, let's open the Design Editor.
Note
It is assumed that you have already learned about the Design Editor JS and have an installed instance of the application.
First, you must specify where the UI Framework can find your editor. In the driver settings, specify the URL linking to your Design Editor instance, for example:
const settings = {
    customersCanvasBaseUrl: "https://example.com:44300/" };
}

const ecommerce = await driver.init(product, editor, config, settings, null, 1, { id: 'test-user' });
Note
If you use the cloud version of Customer's Canvas, you can find the URL of your Design Editor as it is described in the corresponding topic.
Now, let's change our configuration and insert the design-editor widget into the mainPanel of the only step. You can read more about this widget, but for now, we need to know how to specify the type of design we need to load. To do this, you can pass a product definition into the initial node. For example, if you use the cloud version, the easiest way is to copy the design ID.
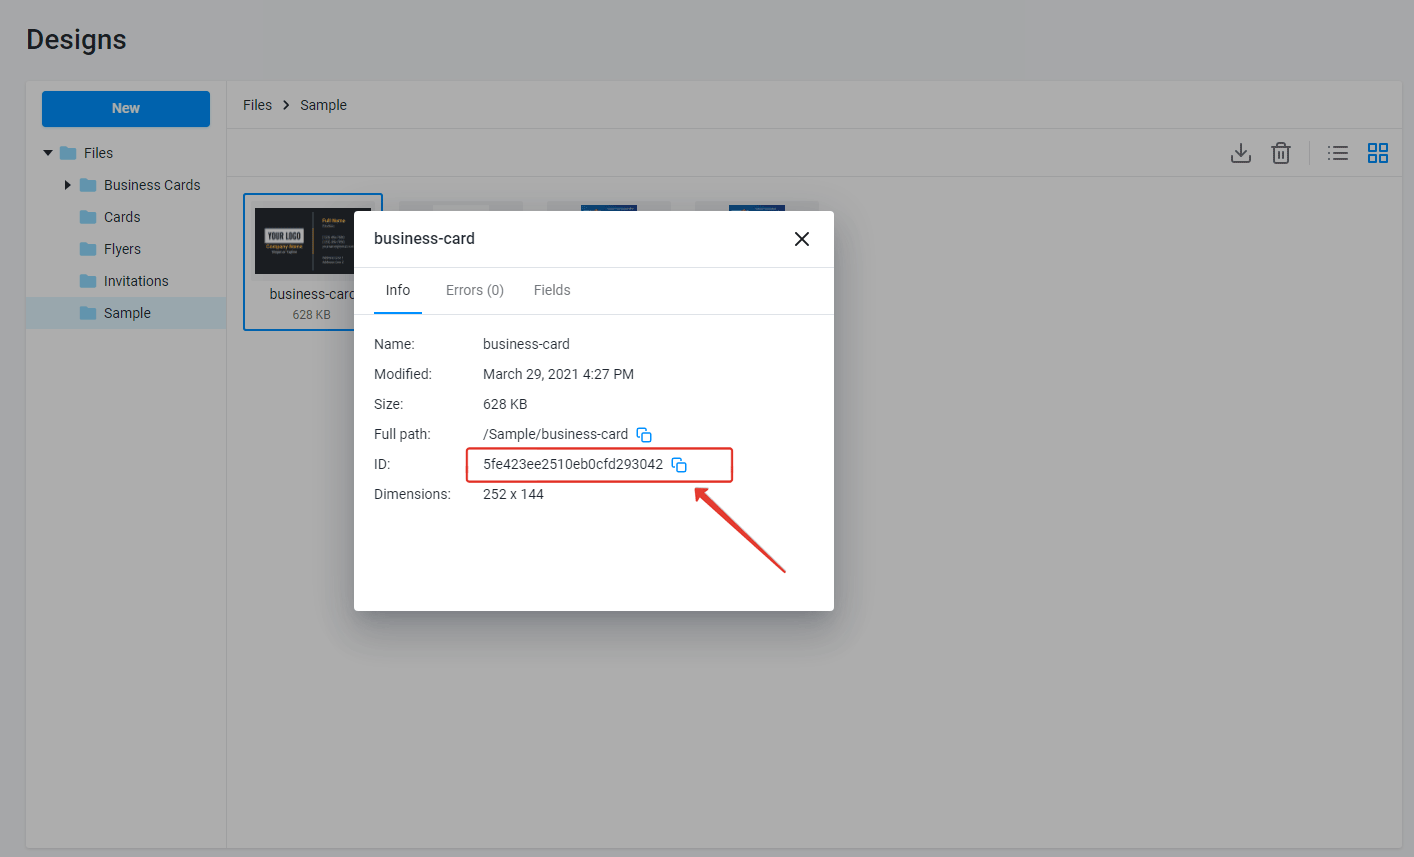
Then, paste this ID as follows:
const config = {
  "widgets": [
    {
      "name": "editor",
      "type": "design-editor",
      "params": {
        "initial": {
          "productDefinition": "5fe423ee2510eb0cfd293042",
          "editorConfig": {
            "initialMode": "Advanced"
          }
        }
      }
    }
  ],
  "steps": [
    {
      "name": "Editor",
      "mainPanel": {
        "name": "editor"
      }
    }
  ]
};
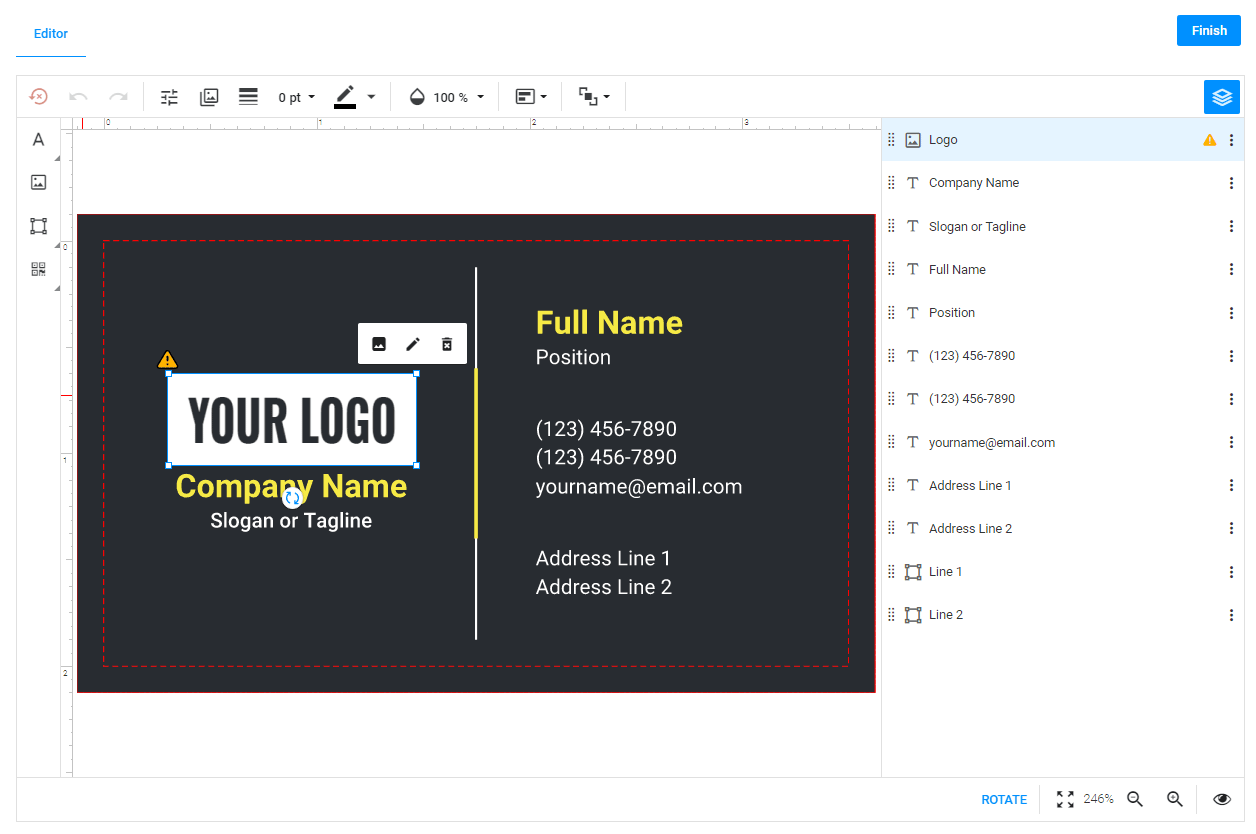
If you do it right, you'll see your design in the editor:
Receiving Data from the Editor
When the user clicks the Finish button, the editing process is considered to be finished. It is time to create an order in the e-commerce system. To get the information from the editor, you can subscribe to the onSubmitted event handler.
ecommerce.cart.onSubmitted.subscribe(function (data) {
  console.log("submitted");
  data.lineItems.forEach(function (order) {
    console.log(order);
  })
});
Code Sample
In the following GitHub repository, you can find a sample ASP.NET Core app that uses the UI Framework to load the editor:
https://github.com/aurigma/DesignEditor.QuickStart/tree/master/ui-framework-sample
You can also find some sample configs in this Github repository:
https://github.com/aurigma/CCSample-UIFramework
Now, let's go further and learn what a config is.