Placeholders with Frames
- 3-4 minutes to read
While designing such photo products as photobooks or photo cards, your users often want to create photo placeholders that are more creative than just rectangles. The Design Editor allows for creating placeholders with additional decorative elements, so-called frames. These elements are attached to the placeholders, and if the user resizes or rotates them, then the frames apply the same transforms. At the same time, changes in the placeholder's content do not affect the frames themselves. These frames may have a complex shape as well as image placeholders. The following images illustrate examples of frames designed in the Design Editor.

You can implement these frames in Photoshop templates.
Frames in Design Editor
To create a placeholder with a frame in your PSD template, you need to perform the following:
- Add one or more raster layers representing the frames to the template. Add the
<FR>marker to the names of these layers. - Add one raster layer representing the content of this placeholder. Leave it free of markers.
- Group these layers together and add the
<PH>marker to the group.
This group can be either a stub, empty, or normal placeholder. It may contain any number of frame layers. The order of these layers matters. So, you can place an image layer either lower or higher than a frame in the Layers list. In the first case, you have an overlaying frame. In the latter case, the frame may behave as a background.
If you need a frame of an arbitrary shape, just add a shape layer to this group as described in Non-rectangular image placeholders.
[Frames only decorate your image placeholders so that you can edit the content of your product and keep the frames intact. To change frames, you need to change your PSD template in Photoshop.
An Example of Placeholders with Frames
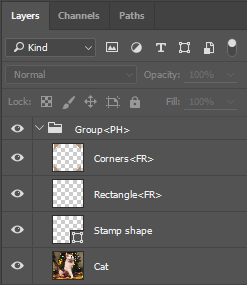
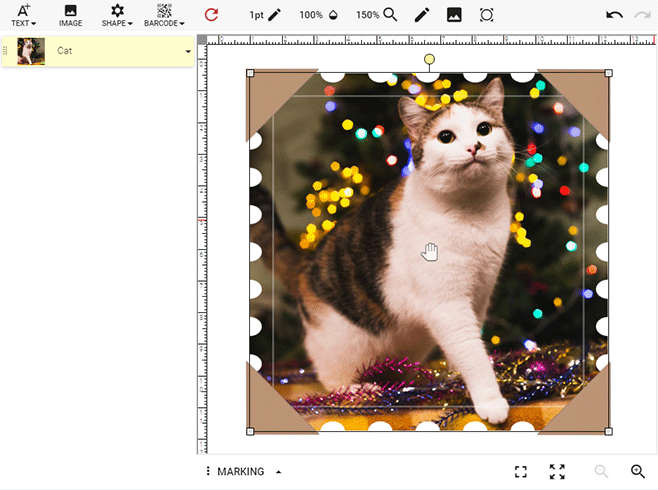
As an example, let us describe how you can design a photo with a stamp shape. This design has two overlaying frames: a semitransparent rectangle and photo mounting corners. In Photoshop, perform the following steps:
- Create a new template. On the File menu, click New.
- Add a photo. For example, drag it from Windows File Explorer.
- Add a shape layer. On the Tools panel, click Shape Tool or press
Uon the keyboard, toggle to a custom shape tool, and draw a stamp shape with the mouse. - Add a rectangle. Add a rectangle shape the same way as you added the stamp shape in the previous step.
- Rasterize the rectangle layer. Right-click this layer and click Rasterize Layer.
- Add the
<FR>marker. Double-click the layer name and type<FR>. - Add photo corners. Drag an image of the photo mounting corners from Windows File Explorer.
- Add the
<FR>marker. Double-click the layer name and type<FR>. - Group all the layers together. Select the layers, right-click the selection, and then click Group from Layers.
- Add the
<PH>marker. Double-click the group name on the Layers tab and add the<PH>marker to its name. The layers should look as follows:

Put the resulting PSD file in the ~\assets\designs\ folder and open it. Note that the Design Editor displays such a layer group as a single item.

Frames from the Gallery
The previous example illustrates how you can create placeholders with frames in a PSD template and open these templates as products in the editor. Also, you can prepare a collection of frames and allow your users to apply them to their products. To prepare frames for the collection, create PSD files as the previous example describes and arrange these files in a single gallery folder. After that, configure the AssetManager and Toolbox widgets in the clientConfig.json file:
Configure the
PublicSourceofFrames."assetSources": { "Frames": { "type": "PublicSource", "allowedExtensions": [ "psd" ], "rootCategory": { "name": "Frames" } } }Add the
Framestab to the AssetManager."AssetManager": { "tabs": [{ "name": "Frames", "assetSourceInstance": "Frames" }] }Add the
Framesbutton to the Toolbox."Toolbox": { "buttons": [{ "translationKey": "Toolbox.FRAMES", "translationKeyTitle": "Toolbox.TITLE_FRAMES", "iconClass": "cc-icon-frames", "action": "Image", "tabs": [ "Frames" ] }] }
In the asset source, you set the rootCategory name to "Frames", which means that your frame templates are in the ..\assets\images\Frames\ folder.