Understanding print products
- 5 minutes to read
From the customer's point of view, the "product" is a print design for a business card, sticker, booklet, or any other printed merchandise the user opens from a template, and customizes in the Design Editor. However, in terms of the Customer's Canvas suite, the "product" is a more complicated construct, consisting of several elements. To open a "product" and let a customer create a print design, you have to address the following elements:
- Design templates and print areas
- Mockups
- Colors and custom fonts
- Safety lines
- Folding lines and spines
Let us review each element separately.
Design Templates and Print Areas
A design template is a major structural element of the product - no less than the product template loaded from a PSD file, customized by a customer, and the resulting file is printed to fulfill the order. The product can be a single page or multipage. In multipage products, there should be a template for each page.
Here is the simplest design - the address sticker for an envelope.

The other way to define an area for printing is to set a print area. It is a rectangular area that displays what is actually going to be printed. Everything outside of this area is clipped and will not be printed on the final product. The print area property is implemented when there is no design template set for a product or a product page.
Mockups
A part of Design Editor is a WYSIWYG web-to-print designer, which means that the customer previews the product that is being created while it is being edited. However, for some products, the image which the user expects to see and the result in a PDF file are quite different. For example, imagine that you are printing address stickers for envelopes. The user may want to see an envelope image that shows their address in the upper-left corner. However, you do not want to display the envelope image in the resulting PDF file.
You can solve this problem with the help of mockups. A mockup is a visual representation of the merchandise your customer wants to create - envelopes, t-shirts, coffee mugs, paper cups, etc. It is stored as a JPEG, PNG or a PSD file. Unlike a design template, a mockup is used only in the web-to-print designer and it is never rendered in the output PDF.
When you use a mockup template, you should usually specify the location of the design template, which may depend on a product or on a selected option (for example, whether the user wants to have an image printed in the left or right corner).
For more details, refer to Mockups.
Colors and Fonts
Although Design Editor does not have any restrictions on how the user modifies the product template, for some products you may want to set some limitations. For example, you may want to use a specific color theme wherein each color should have particular CMYK values. Or the font selected by a user could be in a list defined by your designers to avoid ruining the aesthetics of a template.
That is why the system allows you to consider a list of accepted colors and fonts as part of a product. When opening the print designer, you have the choice whether to use globally defined fonts and colors or to load product-specific ones.
For more details, refer to the description of providing a list of available fonts and Color management in Design Editor.
Safety Lines
When printing some products, you may put multiple items on a large sheet and then cut each item after you print it. You cannot always guarantee that the cut line will always be the same (e.g. it may shift by 1/10 of an inch every time). In this case, you need to give a user an idea of what part of their developmental design will appear 100% on a product and which part may be truncated.
Safety lines address this issue. You can configure different safety lines for each product and the user may toggle them to see where they should add them to their design element.
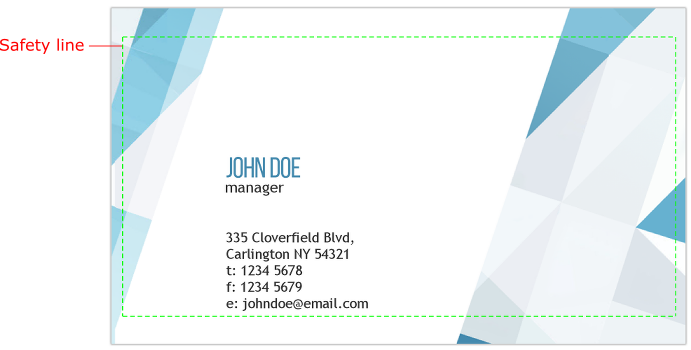
Here is a safety line on a business card:

Folding Lines and Spines
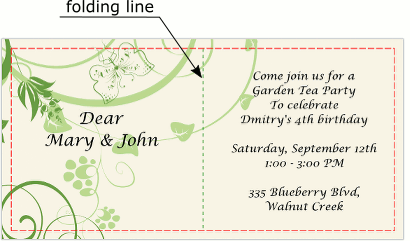
Folding lines are the lines along which the resulting product is folded. They are visible at the design time but not printed on the hi-res output. Folding lines are extremely useful in such products as leaflets and booklets which are fulfilled on a single page and then folded. These lines allow users to make designs optimized for folds, for example, they may prevent the user from mistakenly inserting an image at a crease where it is not supposed to be.

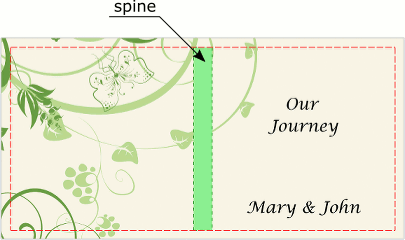
Spines are used on book cover designs to highlight the area where the book spine is located. Spines, like folding lines, are displayed only at the design time and not printed on the hi-res output.

For more details, refer to Folding lines and spines.
How Products Are Organized
After you have installed the Design Editor, you can find the \assets\ folder a level higher than the root of this application. This folder contains all product artwork:
- \designs\ - subfolder with product templates.
- \mockups\ - subfolder with the mockup images.
- \fonts\ - subfolder with the fonts used in the templates.
- \ColorProfiles\ - subfolder with the supported color profiles.
If needed, you can organize files in subfolders.
When you open the Design Editor, you specify the file name of a design template and/or mockup, omitting the folder path and the file extension. Therefore, it is highly recommended that you provide meaningful file names for templates.
As for other elements, such as colors, print areas, etc., there is no specific location to store them. In simple setups, you may just hardcode them. In more complicated scenarios such as loading products from an e-commerce system, you should extend a database with the appropriate fields and store this data along with their associated products.