Lists
- 2-3 minutes to read
In the Design Editor, you can organize text into lists. In the Classic text engine, you will use the Rich text editor to work with formatted text and lists. In the In-place text engine, you can create and edit lists right on the canvas. In this topic, you will learn how to create and configure such lists.
Creating lists
When using the In-place text engine, you can create lists in four ways:
- Import from InDesign templates.
- Click the Bulleted list and Numbered list buttons in the Top toolbar.
- Enter bullets in text elements.
- Enter numbers followed by a dot in text elements.
Importing InDesign templates
The Design Editor imports lists from IDML templates as they were created in InDesign. Your users can change the list format and the nesting level through the Top toolbar. To perform this, the TopToolbar.textListButtonsEnabled should be true.

Using list buttons
In the text editing mode, you can click the Bulleted list or Numbered list button in the Top toolbar to make the current paragraph a list item. The marker for this item will be taken from the default settings in the editor config.

Entering list markers
When you edit text elements and enter bullets (like *, -, •) or numbers (like 1, i, I) followed by a dot, then they start a new list item.
Configuring lists
In the editor configuration, you can find listSettings – the object defining the format and layout settings of lists in text elements. Here are the default values:
{
    "listSettings": {
        "maxLevel": 3,
        "firstLineIndent": -20,
        "listIndent": 30,
        "levelIndent": 40,
        "tabOffset": 10,
        "bulletChar": "•",
        "numberingFormat": "number"
    }
}
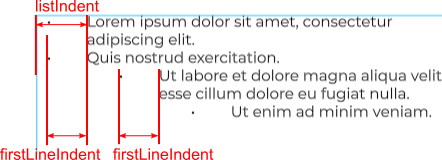
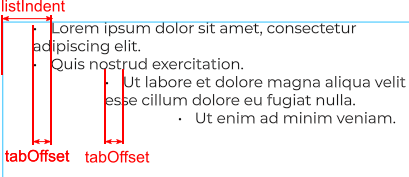
Every list has an indent from the left edge of the text element, listIndent, and all text strings start from this value. The levelIndent creates an indent between list levels, which is limited by the maxLevel parameter.

Note
On mobile devices, the In-place text engine supports only the first list level.
The firstLineIndent defines the position of bullets and numbers. When this is a negative value, the bullets will be drawn within the listIndent, and text lines on the same list level will line up.
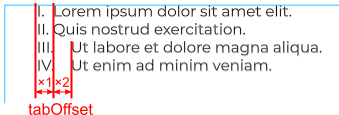
If firstLineIndent is 0 or a positive value, then the bullets in the first line and other lines will line up. To prevent the bullets and the first line text from overlapping each other, the editor will apply a tabOffset.
The bulletChar allows you to define a marker for bulleted lists. For example, you can pass "-", "*", "•", etc.
The numberingFormat specifies the marker type for numbered lists and supports the following values:
"number": 1., 2., 3., etc."lowerLetter": a., b., c., etc."upperLetter": A., B., C., etc."lowerRoman": i., ii., iii., etc."upperRoman": I., II., III., etc."none": list items represent paragraphs without numbers.
Note
If tabOffset is pretty small, it will be applied several times to create space between the bullet or number and the start of the list item.