Projects
This article describes the Projects section in the Customer's Canvas BackOffice panel. This section contains details about customer orders like personalized designs and links to resulting print files.
The Projects section is related to the Orders section in your e-commerce system. When the customer makes a purchase in your online store, the order information such as date, delivery methods, shipping address, and other details is automatically maintained in your e-commerce platform in the Orders section. Then, after the order is submitted, Customer's Canvas creates a project for each shopping cart line item that contains the personalized design and other information you need to fulfill the customer's order.
Now, let's learn how you can manage the projects.
Working on projects
As an administrator of the online store, you can track the appearance of new orders in your e-commerce platform. Then, the personalization data of the new order automatically appears in the Customer's Canvas Project section, and you can start working on it.

In this section, you can see the list of projects and choose the one you need. The project page contains the order information like the customer's name, the creation date, and modification date. Here you can also find the design file, download it for further printing, or open it in the editor to fix a possible mistake. You will learn more about working with projects in the Working with projects article.
As well as the orders, each project has a status that depends on the order fulfillment stage. The status can be changed automatically or manually by the store admin. For example, when the work on the project is finished, it is marked as Completed. Next, we will describe this process in more detail.
Project statuses
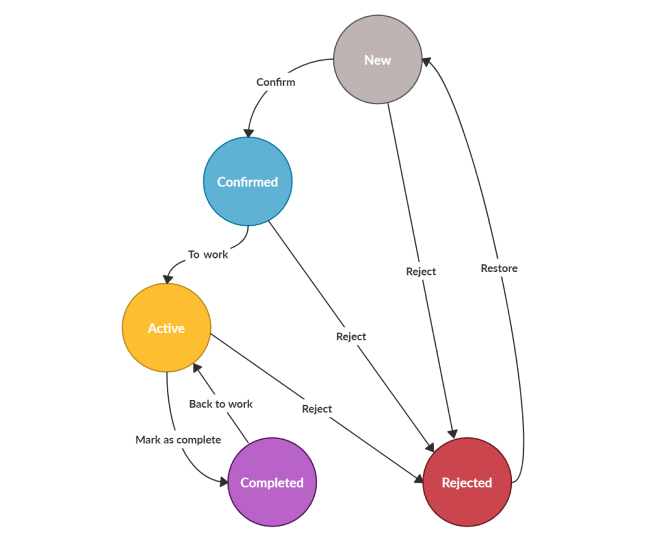
As we have mentioned before, each project has its status that helps to distinguish whether the order is fulfilled or still in progress. Each status shows the state of a project as it moves through its lifecycle. When the order status is updated in your e-commerce platform, some project statuses may switch automatically. As a store admin, you can also change the project status manually, for example when it is impossible to fulfill the order you can mark the project as Rejected. Let's consider all possible project statuses.
- New — this status will be assigned automatically after creating the order.
- Confirmed — this status means that the order is ready to be processed. Some e-commerce platform integration plugins automatically assign this status when the order payment transaction is completed.
- Active — you need to change the status to Active when you send the product to print.
- Completed — this status is set when the order has been successfully processed. Some e-commerce platform integration plugins automatically assign this status when the order is marked as Fulfilled in the online store admin panel.
- Rejected — you need to change the status to Rejected if you are unable to fulfill the order for some reason.
The image below illustrates the process of changing statuses:

Project processing modes
To fulfill the order associated with a project, you need to be able to download a print file from this project. There are two modes of how you can render a print file from a design personalized by the user: on demand rendering and queued rendering. The key difference between them is whether you are generating and downloading a PDF file right away or enqueue a rendering job consisting of several tasks. Rendering is not the only possible kind of tasks - it may include some additional operations such as imposition, saving results to FTP server, or sending requests to external system.
You will learn more about these modes in the Downloading print files article.
For more details about available pipeline tasks, refer to the Overview of Tasks.