Template-based imposition
- 9-10 minutes to read
In addition to mockup personalization, Dynamic Image API supports another scenario - template-based imposition. This scenario is helpful when you want to print small print product like a postcard or a business card on a larger paper sheet.
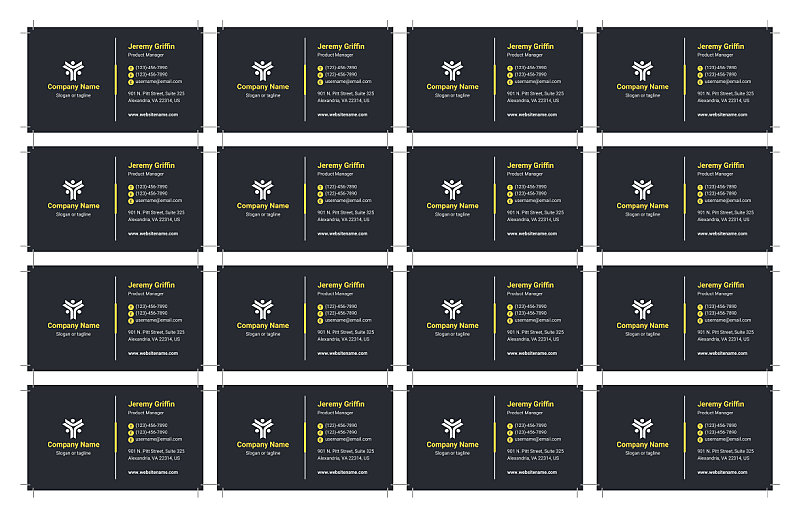
The idea is the following:
- You need to prepare an imposition template as a Photoshop file. It consists of placeholders (Smart Objects) and additional static elements such as cropping and registration marks, slug information, etc.
- It is necessary to obtain a PDF you are going to print. It may be a file generated by Customer's Canvas or just a regular PDF file.
- To generate a print file with imposition, you send a request to Dynamic Image where you point out to the template and the PDF file you would like to put on a sheet.
Let's see how to do it.
How to prepare an imposition template
General considerations
An imposition template is a Photoshop file which should meet the requirements described by the PSD Files article. For the purpose of imposition, there are some additional considerations:
- The Photoshop file size should have exactly the same size as the required output PDF file, for example, A2, A3, or Tabloid size.
- Its content is a grid of placeholders for the PDF file.
- All placeholders should have the same size - a size of your PDF file including bleed zone.
- It is up to you whether you want a gap between placeholders and how large it is.
- You may want to add cropping marks and other additional static elements to this design.
In a simple scenario, you are populating all placeholders by the same PDF file. In this case, you need to give the Smart Object elements the same name, for example, Artwork. However, you may want to mix different designs on the same paper sheet to save a paper. In this case, you may add a sequentional number, like Artwork 1, Artwork 2, etc.
Double sided printing
For double-sided printing, you need to have two imposition templates. You will do separate requests for the front and back side and receive two independent PDF files.
In certain cases, you may re-use the same imposition template for both front and back:
- All gaps between placeholders are the same and page margins are symmetric.
- All placeholders have the same size.
- A template is used for the same PDF file.
This way if you print a front side, flip the paper sheet and print a back side, the designs will appear on exactly same positions.
For the scenario when you need multiple PDF files on the same sheet, you may want to prepare a separate template. However the only difference with the front page template will be an order of placeholders - each row in a grid should be reversed.
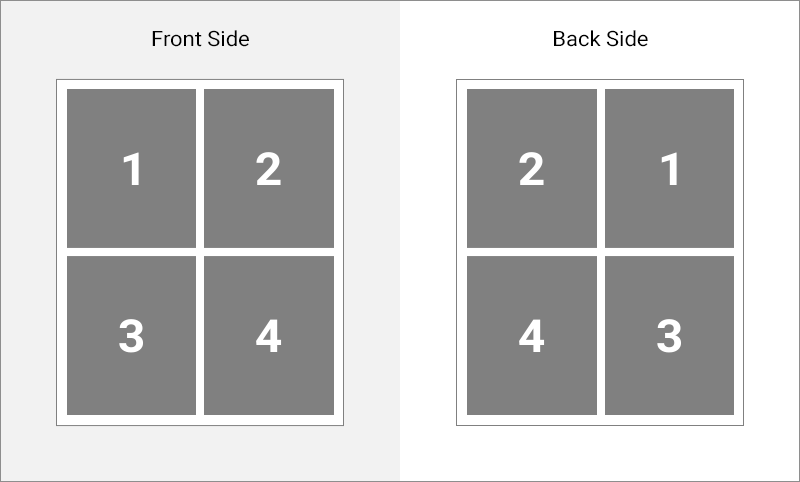
As an alternative to creating a second template for the back side, you can adjust the request (explained further) which populates a template with artwork to change the order of the designs on the back side.
Templates for preview
You may also want to generate a preview of the imposition file. Although you might use the same template as for a print file, it may be a bad idea because of a poor performance of the preview generation.
So for previews you just need to save the same templates with lower resolution, for example, 72 DPI. It is highly recommended to keep the same names of the placeholders to be able to use the same request payload to generate both hi-res print files and previews.
Example - postcards
Let's see how you can prepare templates for 5 x 7 postcards with 0.125 inch bleed zone. Assume that you are going to print it on a 11 x 17 inch paper sheet. To keep things simple, we will implement a template for a single design file.
Follow these steps:
- Create a new PSD file: click New -> Print, select the
Tabloiddocument preset, and click Create. - By using the Rectangle tool, draw a grid of 5.25 x 7.25 inch rectangles (product size + bleed from each side), one above the other.
- Arrange them to have the same gap and the leftmost element should have the same distance from the page edge as the rightmost one.
- Specify the same names for these rectangles, for example,
Artwork. - If you like, you can group these layers and name the group
Sheet. - Use the Line tool to draw crop marks. They should not intersect the artwork placeholders and they should be located 0.125 inch from the appropriate edge of the placeholder.
- Save this file.
The result may look as follows:
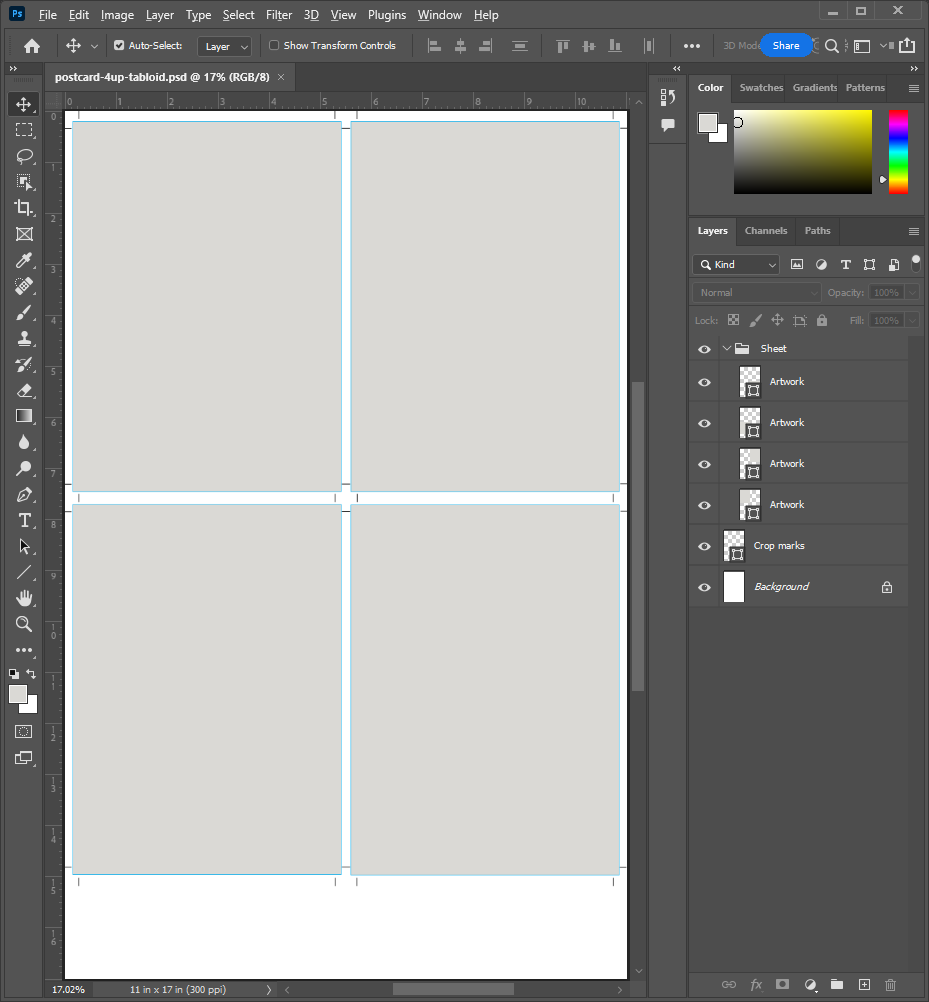
For reference, you can download the resulting template.
Add templates to Customer's Canvas
Once you create imposition templates, you need to add them to Dynamic Image. Below you will find the instructions for two situations when you are using the Customer's Canvas BackOffice application to manage Dynamic Image data and when you are using a standalone instance of Dynamic Image.
Adding templates through Customer's Canvas BackOffice
- Sign in to your Customer's Canvas account.
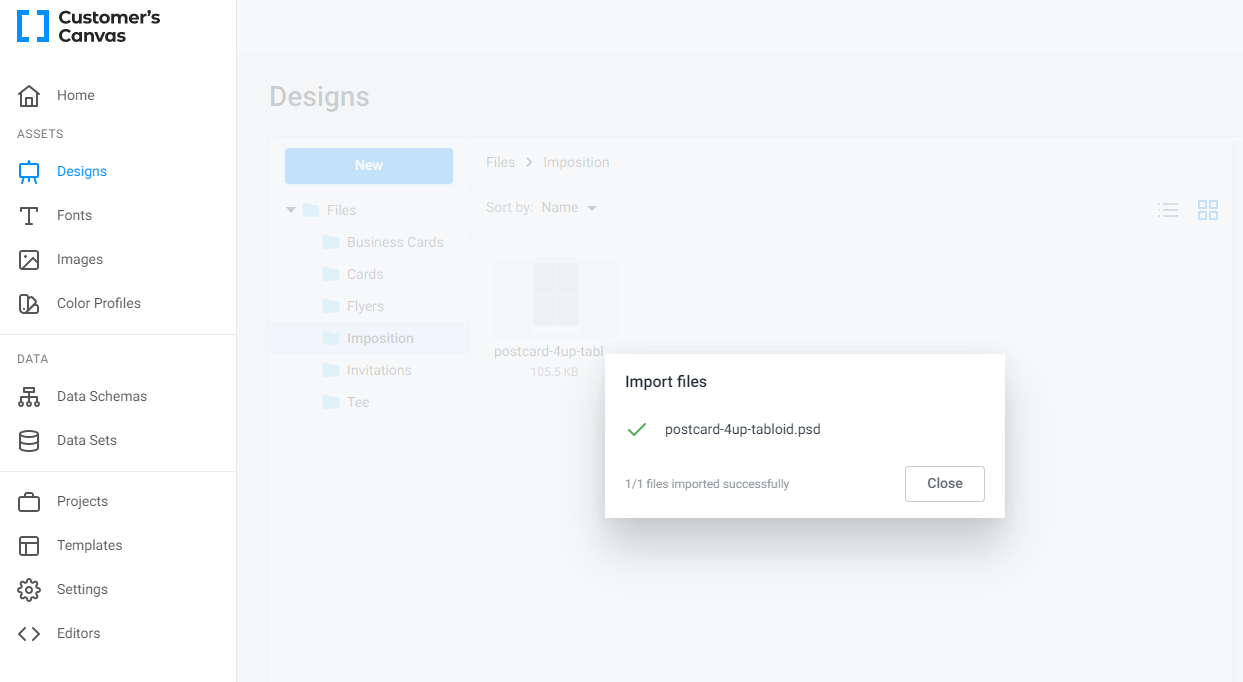
- Click Designs > New > Import in the main menu. Then, select your PSD files and click Open. For details, refer to Importing from Photoshop.
Adding templates to a standalone Dynamic Image
Just copy a PSD file to a folder specified in the TemplatePath parameter of AppSettings. See the Dynamic Image Configuration article for more details.
Generate a result
Generate a print file
For simplicity, let's consider a scenario when you have a single-sided product and you need to have an imposition of a single artwork element. More complicated scenarios are considered further.
To generate a print file, we just need to prepare a proper request to the Rendering_Hires endpoint. It should like this:
POST https://<your-dynamic-image-instance>/api/rendering/hires
{
    "template": "<your-template-id-or-path>",
    "data": {
        "Sheet\\Artwork": {
            "type": "image",
            "image": "<URL-to-PDF-file>"
        }
    }
}
If you add a template through Customer's Canvas BackOffice, instead of <your-template-id-or-path> specify the ID of a PSD file (as explained in the Getting started with Dynamic Image). For a standalone Dynamic Image instance, specify a relative path to the file (relatively the TemplatePath location).
The <URL-to-PDF-file> is typically obtained from the Design Editor through finishProductDesign() JS method or ~/api/Preview/GeneratePreview endpoint. Also, it can be just a plain PDF file uploaded by a user or created manually in Adobe Illustrator. Note, it should not be the arbitrary PDF file, its size must precisely match the placeholder sizes (including the bleed zone).
This request will create a result as an imposition PDF and return you a URL to download it.
Double-sided printing
When we need to do the imposition for a double-sided product, you can just send a request twice. Just change the template (if you are using different templates for front and back page) and URL to PDF artwork.
However, Dynamic Image allows doing it in a single request through the Rendering_MultipageHires endpoint.
The request will look like this:
POST https://<your-dynamic-image-instance>/api/rendering/multipage/hires
{
    "pages": [
        {
            "template": "<your-front-page-template-id-or-path>",
            "data": {
                "Sheet\\Artwork": {
                    "type": "image",
                    "image": "<URL-to-front-side-of-artwork-PDF>"
                }
            }
        },
        {
            "template": "<your-back-page-template-id-or-path>",
            "data": {
                "Sheet\\Artwork": {
                    "type": "image",
                    "image": "<URL-to-back-side-of-artwork-PDF>"
                }
            }
        }
    ]
}
As a response, you will get an array with separate PDF files for each page.
{
   "results": [
       {
           "url": "<result-file-URL-for-front-page>"
       },
       {
           "url": "<result-file-URL-for-back-page>"
       }
   ]
}
Multiple artwork scenario
Now let's consider that you want to add different artwork files to the same imposition template. In this case, the request payload will look like this:
POST https://<your-dynamic-image-instance>/api/rendering/hires
{
    "template": "<your-template-id-or-path>",
    "data": {
        "Sheet\\Artwork 1": {
            "type": "image",
            "image": "<URL-to-artwork-PDF-1>"
        },
        "Sheet\\Artwork 2": {
            "type": "image",
            "image": "<URL-to-artwork-PDF-2>"
        },
        "Sheet\\Artwork 3": {
            "type": "image",
            "image": "<URL-to-artwork-PDF-3>"
        },
        "Sheet\\Artwork 4": {
            "type": "image",
            "image": "<URL-to-artwork-PDF-4>"
        }
    }
}
What is about a double-sided scenario? You need to decide what is more convenient to you – create a front page and back page version of a template for each your imposition scheme or make a code a little bit more complicated.
Separate front and back page templates
You may want to use this approach if you have a reasonable number of product sizes and paper sheets. Another case is when you automate creating back page templates from front pages, say, using Photoshop automation tools.
In this case, you can use the Rendering_MultipageHires endpoint as follows:
POST https://<your-dynamic-image-instance>/api/rendering/multipage/hires
{
    "pages": [
        {
            "template": "<your-front-page-template-id-or-path>",
            "data": {
                "Sheet\\Artwork 1": {
                    "type": "image",
                    "image": "<URL-to-front-side-of-artwork-PDF-1>"
                },
                "Sheet\\Artwork 2": {
                    "type": "image",
                    "image": "<URL-to-front-side-of-artwork-PDF-2>"
                },
                "Sheet\\Artwork 3": {
                    "type": "image",
                    "image": "<URL-to-front-side-of-artwork-PDF-3>"
                },
                "Sheet\\Artwork 4": {
                    "type": "image",
                    "image": "<URL-to-front-side-of-artwork-PDF-4>"
                }
            }
        },
        {
            "template": "<your-back-page-template-id-or-path>",
            "data": {
                "Sheet\\Artwork 1": {
                    "type": "image",
                    "image": "<URL-to-back-side-of-artwork-PDF-1>"
                },
                "Sheet\\Artwork 2": {
                    "type": "image",
                    "image": "<URL-to-back-side-of-artwork-PDF-2>"
                },
                "Sheet\\Artwork 3": {
                    "type": "image",
                    "image": "<URL-to-back-side-of-artwork-PDF-3>"
                },
                "Sheet\\Artwork 4": {
                    "type": "image",
                    "image": "<URL-to-back-side-of-artwork-PDF-4>"
                }
            }
        }
    ]
}
Reuse the same template for both front and back pages
You can follow this approach if you have a large number of combinations of various products and/or paper sheet sizes. You can create a single template for both front and back side, but you have to reverse the order of artwork on the back side. For example, an imposition template has three columns. The request will look like this.
POST https://<your-dynamic-image-instance>/api/rendering/multipage/hires
{
    "pages": [
        {
            "template": "<template-id-or-path>",
            "data": {
                "Sheet\\Artwork 1": {
                    "type": "image",
                    "image": "<URL-to-front-side-of-artwork-PDF-1>"
                },
                "Sheet\\Artwork 2": {
                    "type": "image",
                    "image": "<URL-to-front-side-of-artwork-PDF-2>"
                },
                "Sheet\\Artwork 3": {
                    "type": "image",
                    "image": "<URL-to-front-side-of-artwork-PDF-3>"
                },
                ...
            }
        },
        {
            "template": "<template-id-or-path>",
            "data": {
                "Sheet\\Artwork 1": {
                    "type": "image",
                    "image": "<URL-to-back-side-of-artwork-PDF-3>"
                },
                "Sheet\\Artwork 2": {
                    "type": "image",
                    "image": "<URL-to-back-side-of-artwork-PDF-2>"
                },
                "Sheet\\Artwork 3": {
                    "type": "image",
                    "image": "<URL-to-back-side-of-artwork-PDF-1>"
                },
                ...
            }
        }
    ]
}
Draw attention that on the front page artwork files are populated in a direct order (file 1 -> Artwork 1, file 2 -> Artwork 2, file 3 -> Artwork 3, etc), while on the back side each row is populated right to left (file 3 -> Artwork 1, file 2 -> Artwork 2, file 1 -> Artwork 3, etc).
More complicated imposition schemes
Of course, reverting the order of artwork items in a row is not the only imposition scheme. For example, another classic scenario is creating folder signatures - 4-page blocks like this:
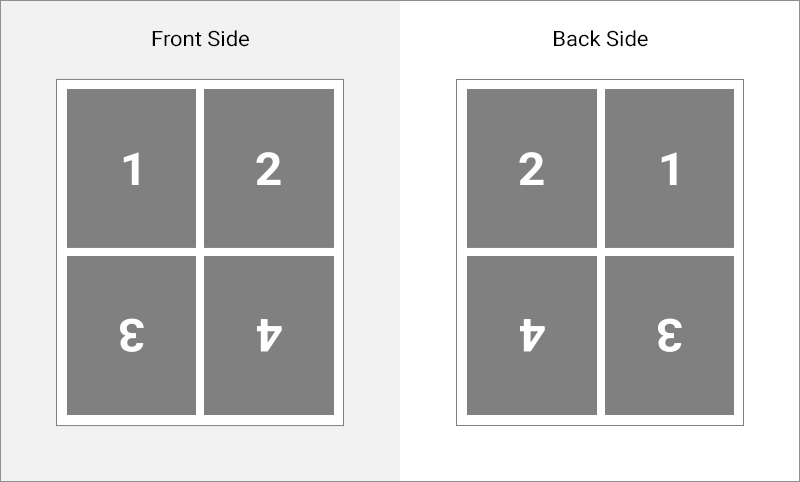
The trick here is that some artwork placeholders are rotated. How you may achieve this?
The simplest way to do it is to convert a placeholder to a Smart Object and then rotate it.
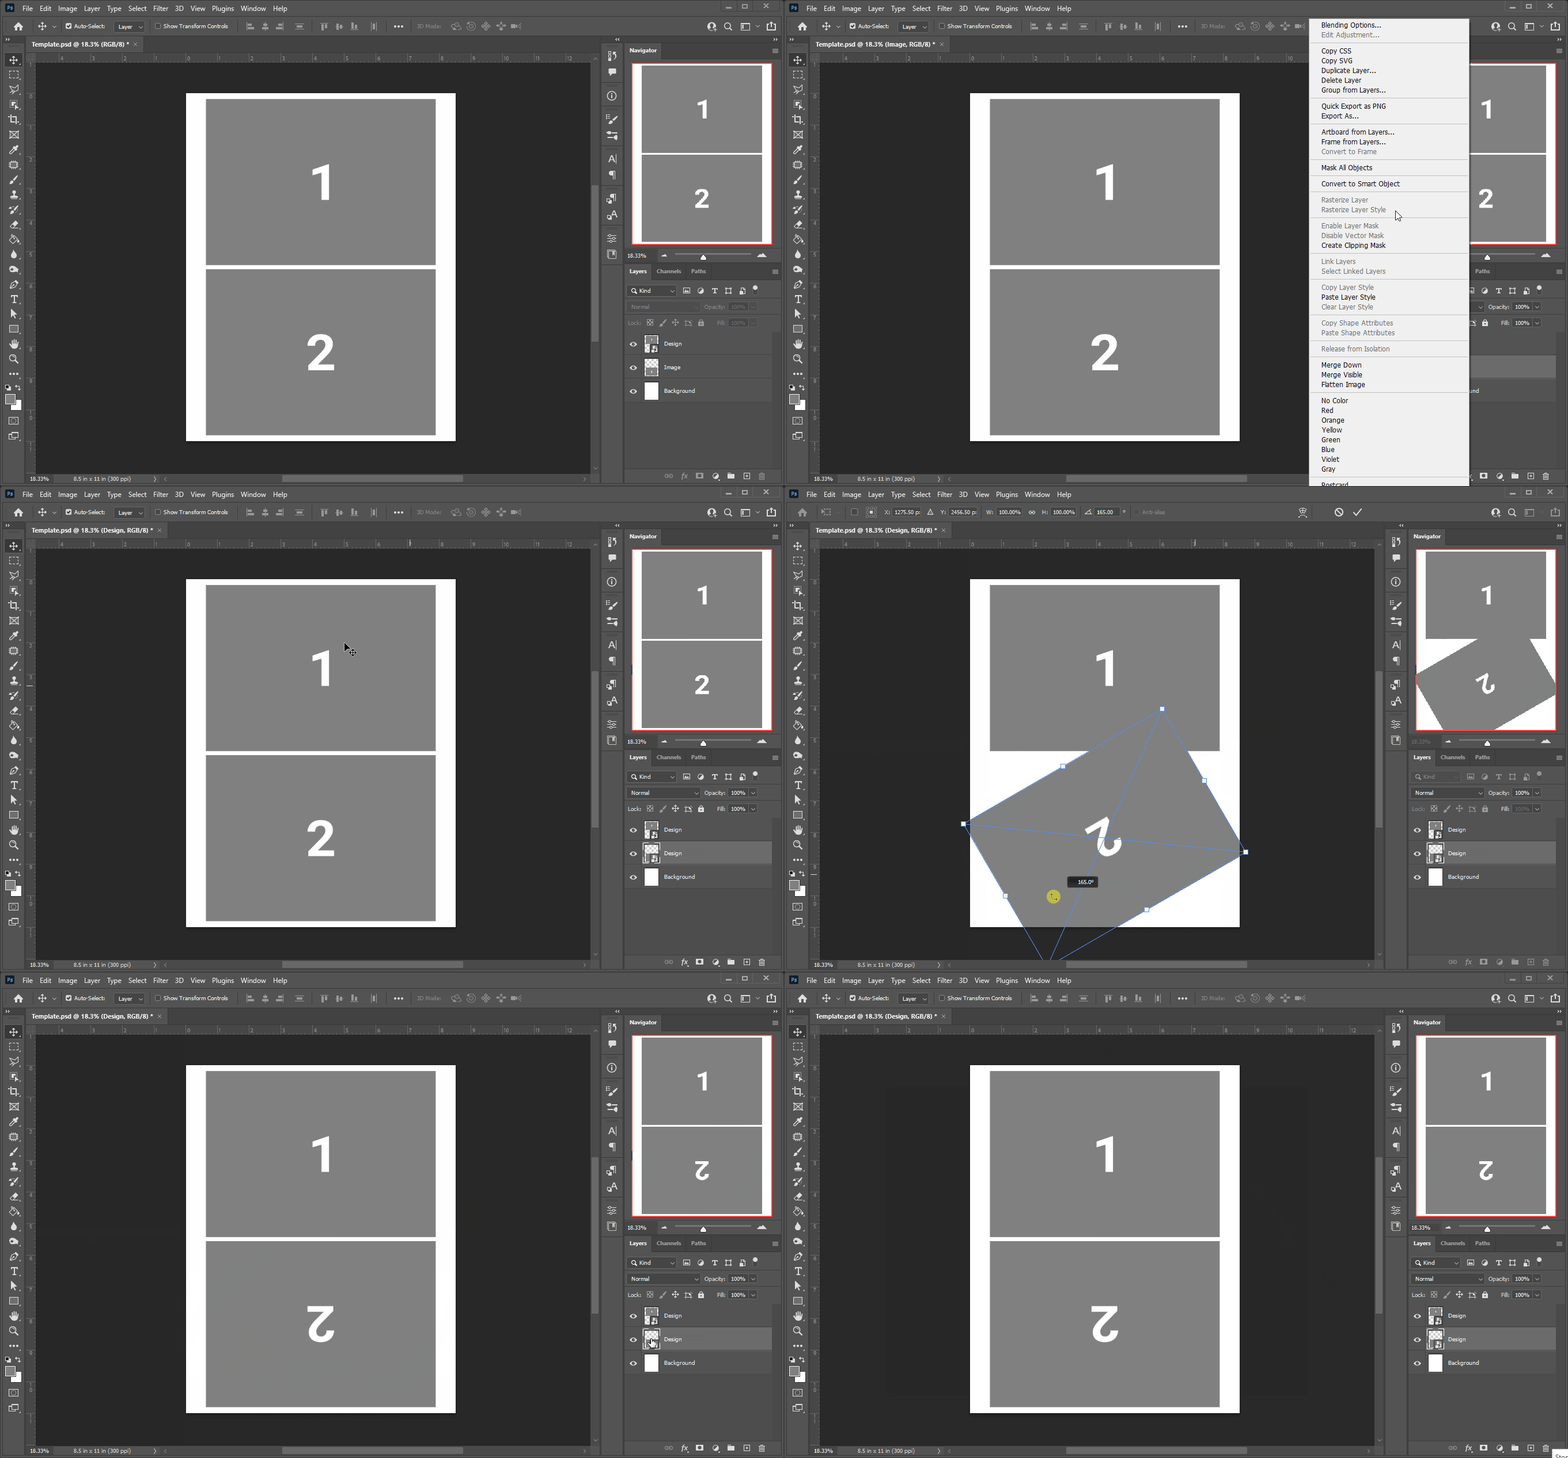
This way the content will be rotated when inserted to a placeholder.
For reference, you can download the resulting template.
However, this approach has a side effect - when an artwork is inserted to a Smart Object, Dynamic Image automatically rasterizes it. If you prefer your PDF to stay vector after being imposed, you should not use Smart Objects.
Forturnately, there is another way to solve this issue - you can send image transformation commands along with the request, like this:
POST https://<your-dynamic-image-instance>/api/rendering/hires
{
    "template": "<your-template-id-or-path>",
    "data": {
        "Sheet\\Artwork": {
            "type": "image",
            "image": "<URL-to-PDF-file>",
            "transform": {
                "rotate": 180,
                "flip": "none" // "horizontal" or "vertical" are supported as well; you may omit `"flip": "none"`
            }
        }
    }
}
This way you may configure any imposition scheme, no matter whether you need to rotate or even mirror the artwork.
Generate a preview
Generating a preview is very similar to a print file. You are sending almost the same request to the Rendering_Preview endpoint:
POST https://<your-dynamic-image-instance>/api/rendering/preview
{
    "template": "<your-preview-template-id-or-path>",
    "data": {
        "Sheet\\Artwork": {
            "type": "image",
            "image": "<URL-to-PDF-file>"
        }
    },
    "format": "jpeg"
}