This feature is available only upon request. To enable it in your account, contact our support team.
Importing products
- Last updated on July 7, 2025
- •
- 4 minutes to read
When you create many products at the same time, you may import a CSV file containing information about these products. After importing, you need to select a workflow and a pipeline, and then create a product link in each product manually.
In this article, you will learn how to create, fill, and import a CSV file to BackOffice, and then how to prepare your products manually.
Creating a workbook
To import products to BackOffice, you need to create a workbook with special column names.
Note
You may fill only the necessary cells and delete empty columns.
The following example illustrates a T-shirt product.
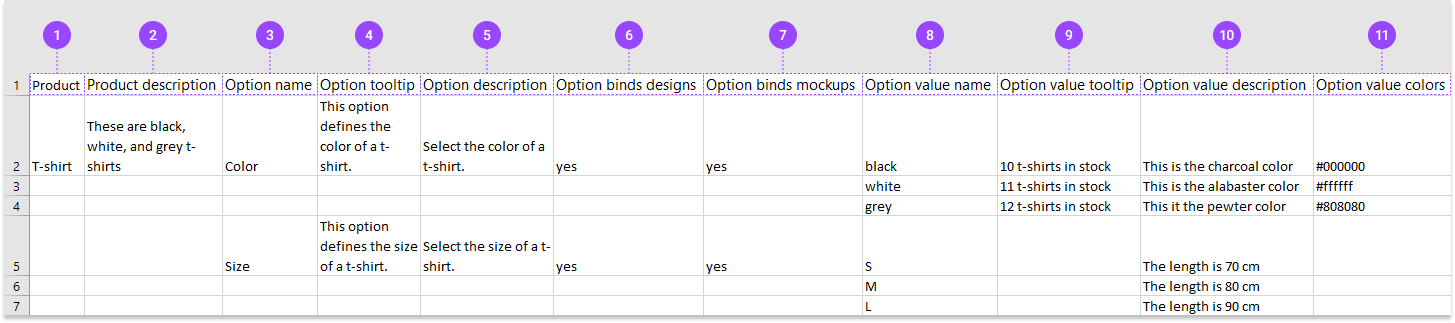
Let's consider each column in detail.
| Number | Name | Description | Type | Example |
|---|---|---|---|---|
| 1. | Product name | Mandatory. The product name in BackOffice. | string | T-shirt |
| 2. | Product description | Optional. The description of this product that is available only in BackOffice. | string | These are black, white, and gray T-shirts |
| 3. | Option name | Mandatory. The name of an option. | string | Size, Color |
| 4. | Option tooltip | Optional. The hidden text that appears when you hover the pointer over the tooltip sign (?). | string | This option defines the color of a T-shirt. |
| 5. | Option description | Optional. The description of an option. | string | Select the color of a T-shirt. |
| 6. | Option binds designs | Optional. The Boolean value that selects the checkbox in the Designs tab. | boolean | yes, no, true, false, 1, 0 |
| 7. | Option binds mockups | Optional. The Boolean value that selects the checkbox in the Mockups tab. | boolean | yes, no, true, false, 1, 0 |
| 8. | Option value name | Mandatory. The name of an option value. | string | Black, White |
| 9. | Option value tooltip | Optional. Additional text for an option value. | string | 10 T-shirts in stock |
| 10. | Option value color | Optional. The color of an option value in the HEX format. | HEX | #808080 |
To learn more about these product features, read the Creating products and Editing options articles.
To start creating your workbook, you may want to download an empty CSV file with these column headers.
Filling cells
Now, let's learn how to fill in a workbook correctly.
Product and options
Let's start to fill this workbook from the Product, Product description, Option name, Option tooltip, and Option description columns. These values must be in the same row.

Binding designs, mockups, and documents
You can select design, mockup, and document variants in the Option binds designs, Option binds mockups, and Option binds documents columns in this workbook. To learn more about selecting assets, read the Connecting assets to products article.
These values must be in the same row as an option name.

Option values
The first option value name must be in the same row as option name. Then, enter option values one under another.

Option values settings
You can add a tooltip, a description, and a color to each option.
They correspond to each option name and must be in the same row with them.

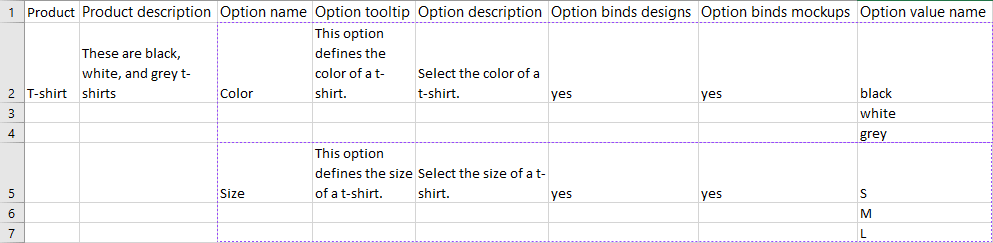
Several options in a product
You can define a new option name in the next row under the last option value.
Here, the first color option is in row 2. The option value names black, white, and gray are in rows 2, 3, and 4.
You can start a new option Size in row 5.
Several products
You can start a new product in the next row under the last option value of the product above.
Here, the lowest value of the first product is at row 7.
You can start a new product in row 8 .
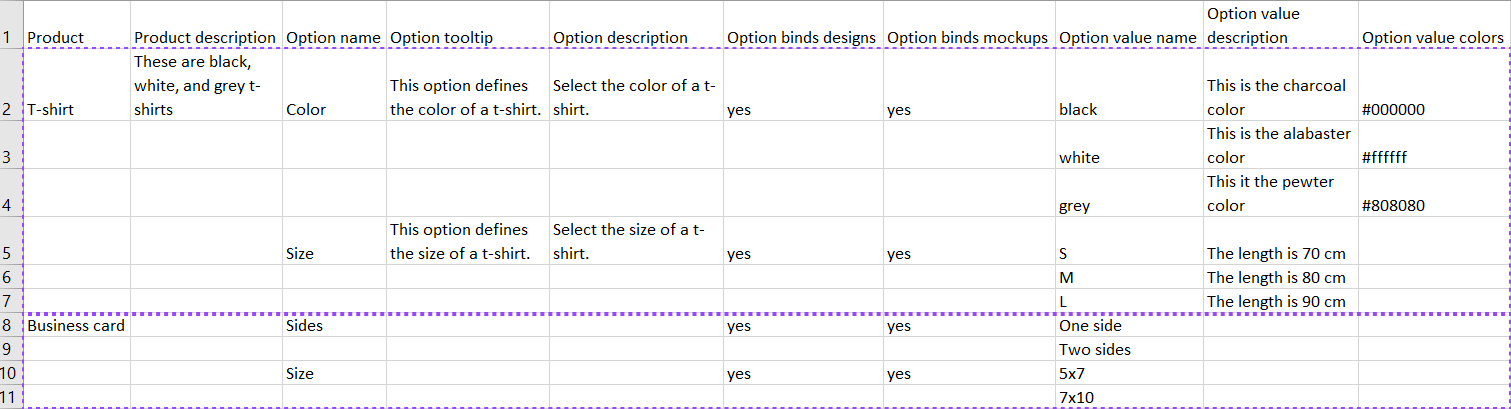
Filled workbook
Let's see the result. In this workbook, you have two products: a T-shirt and a business card.

You can download this CSV file containing the example: the workbook with the example.
Importing a workbook
To import a workbook containing your products, go to the Product and click Import.

The product is almost ready. Now you will define settings manually.
Improving a product
In this paragraph, you will continue to prepare your product manually. You need to select a workflow and a pipeline, fill SKUs, and create product links in each imported product.
Workflows and pipelines
You need to select a personalization workflow and a personalization pipeline manually. To learn how to do this, read the Creating products article.
SKU
You may enter SKUs manually. To do so, read the Product Variants article. To import SKUs from a workbook, read the Importing SKU article.
Designs, mockups, and documents
To connect assets to a product, read the Connecting assets to products article.
Product links
You need to add links to a storefronts and storefront products manually. To create them, read the Product links article.