Text
- 10 minutes to read
Customer's Canvas supports such text types as point (a string without a fixed width), bounded, and arched text. You can also use curved text (text on a path).
Customer's Canvas provides two ways for manipulating text elements. The WYSIWYG text engine, which is enabled by default, allows your users to edit text elements right on the canvas. As an alternative, the Classic text engine uses pop-up boxes for editing plain text and uses the Rich text editor for working with rich formatting.
This topic dwells on the text types and their features.
Text formatting
All the text types support rich formatting in Customer's Canvas. However, you control whether you want a user to allow adding rich text formatting or not with an appropriate behavior property. If you disable it, a user may change the text settings only for the entire text, not for the individual characters.
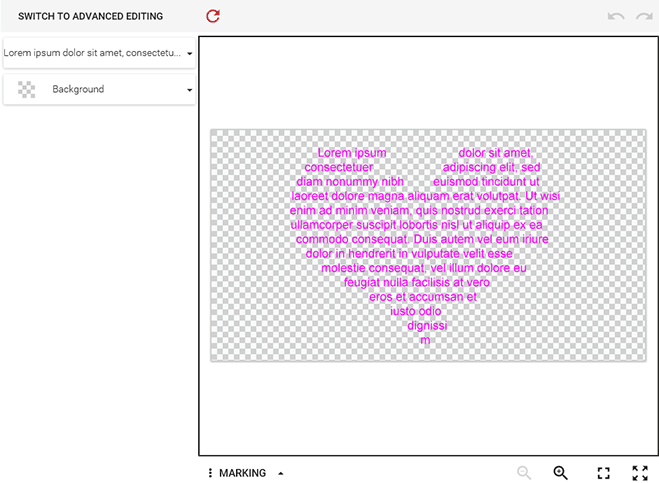
Point Text
Point text represents a text block of variable width. Point text does not support automatic text wrapping. If a user changes the text in this element, then it causes the text block width to change.
The following screenshot shows point text in the Design Editor.

Creating Point Text in Photoshop
In Adobe Photoshop, you can create point text with the Type tool.
Customer's Canvas imports point text layers from PSD templates in either plain or rich format, depending on the <TATF> marker.
Creating Point Text in Design Editor
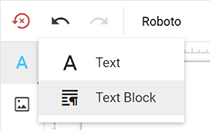
To create a point text element in the Design Editor, click Add text on the Text menu, on the Toolbox.

Note, this is the default configuration of the Toolbox, but you can configure a custom toolbox.
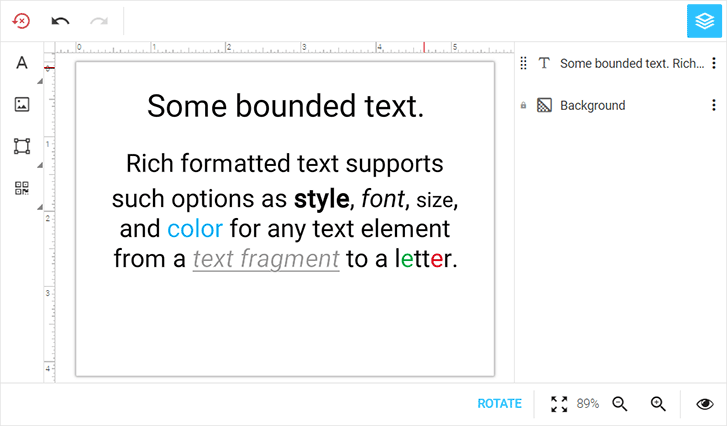
Bounded Text
In contrast to point text, bounded text takes a rectangular area and has a fixed width and height. Users can change the size of the bounding rectangle. If such a text does not fit the bounding rectangle by height, it is cropped. Bounded text may have columns and wrap around other elements or inside shapes.
The following screenshot shows bounded text in rich format in the Design Editor.
Creating Bounded Text in Photoshop
In Adobe Photoshop, you can create bounded text with the Type tool.
Customer's Canvas imports paragraph text layers from PSD templates in either plain or rich format, depending on the <TATF> marker.
Creating Bounded Text in Design Editor
To create bounded text in the Design Editor, your users can just click the Text block command on the Text menu, on the Toolbox.
Multicolumn Text
When your users add bounded text to the canvas, the one-column text appears by default. To allow them to create multicolumn text using the Classic text engine, set the createMultiColumnText property to true. You can define this configuration parameter in clientConfig.json or through IConfiguration.
The Design Editor supports multicolumn text imported from InDesign templates. In Photoshop templates, you can enable columns by using the <TCC> marker.
Vertical Alignment
From the Top Toolbar, you can vertically align both rich formatted and plain bounded text types within their bounds.

To specify vertical alignment in PSD or IDML templates, add the <TVA_xxx> marker to a text element. There are top, center, and bottom values available for this marker. For example, <TVA_top> automatically aligns text with the top bound of the layer.
<TVA_xxx> is ignored if the layer contains the <TCC> marker defining a column count or the <PBT> marker getting the text wrapped inside a shape. If any of these markers are used in a paragraph layer name, the text string is aligned with the upper bound and the alignment cannot be changed. The default value is top; it is used if a layer name does not contain <TVA>.
Character Count
For rich formatted text, unlike point and plain bounded text, you cannot limit the number of lines. Instead, the Design Editor allows for limiting a maximum number of characters that users can enter in the Rich text editor when using the Classic text engine.
The <TCL_n> marker enables this feature for rich formatted text in PSD and IDML templates, where n is a maximum possible number of characters allowed in the corresponding element. For example, <TCL_200> allows users to enter up to 200 characters. It will not accept any new characters if the user reaches the limit.
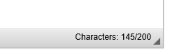
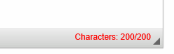
The character count turns red if a user reaches the limit.
Copyfitting
For bounded text, you can enable copyfitting. In this mode, bounded text appears in plain format, and the <TOS> marker defines how to change the text if it goes out of its bounds.
Tip
You may also use text on a curve to autofit the font size, altough this method is less flexible.
To enable this feature, you can apply the <TOS> and <TSM> markers to paragraph text layers in Photoshop and text frames in InDesign templates. The <TOS> marker defines how text appears on the canvas when it goes out of its bounding rectangle. The Design Editor can either cut such text or fit it to its bounds. The second marker resizes the font size of overflowing text.
Note
Both these markers work for paragraph text and do not affect point text.
<TOS_fitToBox> and <TOS_fitToWidth> ignore rich text formatting, despite the <RT_true> marker.
Text Overflow Strategies
TOS stands for a text overflow strategy. The Design Editor supports the following strategies:
Clip
Crops text that goes out of the text region. This is the default behavior that occurs if you have not specified a TOS for a text element. To validate that bounded text is not cropped, you can enable corresponding warnings in the user interface through the
violationWarningsSettings.textCropViolationWarningEnabledproperty.
ExpandBox
Expands the bottom bound of the original text area when the text goes out of this area. After that, if you erase the text, the bounding rectangle remains expanded.
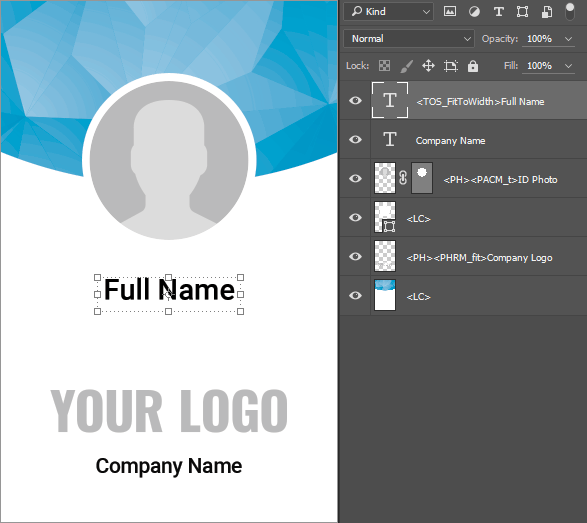
FitToWidth
Downsizes text to fit the bounding rectangle's width. The text moves to a new line only when the user presses Enter. The following image illustrates how this option looks in the editor.

FitToBox
Moves text to the next line when the end of the current line is reached, and starts to downsize the text only when the bottom of the bounding rectangle is reached.

To enable a strategy, pass it as a marker parameter to a text layer name. In the following example, Full Name is the paragraph text layer, and the <TOS_FitToWidth> marker enables the FitToWidth strategy.
Shrinking the font size
In addition to clipping, you can downsize text that goes out of its bounds by changing the font size.
To enable the shrink mode, you can use the <TSM> marker.
Arched Text
As a specific case of text on path, Customer's Canvas allows you to display text along an arch. Defining a bend of arched text, you can both place the text on a straight line and enclose it in a circle.

Creating Arched Text in Photoshop
In Adobe Photoshop, you can create a path, add text on this path, and add the <ART> and <ARTB> markers to the layer name. When Customer's Canvas imports this element, it creates an arched text element with the center point in the center of this path's bounds and calculates a bend depending on the text size. Note that such an element will appear on the canvas visually different than the layer in the PSD or IDML template.
Creating Arched Text in Design Editor
To allow your users to create arched text in the Design Editor, you need to enable the Arched text command in the Toolbox. You can do this by adding the ArchedText action to the Toolbox.buttons array in clientConfig.json.
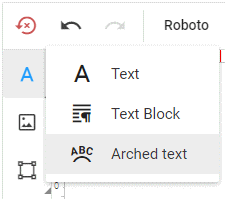
After that, you can click this command to add arched text to the canvas.
Common Text Features
Defining Text Formatting in Templates
The Design Editor loads text layers from Photoshop and text frames from InDesign as rich formatted text by default.
In PSD and IDML templates, you can enable plain formatting for a text element by using <TATF_f>. The <TATF> marker allows you to activate the following modes for text:
<TATF_t>keeps rich text formatting. The top toolbar displays buttons for changing layer properties, and when the user double-clicks a text layer and it opens the Rich Text editor or allows for changing the rich formating on the canvas, depending on the text engine enabled.<TATF_f>enables plain formatting. If there are various styles in a text element, then the first style is applied to the entire text and the rest styles are ignored. The top toolbar displays buttons for changing the layer properties and editing the text. The user can edit text on the canvas and Object Inspector in this mode.<TATF_null>applies the default mode defined in thewidgets.common.textFormattingEnabledparameter.
A Text Placeholder
Text placeholders allow you to specify a prompt that motivates users to fill in a text box. In the Design Editor they look as follows:
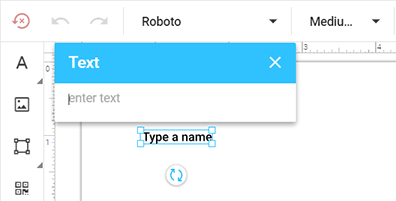
In this example, you can see that the Type a name prompt does not act as a regular text string, and the user does not have to remove it before entering their text.
You can enable a placeholder by using the <TPH> marker in either a Photoshop or InDesign template.
In the case where a user leaves the placeholder unfilled, the prompt does not appear in the hi-res output. However, you may want to indicate on proof images that the placeholder should contain a text. To enable this, set the rendering.proofImageShowStubContent property to true in clientConfig.json.
Character and Line Count
Note
In the current implementation, you can limit the user input in the Classic text engine.
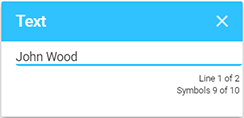
You can specify the maximum number of lines and characters per line that the user is allowed to enter into plain point text or plain bounded text. The <TMLC> marker defines the maximum line count in a text element. <TMLL> allows you to set up the maximum number of characters per line. For example, if you add the <TMLL_10><TMLC_2> markers to a layer name, you can observe the following counter in the lower-right corner of the pop-up box.
If you do not specify these markers, the user is allowed to enter as many characters and lines as they want.
OpenType Features
When you use OpenType features in your PSD and IDML templates, the Design Editor applies them to text elements. The following OpenType features are rendered by default if your font supports them:
- Contextual Ligatures (
Clig) - Cursive Positioning (
Curs) - Glyph Composition/Decomposition (
Ccmp) - Kerning (
Kern) - Localized Forms (
Locl) - Mark Positioning (
Mark) - Mark to Mark Positioning (
Mkmk) - Required Contextual Alternates (
Rclt) - Required Ligatures (
Rlig) - Standard Ligatures (
Liga)
For the full list of supported OpenType features, you can refer to the specification of the Aurigma Graphics Mill library.
Text Wrapping
Products like books, magazines, booklets, etc. may contain large text areas. Large plain texts are boring and they make catching the main idea, at first sight, difficult. So, if your users want to create eye-catching products that attract attention, they can use rich formatted text. This text type can wrap around other elements or inside shapes.
To wrap text in your products, you can just enable this feature in InDesign templates through the Text Wrap panel. In Photoshop templates, you need to apply markers to objects being wrapped.
The Design Editor provides four ways to combine images (shapes) and text areas:
Text wraps around the image's bounding box.

Text wraps around the image's shape.

Images overlay underlying text.

Text appears inside a shape.
Troubleshooting
Here is a list of the most common issues with text and guidelines on how to address them.
Font rendering artifacts in the editor
If a specific font displays visual artifacts (e.g., distorted or corrupted characters) only in the editor, while appearing correctly in proof images and print outputs. This is typically caused by rendering inconsistencies in the editor’s text engine.
Solution: Apply a shadow with zero parameters to the affected text element.