E-commerce integration
- Last updated on May 15, 2025
- •
- 19-20 minutes to read
One of the most common scenarios for using Customer's Canvas is its integration into an online store for ordering personalized products. Integration is not limited to embedding the editor on the product page. Here are some aspects that you may want to implement with this integration:
- Setting up and publishing Customer's Canvas products in the store.
- Displaying various elements of the order workflow on the store's frontend — both the editor and additional elements such as the selection of options, the approval screen, the shopping cart, etc. In some cases, you can embed Customer's Canvas components entirely, and in others, you can integrate the components into existing ones or develop them from scratch, relying on the Customer's Canvas API.
- Calculating the price if there are not enough opportunities in your system to get the price of a personalized product, for example, for products with a custom size (the price depends on the area) or when there is a complex combination of options.
- Temporary saving of personalization results until the moment of purchase.
- Processing the order and creating print files.
- Downloading the print files or transferring them to the production system.
- Completing repeat orders or re-personalization.
This article contains all the information required for integrating Customer's Canvas with an external e-commerce system. Supported e-commerce systems include Shopify, WooCommerce, nopCommerce, Magento, and BigCommerce, using our developed plugins. You can also integrate your custom systems.
Use cases
Let's learn what use cases will be covered with the integration:
- In the e-commerce system admin panel
- On the e-commerce storefront
E-commerce system admin panel
Publishing Customer's Canvas products in the customer's store
The products in Customer's Canvas are used to describe the edited product in terms of personalization. Like e-commerce, it can have options — certain properties of the product that the user can choose — for example, the material color, the artwork position, size, printing method, etc. The property can determine which mockup we use to visualize the product and which design template we use. All combinations of option values form a variant set, for example, a pen may have the following variants identified by SKU:
- "Blue" / "Design on the barrel of the pen" / "Engraving"
- "White" / "Design under the clip" / "Color printing"
Product catalog models in different e-commerce systems may have a different structure, but it is often close to how it is described in Customer's Canvas. In addition to a single product, there is also the concept of options and product variants. The description of products in the e-commerce system may be richer, for example, include options that do not affect the design and do not require the use of Customer's Canvas. So, when we want to publish a Customer's Canvas product on a product page in the e-commerce system, we need to solve two tasks: associate the Customer's Canvas product with the product page and reflect a set of SKUs from the e-commerce system to a set of SKUs in Customer's Canvas.
There are two ways to link the products:
- Save the Customer's Canvas product ID in the product database of your e-commerce system.
- Save your product ID in a Customer's Canvas product by creating a product reference.
These aspects are covered in the article Publishing Customer's Canvas products on your online store.
Saving personalization data when processing an order
Below, we will discuss how the customer creates a private design (or several designs) during the order process. Until the moment of purchase, links to these designs are stored somewhere along with information about the line items in the cart.
When the customer completes the payment, the shopping cart turns into an order in your system. As a rule, e-commerce systems can process this event through the UI or an internal event of your e-commerce system. The handler of such an event is the right place to transfer information about personalized orders to Customer's Canvas to turn the designs into print files.
To do this, you need to create a project, which is a Customer's Canvas structure that describes the order personalization data. For more details, refer to the article Working with projects.
Once a project is created or transferred to another status, its processing pipeline runs. Usually, a pipeline describes how a personalized design will be processed, for example, turning it into a PDF as well as transferring it to an order fulfillment system. More on this below.
Obtaining print files
Rendering and processing of the designs do not occur immediately. They are placed in a queue, and print files are generated asynchronously. In some cases, the process of creating such artifacts may take a long time.
If you do not need to automate the transfer of these files externally, your order fulfillment staff can simply go to the Customer's Canvas admin panel, find the corresponding project, and download the files manually. However, if you want to automatically extract these files from the system, Customer's Canvas supports two approaches to getting print files:
- You can poll the created projects (or all those with a certain status) and check if the artifacts are ready. As soon as they are ready, download them.
- You can configure the rendering pipeline to transfer files via FTP or HTTP request immediately after rendering is complete.
The first approach is described in the article Downloading artifacts for an order. Use this approach if rendering does not take a long time, and it is convenient for you to receive print files in the same order processor where you create projects.
For the second approach, examine the documentation on creating a pipeline. You may want to create an application that accepts files on your side.
Working with project statuses
Depending on your tasks, you will need to switch project statuses. This may be necessary to synchronize the order processing statuses in your order fulfillment system, or simply distinguish projects for which you have received print files from those that have not yet been processed.
Visualization of personalized orders
When you display a list of orders in your storefront admin panel, it may be convenient for you to show which orders have personalized data. This can be useful if you can order more than just personalized products in the storefront, and you have different processing procedures. In addition, the order fulfillment staff may want to view personalized designs without going to Customer's Canvas when viewing orders.
Storefront
The beginning of personalization
- Every customer using your storefront needs to be registered in your Customer's Canvas account to create private storage of personalized data. To work with the customer's private storage, you will need to generate an access token. For more details, refer to the article Launching the personalization process.
- To provide a product for personalization, you will need to find a product variant by SKU or by a reference that links to your e-commerce product. For more details, refer to the article Associating products with designs.
- To open a product for personalization, you first need to determine which editors are provided for working with this product. These can be Workflow Elements, UI Framework, Design Editor, Simple Editor, etc. The list and configuration of such tools is set in a personalization workflow. Depending on the workflow type, you can open the appropriate editor as described in the article Opening products for editing.
Saving personalization data to a cart
All editors have a certain button that stops the personalization process, like "Finish", "Add to cart", etc. For example, you can learn how to catch this event triggered by the Simple Editor in JavaScript and extract the ID of a personalized design.
Creating a personalized design in the editor is not enough in Customer's Canvas to make a purchase. It may take a long time between the moment when the buyer created the design and completed the payment, they may add more products to the order, etc. Therefore, before transferring design data to Customer's Canvas for processing, it is necessary to temporarily save links to these designs.
The organization of storing this data until the moment of purchase is entirely the responsibility of your system and its specific implementation strongly depends on its design. As a rule, e-commerce systems have the concept of a shopping cart, so that a temporary order is stored for some time for all users, including anonymous ones. Usually, each product in the cart is represented by a line item, to which arbitrary data can be added as meta fields, for example, the ID of personalized designs.
The shopping cart is displayed in a special UI element. You can replace the standard product image with a personalized preview. It is also often possible to return to editing the design. Knowing the design ID, you can call the editor again and pass it.
Pay attention to the data retention policy in Customer's Canvas. When a file is created in the editor, it is considered temporary. By default, it will be deleted after 30 days. But when you put it in a project, it will be stored for as long as the project exists. By default, projects and artifacts are never deleted.
Creating an order confirmation page
On the page displaying the personalized product, the customer must confirm the result. Also, you may want to display general information about the order, such as the selected options and price.
Calculating the price
The cost calculation is based on the price calculation rules, which allow you to take into account various data (options, tags, SKU, etc.) of the product used to calculate the final cost of the product variant.
The discount is calculated based on the discount rules, which allow you to take into account various data (options, tags, SKU, etc.) of the product used to calculate the final discount on the product.
Integration overview
To understand what it means to "integrate Customer's Canvas into an e-commerce system," let's take a look at the system context diagram for a typical web-to-print solution involving Customer's Canvas.
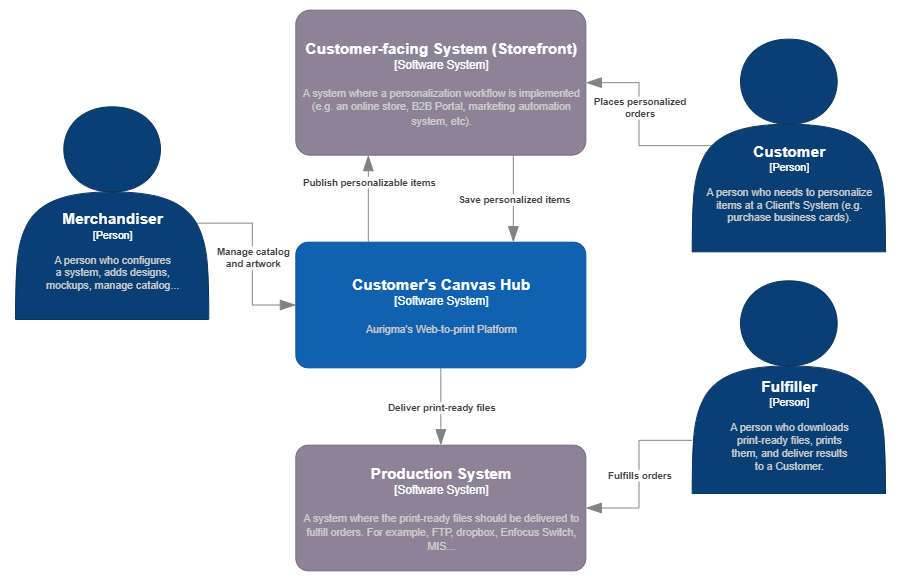
As you can find out from this diagram, it is supposed to work as follows:
- Merchandiser: A person responsible for configuring the web-to-print system sets up products, associates design templates with product variations, and publishes these products to the online store.
- Customer: A customer visits the storefront, selects a product, personalizes it (e.g., creates a modified copy of a design template), and places an order. Once the order is completed, the personalization data is sent back to Customer's Canvas to produce a print-ready file.
- Fulfiller: The print-ready file, along with the order details, is typically sent to a production system. The person responsible for order fulfillment downloads it, produces the product, and ships it to the customer.
So, in a nutshell, the integration between Customer's Canvas with an online store means building an extension to your e-commerce platform which implements the following tasks:
In the admin panel of your site (or Customer's Canvas)
- Connect Customer's Canvas product to an e-commerce system product.
On the storefront
- Start the personalization process.
- Upon completion of the personalization process, add the personalization data to the shopping cart (no rendering yet).
- When the customer proceeds to checkout and completes the order, extract personalization data from the order line items and send it over to Customer's Canvas (by creating a project).
In the production system
- Organize the process of receiving print-ready files for the production.
Customer's Canvas configuration
Your e-commerce extension should store the following Customer's Canvas related settings:
- Store API authorization data. See External apps for registration details.
- Store the storefront ID. See Creating a custom integration for setup instructions.
If you support multiple storefronts associated with the same Customer's Canvas account, create a separate integration (with a different Storefront ID) for each storefront.
Note
In the API, you may notice the tenant ID as an additional piece of data that you could potentially store in the configuration. However, this is typically unnecessary, as the API can retrieve this information from access tokens. You should only pass the tenant ID in API calls if there is a specific reason to do so.
Authentication schemes
You need to support two authentication schemes:
- Standard OAuth2 Scheme (Client Credentials Flow) for general API use. This token and authorization data must be stored securely and not exposed on the frontend. Learn more in Authentication in Customer's Canvas Hub.
- Storefront User Token Scheme for limited API access, suitable for frontend use. For more details about the API for working with Storefront User, see Registering customers.
Changes on the storefront
Typically, you need to make changes on two pages:
- Product Details Page.
- Cart Page.
On the Product Details Page, do the following:
- If the product is marked as customizable, find the appropriate Customer's Canvas product for that product page.
- Initialize and open the Personalization Workflow (i.e., an online editing tool) based on the product settings.
- Handle a special JavaScript event of the editor which is raised when the customer finishes personalization. As usual, you need to submit an item to the cart, and include a private design ID (personalization data) as a metafield of a line item. Also, it is often you navigate to the Cart Page from here.
In terms of the Cart Page, you would like to display personalized line items a bit differently:
- Display the preview images instead of the product images.
- Display the "Edit" button that brings you back to the editor.
Order completion handler
The crucial part of the integration is creating projects when the order is successfully submitted. Until you create a project, the print-ready file is not created. It is not recommended to create projects ahead; otherwise, if the customer abandons the shopping cart, the system will generate print-ready files and spend rendering credits in vain.
In most e-commerce platforms, you have to register a webhook which is triggered when the order is complete. This webhook is the right place to add the code which processes the order.
Depending on your needs, you can either create an individual project for each line item in the order or create a single multi-item project. Learn more in the article Processing personalization results.
Order fulfillment
When you create a project, it runs a so-called "rendering pipeline," similar to CI/CD pipelines which are widely used to organize build and deployment processes in software development. Likewise, you get the personalized data from the project, "build an artifact" by converting it from Customer's Canvas internal image format to a PDF or JPEG. You can additionally process it (e.g., do the imposition or merge it with some other PDF template). After that, you can "deploy" your artifact to a production system by triggering a special URL, sending it to FTP, or just through email—whatever you configure in the pipeline tasks.
If you are considering sending an HTTP request, you need to create an app which accepts such a request and delivers files and order details to the production system. You are free to define any body format - you can build a request JSON as a part of pipeline task configuration. See the invoke URL task reference for details.
Data model
Before diving into describing each task in more detail, let's understand the domain and main concepts.
Key concepts in Customer's Canvas
- Integration (Storefront): An entity describing within Customer's Canvas the external e-commerce system (such as the online store). It is registered manually at the beginning of the project, and its identifier is saved in the configuration of the e-commerce system extension.
- Storefront User: A projection of the store's customers from the external e-commerce system into Customer's Canvas. In Customer's Canvas, it is sufficient to pass only the user identifiers.
- External App: An entity storing authorization data for the e-commerce system extension. Various OAuth2 flows are supported (it is recommended to use the Client Credentials flow).
- Product, Option, OptionValue, Variant: Entities describing the product, its options, and product variations in Customer's Canvas, which are important from a personalization perspective. It is assumed that equivalent entities exist in the e-commerce system, but it is allowed that the list of variations and options may differ.
- Public Design (Design Template): An entity describing the artwork (either pre-designed or blank) which is loaded into the editor when they start personalization. It is linked to a product variation.
- Private Design (Personalization Data): A template modified by the customer — logos, texts, and other custom elements have been added to it.
- Mockup: An image of the product visualizing the personalized item applied to a product photo. Multiple mockups can be attached to one variant, for example, images of a product from different perspectives.
- Personalization Workflow: A set of frontend component settings used to organize the ordering process (for example, a design editor and a shopping cart element).
- Product Reference: An entity organizing the link between a Customer's Canvas product and a product in the external e-commerce system. It stores the product ID from that system, which should be easily obtained on the Product's page. It should remain unchanged for the same product, even if the external e-commerce system deletes and re-creates the product catalog on a regular basis.
For more details, refer to the Concepts section.

E-commerce backend
For further discussions, let's assume that your e-commerce platform supports the following entities:

They may be named differently in different systems, however, you can always find an equivalent entity in any e-commerce platform.
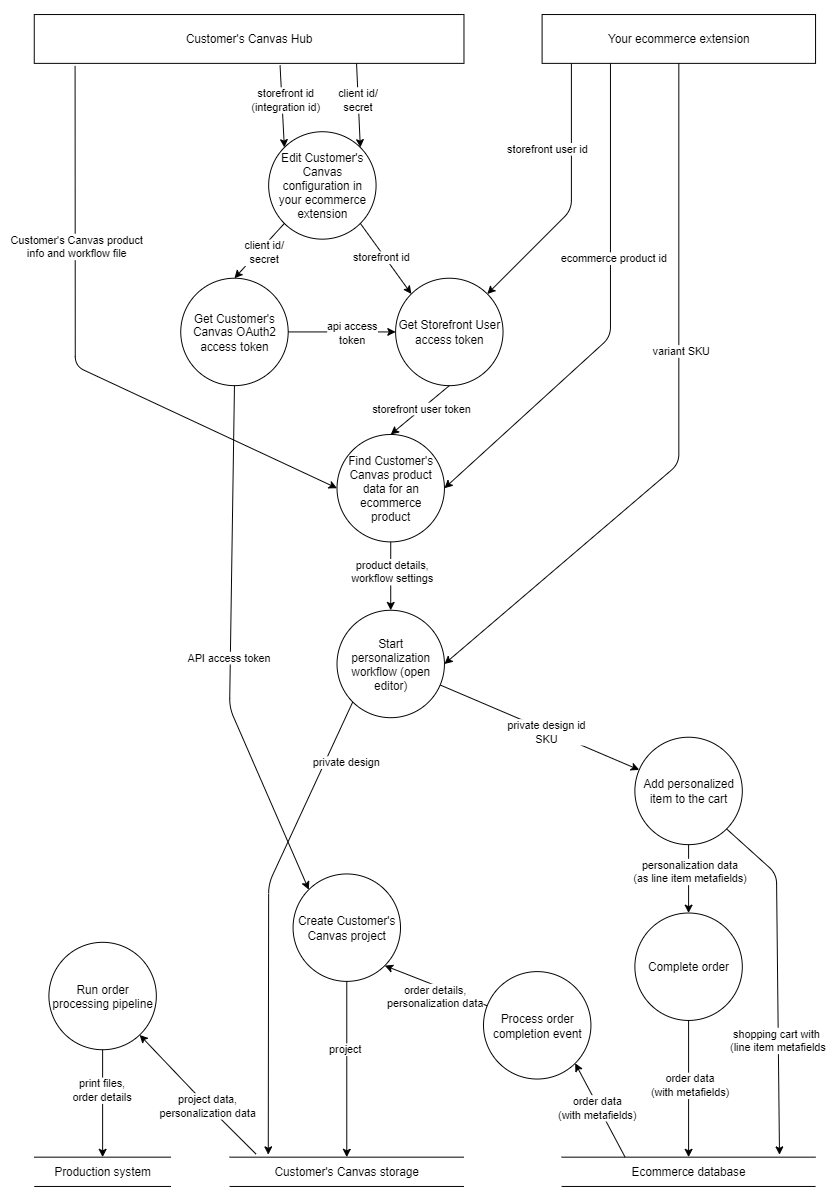
Data flow
This diagram illustrates the data flows (using DFD notation). With the help of this diagram, you may better understand how to break down the personalization process into smaller parts, where certain pieces of information should originate from and where they should go.
Detailed integration steps
Now, let's review each individual operation in more detail.
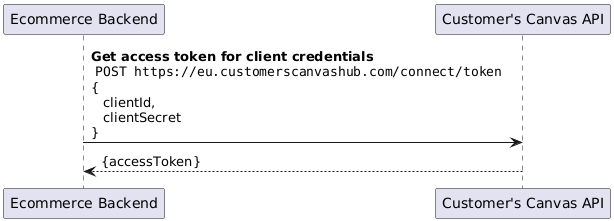
Authentication
For working with the API, you first need to request an access token, which needs to be added to every request.
- Input: Client ID and Client Secret, obtained from the e-commerce extension settings (these should be preconfigured).
- Output: Access token, which can be passed in API calls through the Authorization HTTP Header (Bearer token).
Obtaining storefront user access token
This token is necessary for accessing the API from the frontend, including personalization workflow components such as the online editing tool. You must pass this token to the editor to work with the data of a specific customer (e.g., their uploads or previously created designs). You can get it using the endpoint GET /api/storefront/v1/storefront-users/token.
- Input:
- API access token obtained from the previous procedure.
- Storefront ID obtained from the e-commerce extension configuration.
- Storefront User ID - any unique identifier of the e-commerce user. For anonymous users, you can generate a unique string.
- Output:
- Storefront User Access Token, which can be passed instead of the API Access Token and used to configure the Customizer.
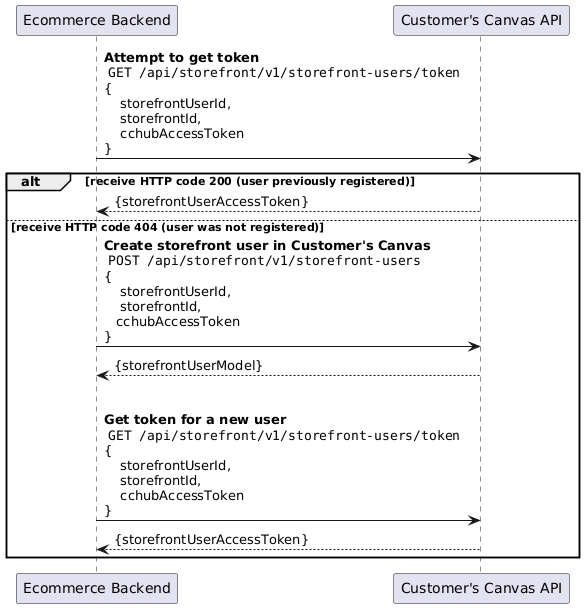
For more details about working with storefront users, see the Registering customers topic.
Preparing Customer's Canvas data for editor initialization
When opening the Product Detail Page, you need to determine if the editing tool should be loaded for the given product. It is assumed that this product is marked in a special way in your e-commerce system.
If this is the case, perform the actions below. If there are issues retrieving product information, it can be assumed that customization is not configured, and the standard user interface can be displayed. Otherwise, it will be necessary to connect the editor as described below.
Technically, it is possible to perform these actions from the frontend (except for registering the storefront user), but it is recommended to do this before rendering the page if possible.
You can get a product by your store product identifier using the endpoint GET /api/storefront/v1/product-references/{reference}. To get a personalization workflow, use the endpoint GET /api/storefront/v1/product-references/{reference}/personalization-workflow.
- Input:
- External Product ID from your e-commerce system (see data model description).
- User ID from e-commerce (or the already completed procedure for obtaining the storefront user access token).
- Storefront ID from the extension configuration.
- Output:
- Information about the Customer's Canvas product (product ID, product version ID).
- Personalization Workflow configuration.
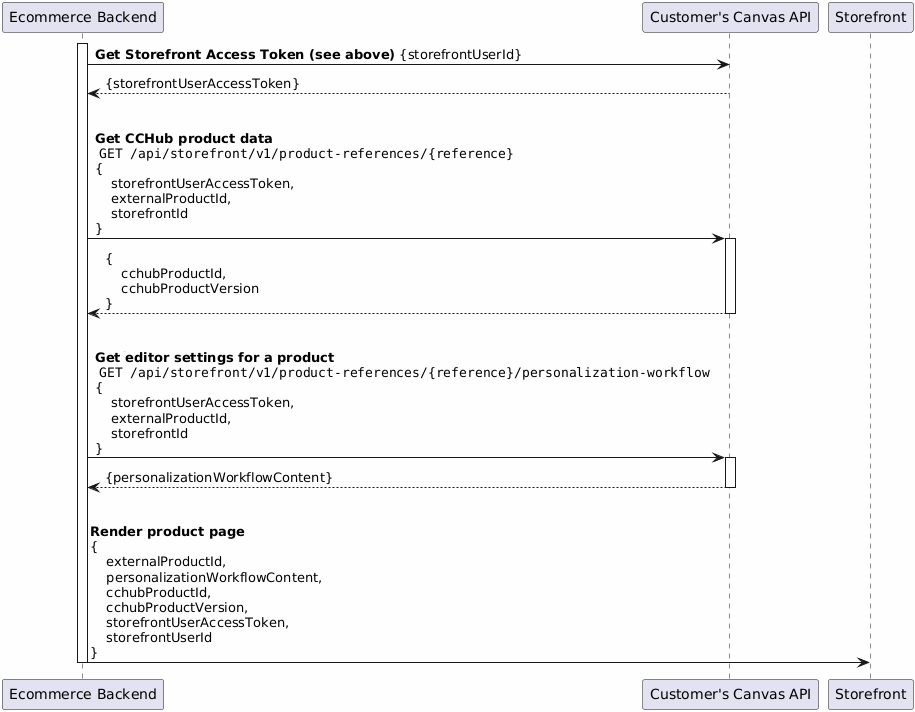
For more details, refer to the Opening products for editing topic.
Opening the editor
When creating the Product page, it is necessary to:
- Add the component to the markup.
- Replace the Add to Cart button with a Personalize button.
- Determine the current selected product variant (if there is an option selector on the product page) and its SKU.
- Add the component initialization code, passing the editor configuration, SKU, and other data obtained in the previous step.
- Depending on preferences, make the component visible by hiding other HTML elements or open it in a modal window.
As a result, when the Personalize button is clicked, the editor interface will open, allowing the user to continue working until the Continue button is pressed. This will generate a special JavaScript event that needs to be handled as described below.
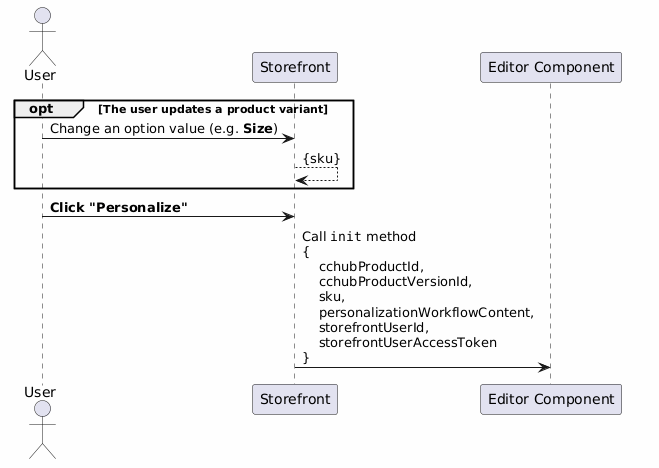
For more details, refer to the Opening products for editing topic.
Completing personalization
When the user exits the editor, the component raises an onFinish event (the name may vary depending on the specific editor component). Among the data provided in this event, the primary piece of information is the private design ID - the identifier of the personalization data based on which the order will be created.
It is necessary to combine these data with the data obtained in the previous step, as well as from the product page (e.g., quantity), and based on these data, create a Line Item in the cart. After this, the user should be redirected to the Cart page.
It is important to note that in addition to the traditional line item data stored in it (SKU, quantity, etc.), it is also necessary to store data related to Customer's Canvas. Typically, this is implemented through the ability to add arbitrary key-value pairs to cart line items (metafields). If such a mechanism is not available in your e-commerce system, it is necessary to organize the storage of these data and their association with cart line items.
The operation of creating a line item in an e-commerce system is not described in this article.
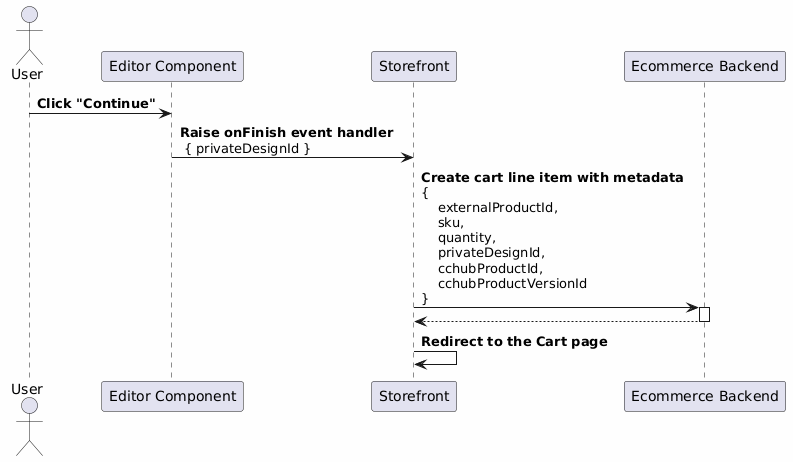
For more details, refer to the Launching the personalization process topic.
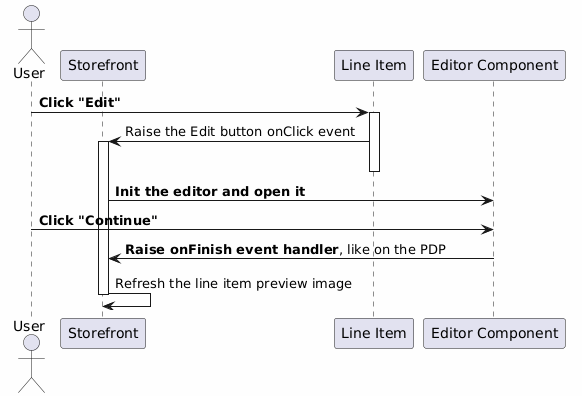
Displaying personalized line items in a cart
It is assumed that the HTML markup that displays the cart items already exists. As usual, you want to display a preview image of a personalized item and add the Edit button that brings you back to the editor.
It is supposed that you display such modifications based on the private design ID stored in the cart line items metafields.
To edit the design again, you need to open the editor again, in the same manner as you do it normally, with the only exception - instead of initializing the editor with a public design template associated with the product, you need to pass the private design ID.
After exiting the editor, the changes are saved over the same private design ID. When you get back to the cart page, you may want to refresh the design preview.
Note
Explanations of how to display a preview image of a private design through API are out of the scope of this article.
Handling completed orders
It is assumed that during the checkout process, the e-commerce system transfers all data from the cart to the Order, including the metadata of the line items. It is assumed that the e-commerce extension will add order processing, and for each line item containing Customer's Canvas metadata, a special API call will create a project.
The project will contain order data that needs to be included in the HTTP request you will send to your production system (order number, buyer's contact information, etc.), the private design ID, and other information about the purchased product.
Creating the project will start the order processing pipeline, which will prepare all the files needed by the Fulfiller.

For more details, refer to the Working with projects topic.