Creating a new design
- Last updated on March 20, 2025
- •
- 3-4 minutes to read
You don't have to use Adobe software to create designs for Customer's Canvas. In BackOffice, you can create a blank design file of the specified size and continue editing it in the Template Editor.
In this topic, you will learn how to manually specify dimensions and create a blank design based on them. To learn how to create a blank design based on a 3D mockup, refer to the Generating from mockup topic.
How to create a blank design
To start creating a design, follow these steps:
- Navigate to the Designs section in your Customer's Canvas account.
- Open a destination folder where you want to create a design.
- Click the New button in the top left corner, and then click Design file.

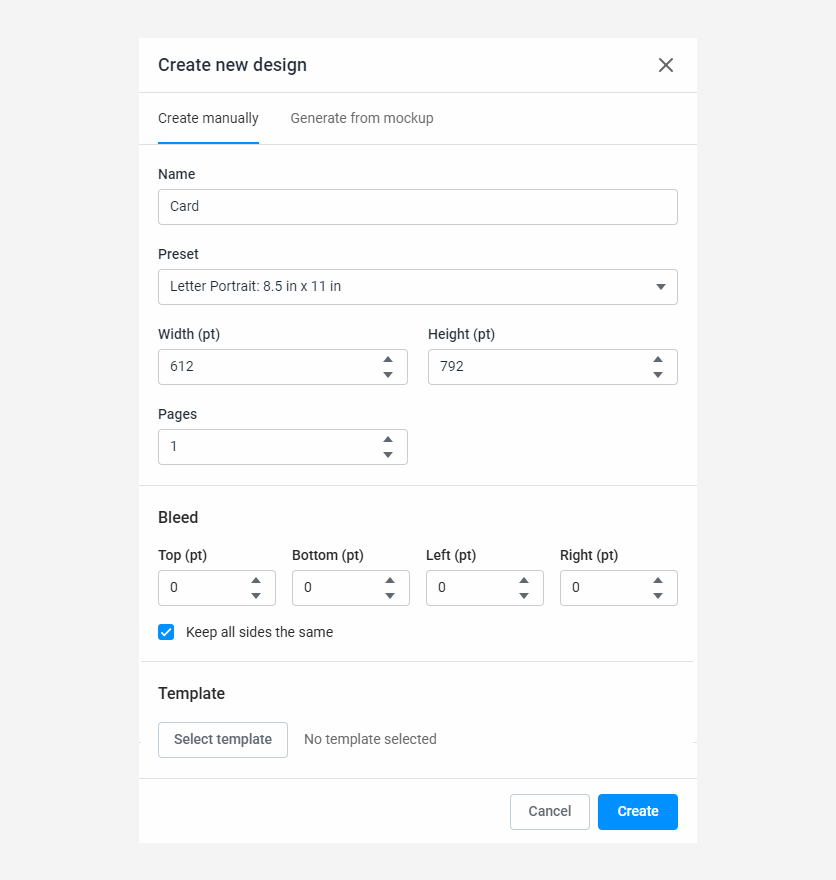
After you click this command, the following pop-up window will appear.

You can learn how to generate a design fom mockup in the following topic. Now, let's learn how you can create designs manually.
On the Create manually tab, specify the new design name, dimensions, number of pages, and the bleed zone parameters. If you are not sure what values to specify, don't worry. You can change them later after you create a design.
Note
A design file name should be unique to the current folder. If a design with this name already exists in this folder, you will see an error message warning that the file already exists.
Once you click Create new, a new blank design with the specified settings is created and automatically opened in Template Editor.
Page sizes
You can specify a custom page size by entering values in the Width and Height fields. You need to use the same units as configured in Settings > Editor > Default measure unit.
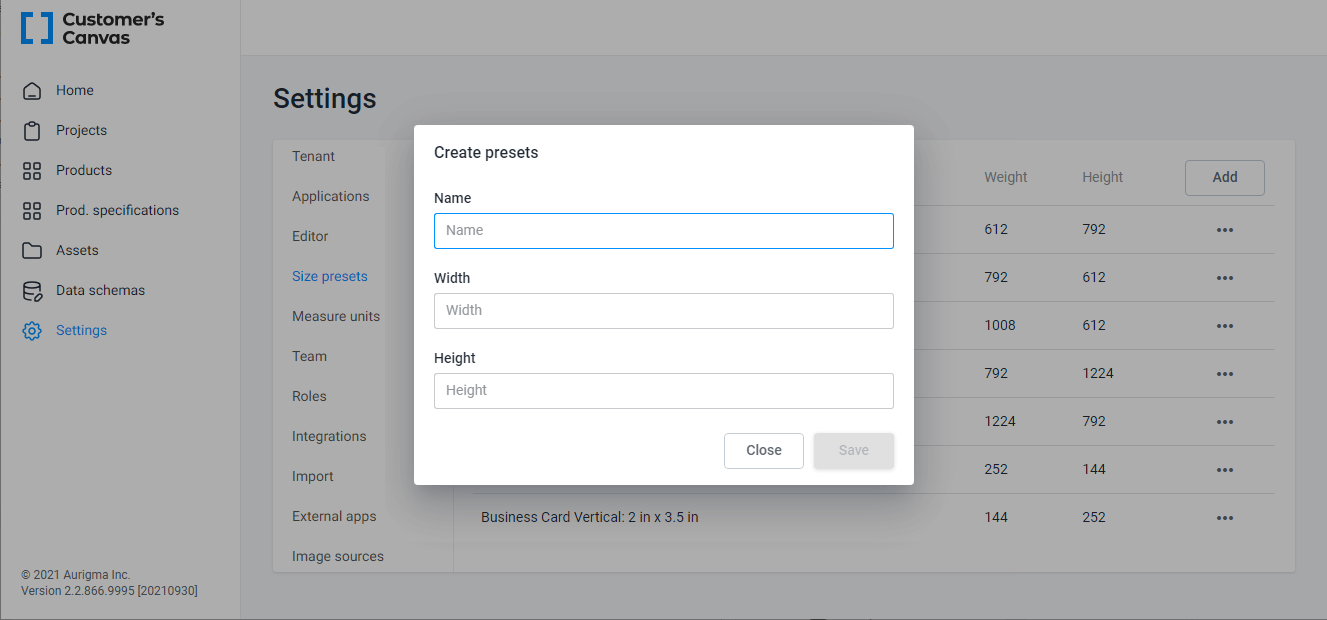
However, if you are creating many designs of the same size, you may find it annoying to enter values in the fields over and over again. Alternatively, you can use the Size presets to choose one of the predefined sizes.
By default, it contains the most popular presets, such as Business Card, Letter size, etc. However, you can edit this list in the Settings > Size presets section. To add your size, click Add, give the preset a name, and specify Width and Height (also, specify a value for the default measure unit).

Multipage designs
If you want to create a multipage document, just increase the number in the Pages field. All pages will have the same dimensions and bleed zone settings.
If you need to create pages with different dimensions, you can modify them after you create a design, as explained in the Pages section of the Template Editor Guide.
Bleed
A bleed area is added to the outside area of a product to help the print production team prevent problems when trimming a printed product. Its size depends on the product type and production technology. A typical bleed zone size for commercial printing products is 1/8 inch (9 points).
You can define four different margins for the Top, Bottom, Left, and Right, or click Keep all sides the same and define a single value. If you are not sure what value to specify, just use the default value. You can change it later.
Tip
You can learn about the bleed zone in more detail in the Pages section of the Template Editor Guide.
Template
The Template button allows you to select a design template previously saved in the Designs section of your account.
This template serves as a base for the new design. All containers are copied into the new design, retaining their settings (such as linked palettes, constraints, etc.).
Design elements from the template are transferred to the corresponding pages in the new design. If the number of pages in the new design exceeds the number of pages in the template, the last page of the template is duplicated. The transferred elements are placed at their original locations without adjusting their position or size to fit the new pages.
You can also create blank designs based on a 3D mockup.
Creating designs from scratch in the Template Editor is great for simple designs. For more complicated templates, you may prefer creating with professional graphic design software, such as Adobe InDesign or Adobe Photoshop, and importing the files into Customer's Canvas.