

Cloud Design Editor
Let's assume that you have connected Design Editor to Asset Storage in AppSettings.config. This article explains how to open Design Editor on a page and pass the assets you manage through BackOffice there.
To do this, you need to load Design Editor to a page by adding an <iframe> element and loading the application into it through the IFrame API. After that, you just pass the name/id of the required asset to the IFrame API members.
Let's walk through this process and load a design from Asset Storage to Design Editor, pass a list of fonts, and show images in an Asset Manager widget of the editor.
Adding Design Editor to the page
If you already have experience with older versions of Customer's Canvas, you may skip this section.
On the page where you want to display an editor, you need to do the following:
Load the IFrame API JS library
Among the scripts of your page, add the following line:
<!-- INSERT CUSTOMER'S CANVAS URL HERE!-->
<!-- To the base URL of your CC instance, add Resources/Generated/IframeApi.js -->
<script type="text/javascript" id="CcIframeApiScript"
    src="<DESIGN EDITOR URL>/Resources/Generated/IframeApi.js"></script>
The <DESIGN EDITOR URL> is the location of your Design Editor instance, which may look like https://my-site.com/design-editor/6.0.3.
Notice the id="CcIframeApiScript" part. Don't forget to add it to the <script> tag, otherwise the editor may fail to load.
Add the <iframe>
Add the <iframe> element, which will contain the editor on the page. For example, it may look like this:
<main class="main">
    <div class="main__section main__section-iframe">
        <div class="main__iframe">
            <iframe id="editorFrame"></iframe>
        </div>
    </div>
</main>
Most likely, you will want to add it to a modal dialog or occupy almost 100% of the screen, so feel free to adjust the CSS to achieve this, for example, like this:
.main {
    padding: 1.429rem;
}

.main__iframe {
    height: calc(100% - 8rem);
    width: 100%;
}

.main__iframe iframe {
    border: none;
    height: 100%;
    width: 0;
    min-width: 100%;
    position: relative;
}
Load the editor to the IFrame
Now, let's use the IFrame API to load Design Editor to the IFrame. To achieve this, let's use the IframeApi.loadEditor function as follows:
<script>
    document.addEventListener('DOMContentLoaded', async () => {
        const product = "..."; // Design ID - see further
        const config = {
            // ...
            // Few options will be considered further
        };

        // Customer's Canvas is loaded with this line.
        var editor = await CustomersCanvas.IframeApi.loadEditor(
            document.getElementById("editorFrame"), product, config);

    });
</script>
As you can see, we are passing three parameters here - the IFrame element itself, the product definition, and the config of the editor.
Working with designs
Loading a design from Asset Storage
Now, let's load a design created in BackOffice or imported from an InDesign or PSD file. All you need to do is pass its ID as a product definition to the loadEditor method call.
For the sake of this tutorial, we will just hardcode the design ID. You can find it by right-clicking the design thumbnail and choosing the Properties command:
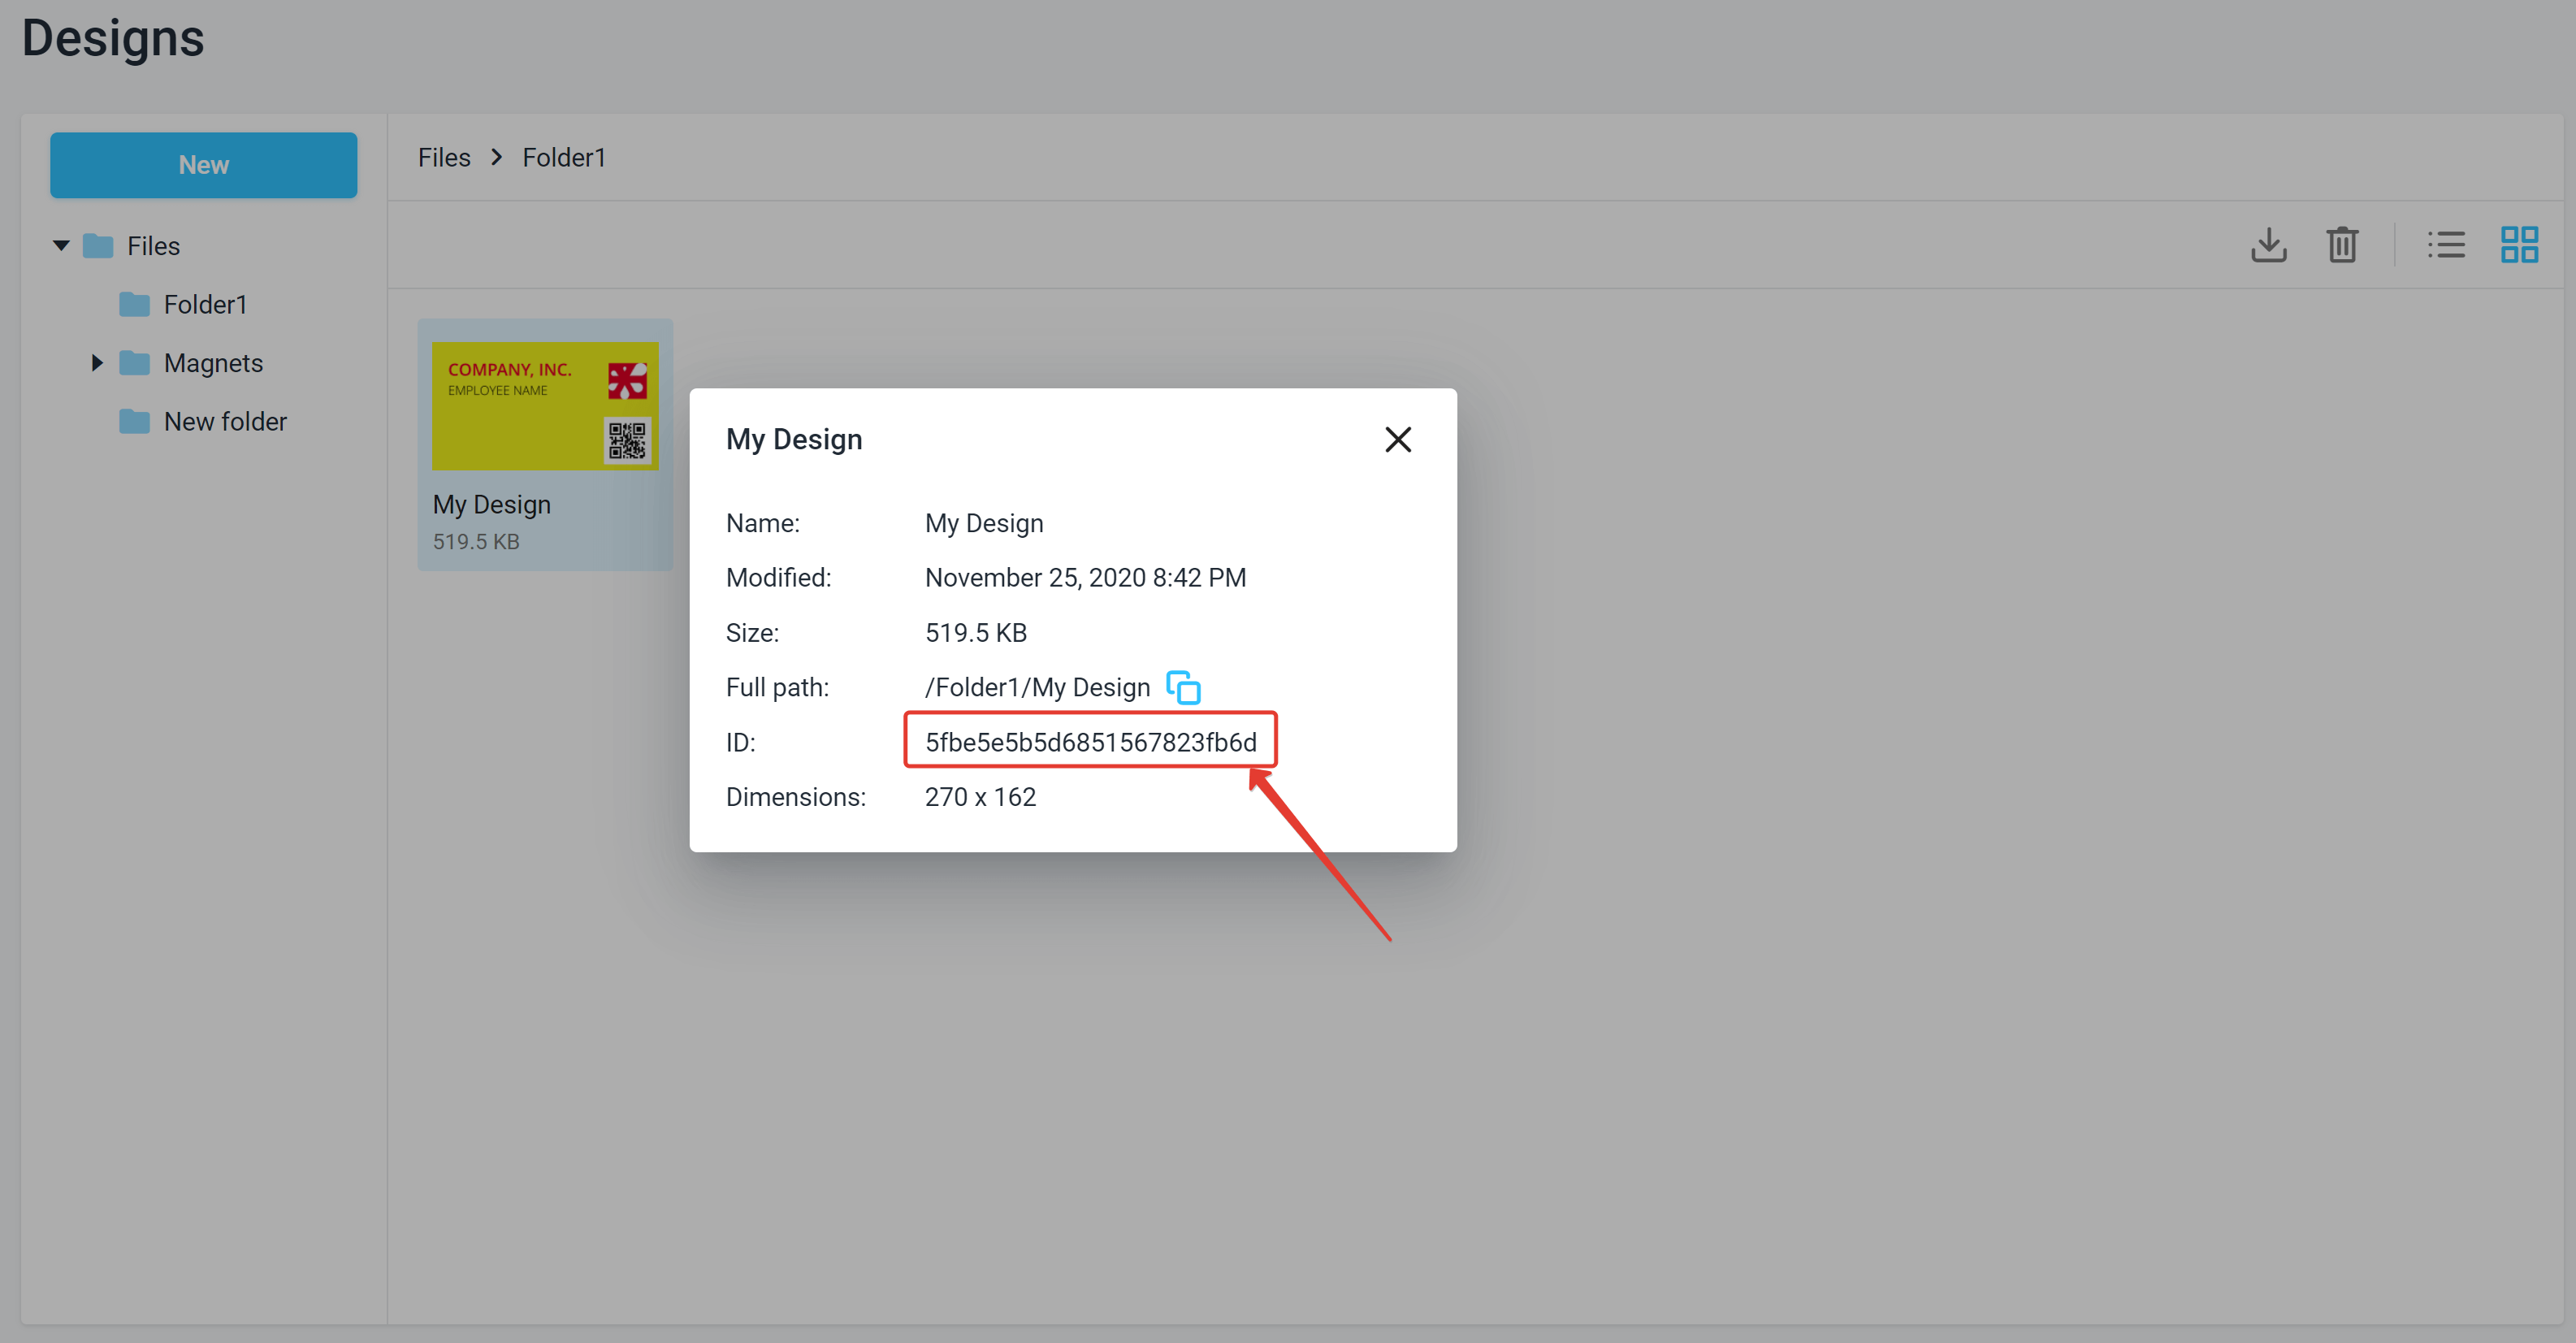
Let's modify our code:
<script>
    document.addEventListener('DOMContentLoaded', async () => {
        const product = "5fbe5e5b5d6851567823fb6d";
        const config = {
            // ...
        };

        var editor = await CustomersCanvas.IframeApi.loadEditor(
            document.getElementById("editorFrame"), product, config);

    });
</script>
In a real-life application, you most likely won't hardcode any IDs. You would rather retrieve the list of designs through the Asset Storage API endpoint GET /api/storage/v1/designs and use one of the IDs, or you may want to associate a design with some entities in your system - for example, products in an e-commerce system. You may also use BackOffice entities we have created especially for e-commerce system integration (such as Product specifications and Projects), however, this is out of the scope of this tutorial.
Saving a design
You may have noticed that the loadEditor function returns an Editor object. It allows one to do many things with a design modified by a user. In particular, you may save the user's work as a private design.
To do so, we need to specify the name of the user you are working with.
<script>
    document.addEventListener('DOMContentLoaded', async () => {
        const product = "5fbe5e5b5d6851567823fb6d";
        const config = {
            userId: "12345"
        };

        var editor = await CustomersCanvas.IframeApi.loadEditor(
            document.getElementById("editorFrame"), product, config);

        // ...
    });
</script>
Once you pass a userId, you may get the User token must be provided error. This happens when you enable the secure mode (enabled by default in Customer's Canvas 5 and above). Without this protection, it would be possible to pass any username from JavaScript code, which may allow malicious actors to steal designs or uploads made by other users.
The best way to work with users is to use the special API in Design Editor to generate a token for a specific user, and pass it as a tokenId parameter along with the userId. See the Security in Customer's Canvas section in the IFrame API for details.
For the time being, to complete this tutorial, you may just turn off the secure mode by setting the SecureModeEnabled key in AppSettings.config of the Design Editor to False. However, it is strongly recommended not to do this for the production environment!
Now, we need to use the finishProductDesign method of the Editor object to save the result. Let's add a button somewhere in HTML:
<button class="header__button" id="finish" disabled="disabled">
    Save
</button>
and add this code:
<script>
    document.addEventListener('DOMContentLoaded', async () => {
        const product = "5fbe5e5b5d6851567823fb6d";
        const config = {
            userId: "12345"
        };

        var editor = await CustomersCanvas.IframeApi.loadEditor(
            document.getElementById("editorFrame"), product, config);

        document.getElementById("finish").removeAttribute("disabled");
        document.getElementById('finish').addEventListener('click', async () => {
            let result = await editor.finishProductDesign();
            console.log("Pass to reopen the design (private design id and user id accordingly): ", result.stateId, result.userId);
            console.log("Links to print-ready files: ", result.hiResUrls);
            console.log("Links to proof images: ", result.proofImageUrls);
        });
    });
</script>
Working with private designs
As you may notice, finishProductDesign returns an object with a stateId field that holds the design ID of a new design. You can just pass it as a product definition and it will reopen the user's design (provided that it is accompanied with a proper user ID), as in the example below.
When you call finishProductDesign without parameters, it will create a new copy of a private design on each call. You may not always want to have all copies of all private design versions. To overwrite the previous design on each save, just pass it as a stateId parameter of the options object passed to finishProductDesign.
<script>
    document.addEventListener('DOMContentLoaded', async () => {
        // Let's imagine finish product design returned something like `9caeb6fc-ae91-4c66-a2c0-d6d9926ec57e`
        const product = "9caeb6fc-ae91-4c66-a2c0-d6d9926ec57e";
        const config = {
            userId: "12345"
        };

        var editor = await CustomersCanvas.IframeApi.loadEditor(
            document.getElementById("editorFrame"), product, config);

        document.getElementById("finish").removeAttribute("disabled");
        document.getElementById('finish').addEventListener('click', async () => {
            let result = await editor.finishProductDesign({
                stateId: product
            });
        });
    });
</script>
Loading fonts
Now that we know how to work with the designs, let's learn about fonts. Let's see how you can set up a list of fonts available for a user.
By default, Design Editor will show all fonts it finds in Asset Storage, but you quite often don't want to show such a large list to a user. Instead, you may want to handpick several fonts that work best with the design the user edits.
What you need is to set a list of the Postscript names of the necessary fonts to the fontList parameter of a config. You can see a Postscript name of a font in a similar way to how you did for the design ID - by right-clicking the font in the Assets browser and opening the Properties:
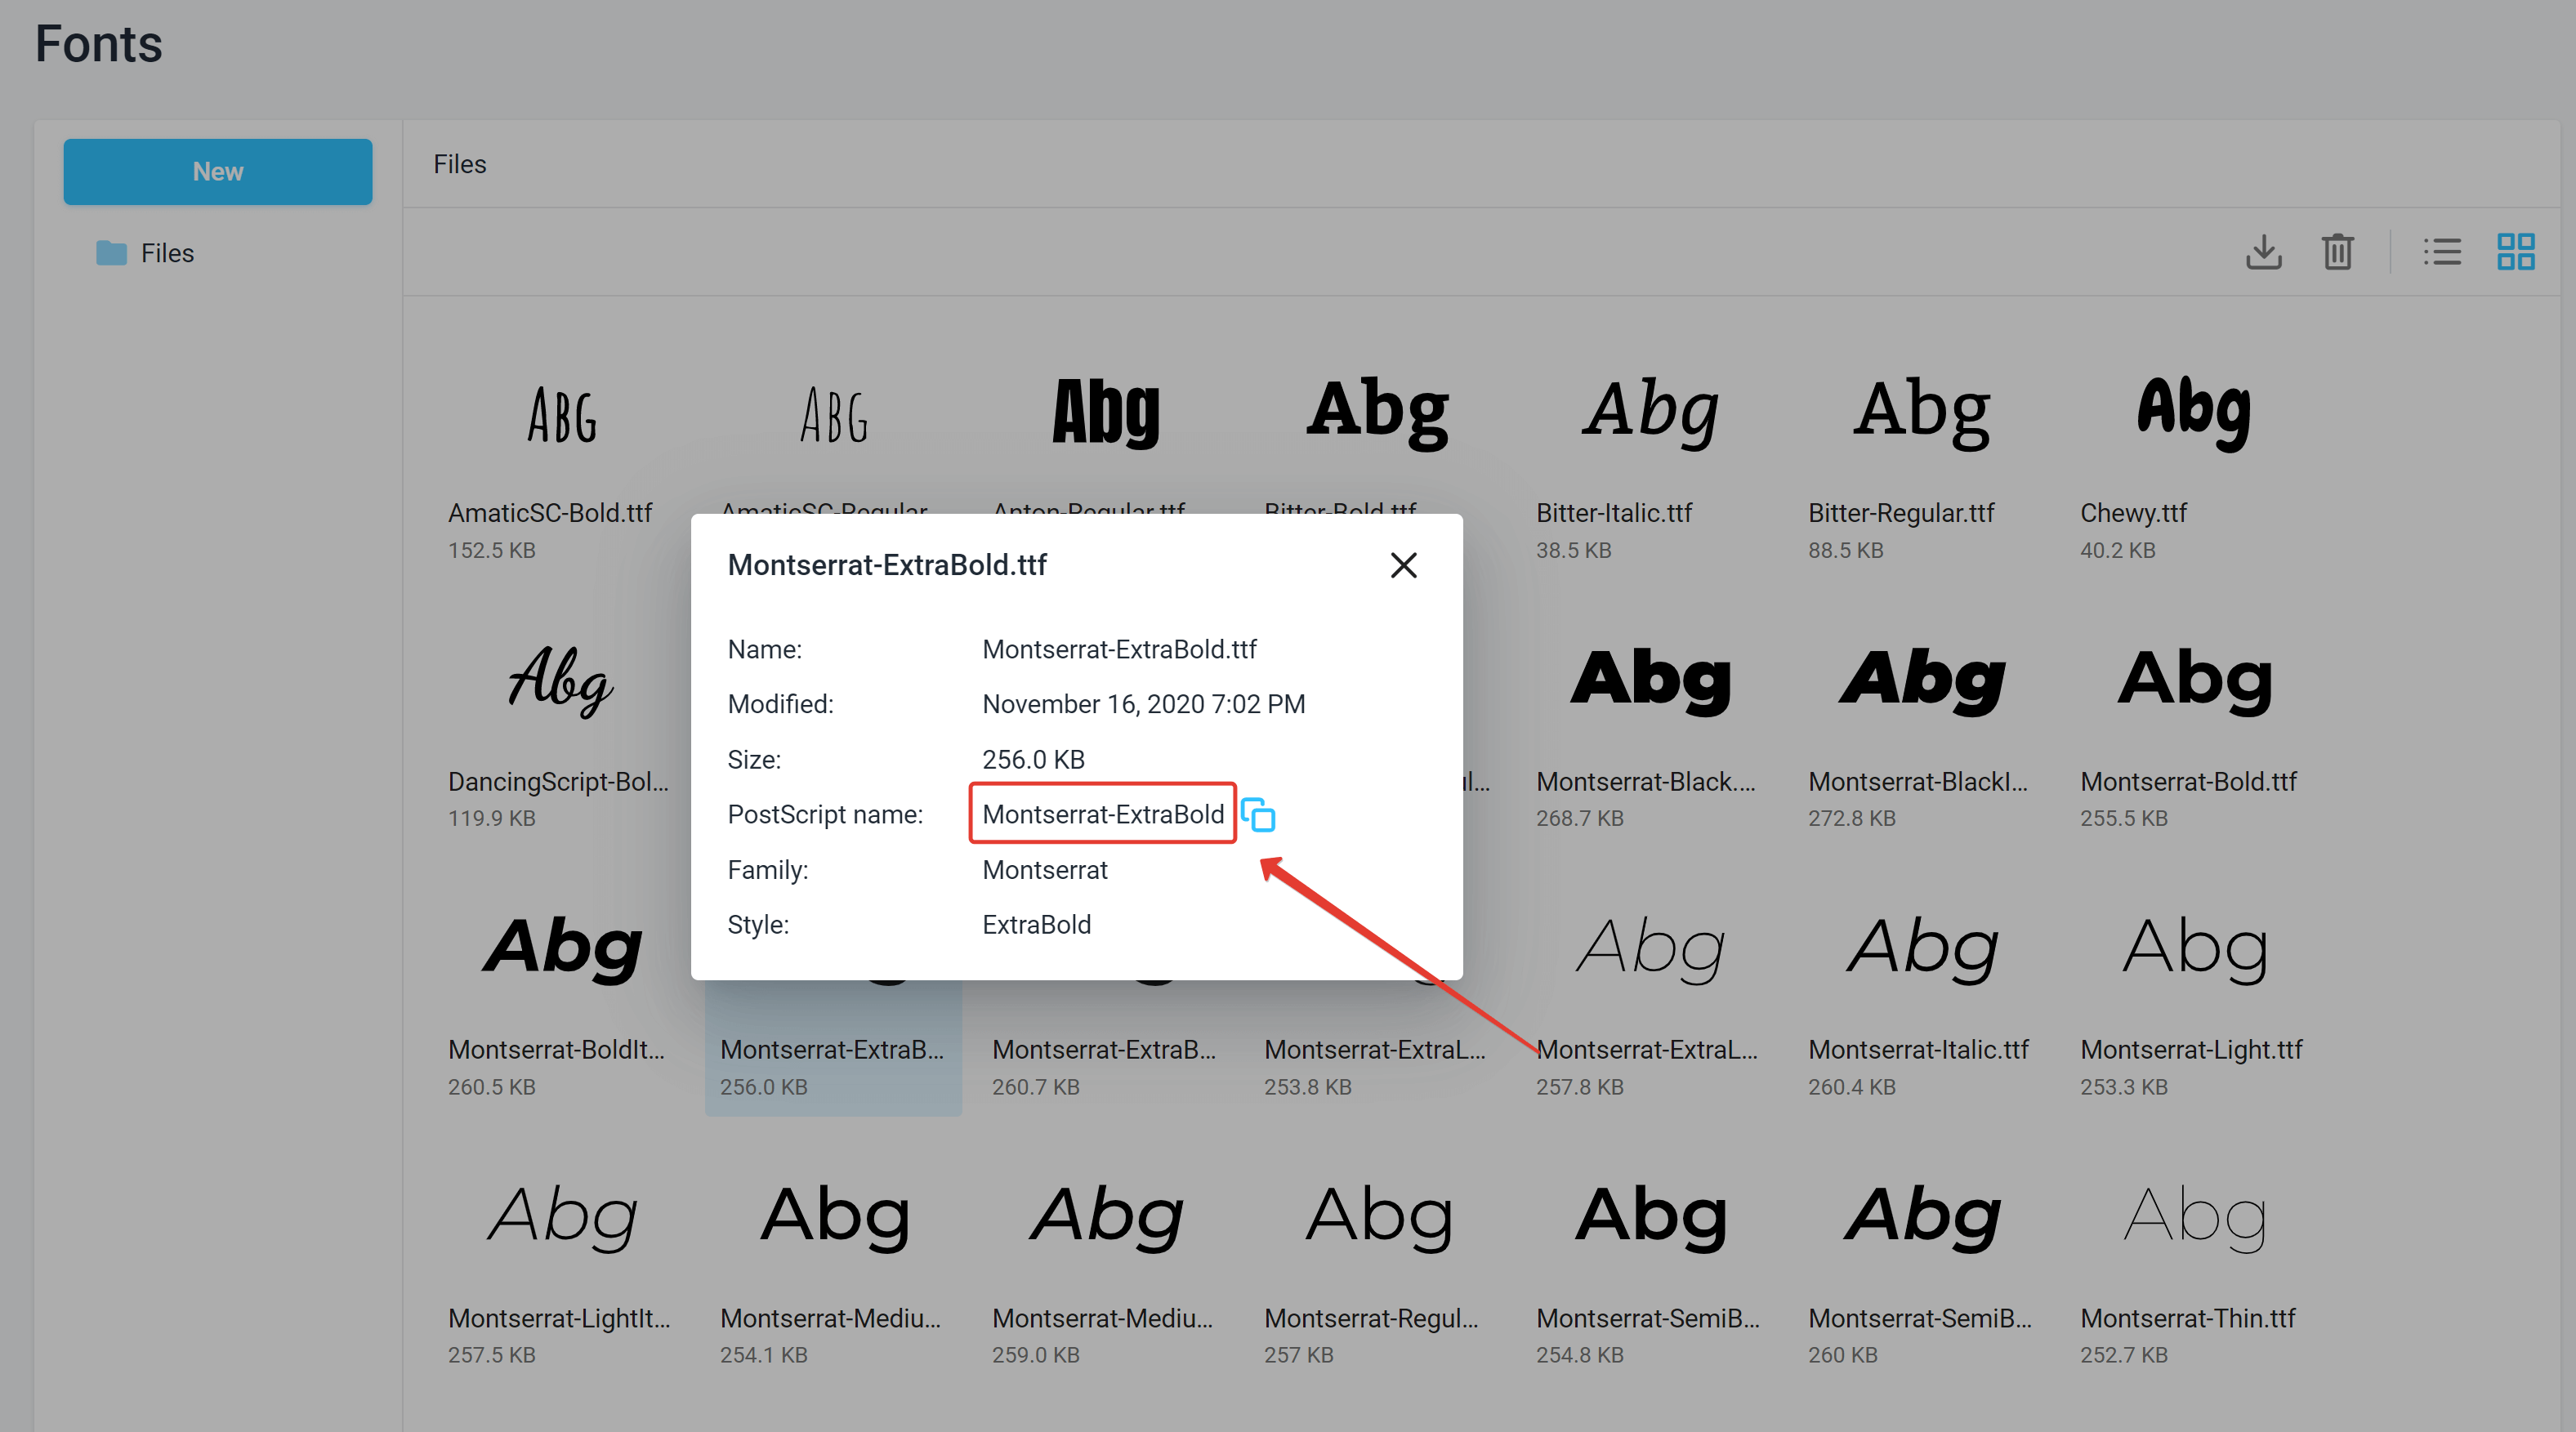
Just insert them as an array of postscript names:
<script>
    document.addEventListener('DOMContentLoaded', async () => {
        const product = "5fbe5e5b5d6851567823fb6d";
        const config = {
            initialMode: "Advanced",
            fontList: [
                "Montserrat-Regular",
                "Montserrat-Light",
                "Montserrat-ExtraBold",
                "OpenSans-Semibold",
                "OpenSans",
                "Roboto-Black"
            ]
        };

        var editor = await CustomersCanvas.IframeApi.loadEditor(
            document.getElementById("editorFrame"), product, config);

    });
</script>
In practice, you may want to keep a list of fonts with each template, like the design ID. Consider providing your content manager an interface to select a font list. You may use the Asset Storage API to retrieve available fonts.
Organizing image gallery
You may also want to provide your users with some standard clipart, branding materials (e.g. logos), and photos. The Asset Manager article in the Design Editor documentation explains all possible options of how you can use it to organize galleries, but for the purposes of this tutorial, let's just see how we can pick our images from Asset Storage.
Imagine that you are doing an editor for real estate agents and you want to provide them with the logos of the brokerage they work with. You will organize images in the Assets section into folders. There will be a Logos folder and subfolders for each of your brokerages, like this:
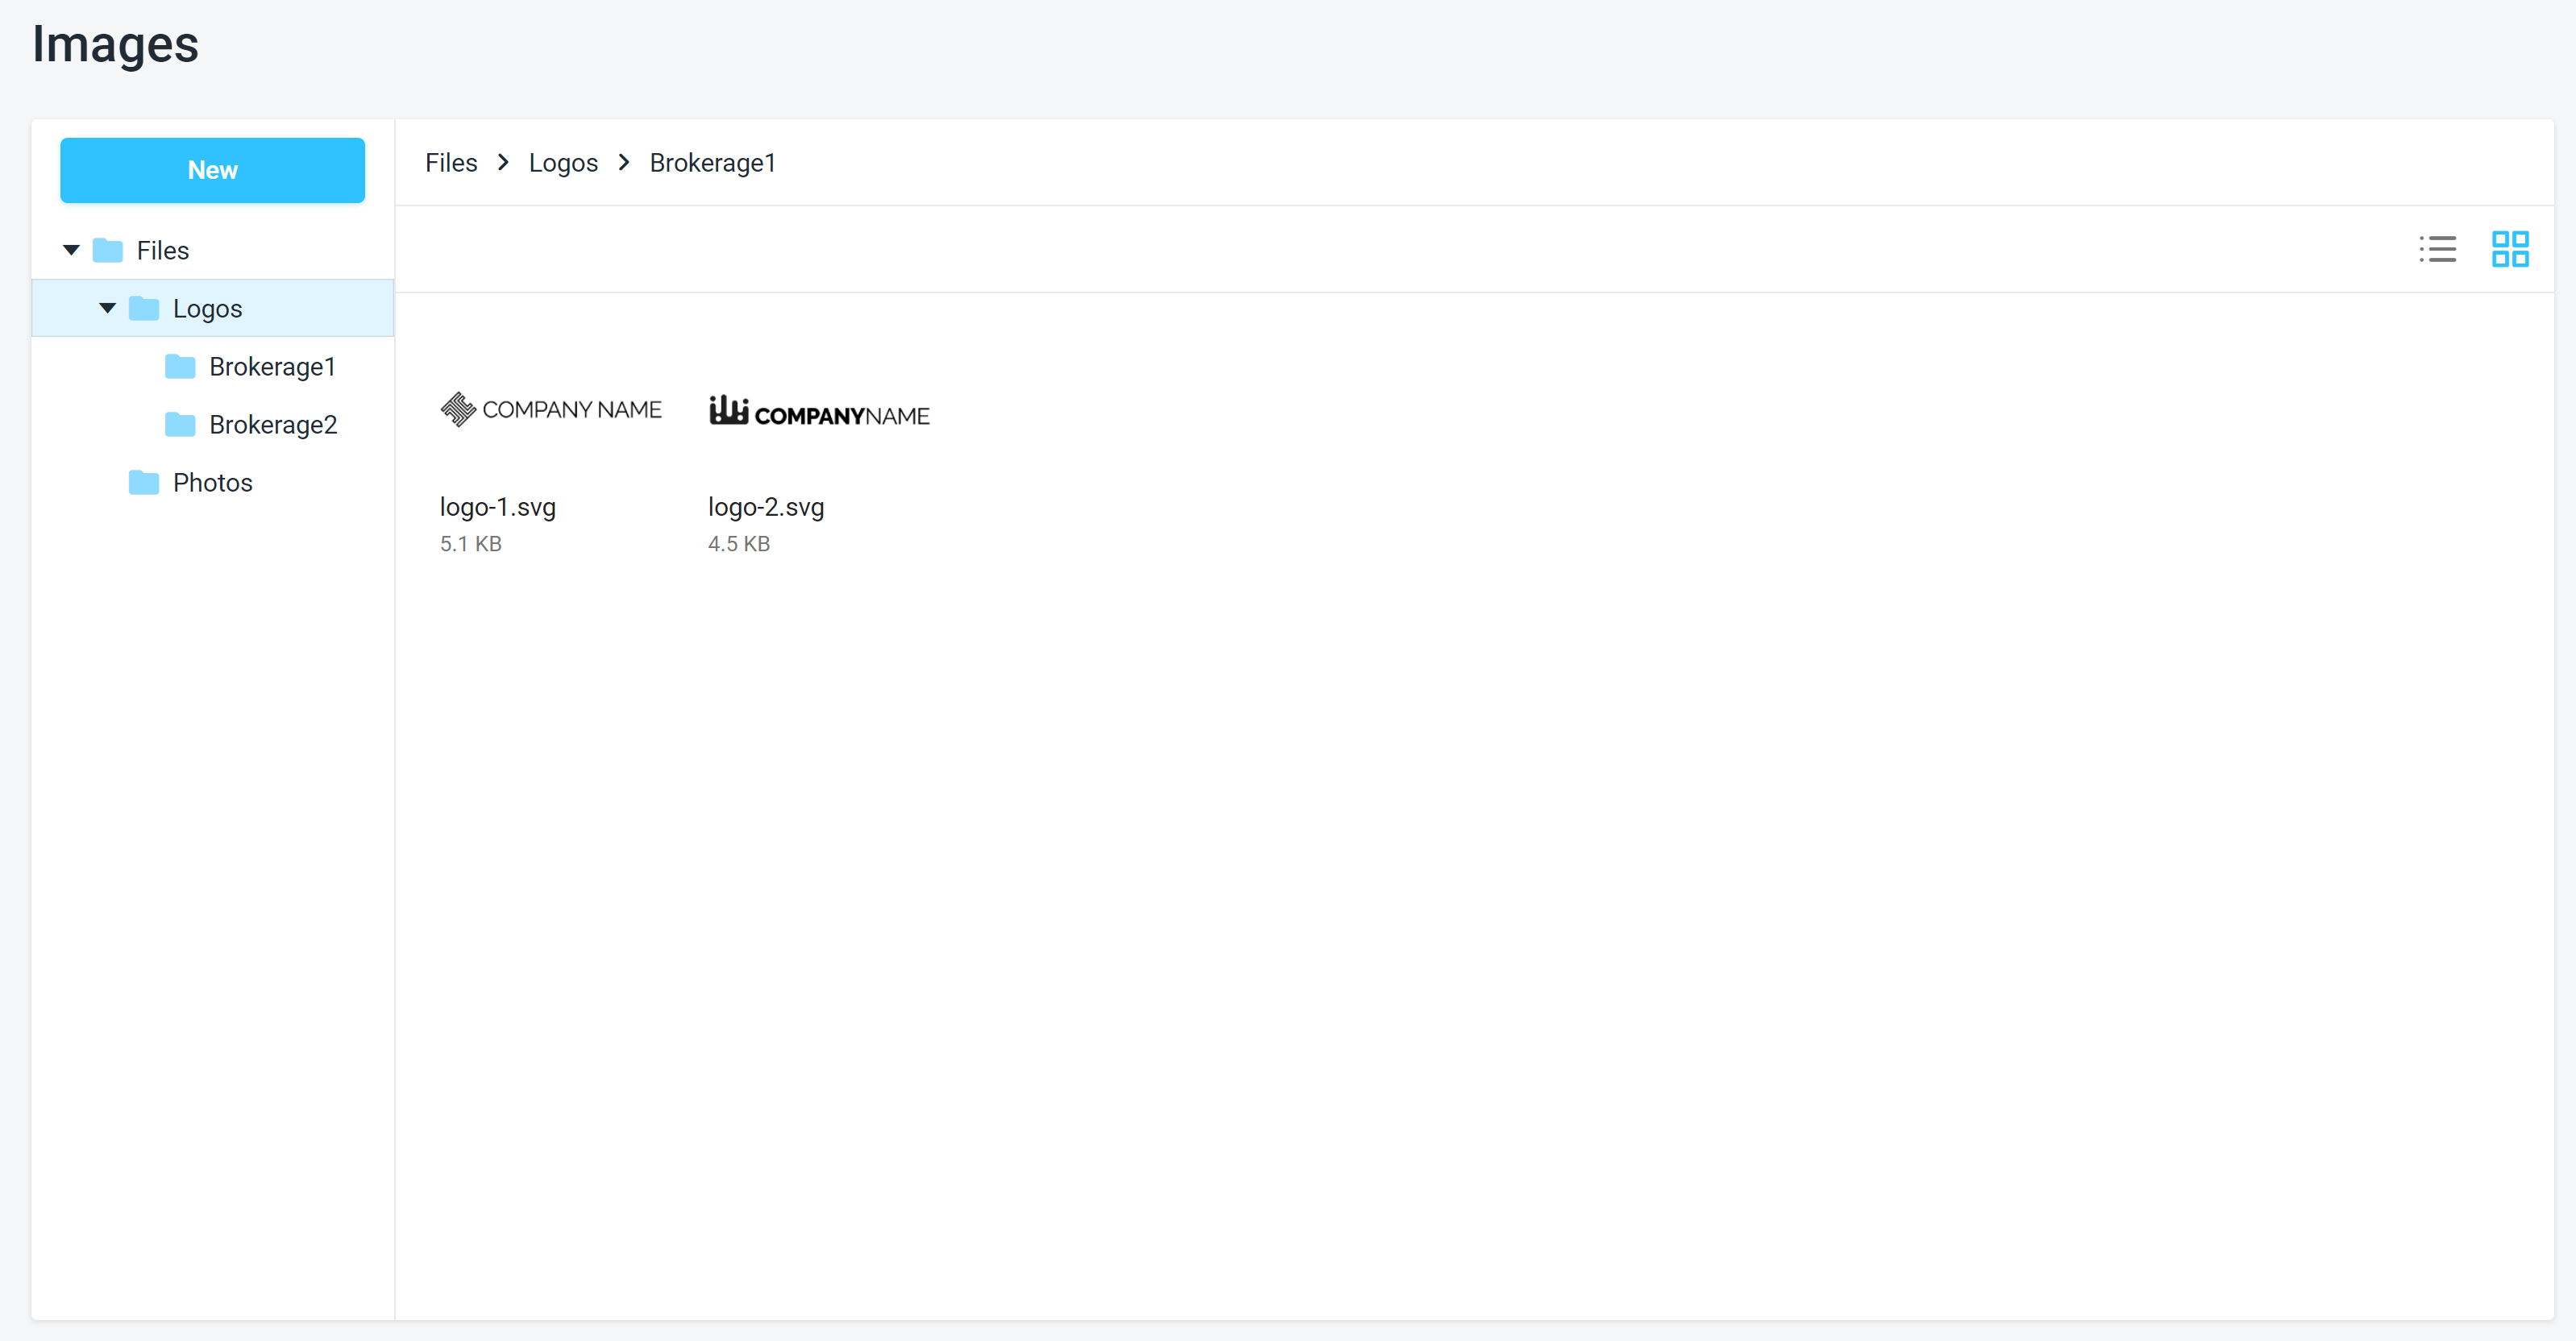
Let's set up the editor to show an Add Logo button which would allow users to choose a logo from the /Logos/Brokerage1 subfolder. To do this, you need to set up several sections in the config:
-
Initialize the image source. You need to use the PublicSource and specify the path to the folder.
noteIf you want to specify a root folder, use the
/character or an empty string. -
Configure the gallery (Asset Manager) widget - add a tab connected to the source you have just described and set up a few options.
-
Configure a toolbox button, which would show the Asset Manager and add an image to the editor.
<script>
    document.addEventListener('DOMContentLoaded', async () => {
        const product = "5fbe5e5b5d6851567823fb6d";
        const config = {
            assetSources: {
                Logos: {
                    type: "PublicSource",
                    rootCategory: {
                        name: "/Logos/Brokerage1"
                    }
                }
            },
            widgets: {
                AssetManager: {
                    tabs: [{
                        name: "Logos",
                        assetSourceInstance: "Logos",
                        controls: {
                            categoriesEnabled: false,
                            assetNameEnabled: false,
                            toolbarEnabled: false
                        }
                    }]
                },
                Toolbox: {
                    buttons: [{
                        action: "Image",
                        iconClass: "cc_icon_clipart",
                        tabs: ["Logos"]
                    }
                    ]
                }
            }
        };

        var editor = await CustomersCanvas.IframeApi.loadEditor(
            document.getElementById("editorFrame"), product, config);

    });
</script>