

Rendering issues
Stretched Text Strings in Design Editor
A text rendered in Design Editor looks blurred, unlike the same string with the same font settings in Adobe Photoshop.
Solution
Check if scaling is applied to the text:
-
Select the text layer in Photoshop.
-
Check the Info tab.
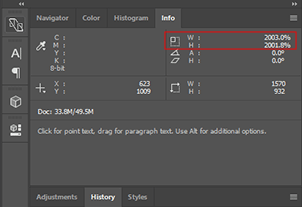
In this case, set a bigger font size instead of scaling the text.
Faded Hi-res Outputs in PDF
The hi-res output looks faded if your design contains transparent raster layers above vector layers.
Solution
Enable the rasterization of vector layers in Aurigma.DesignAtoms.config by using the PdfHiResRasterizeVectorLayers parameter.
<Aurigma.DesignAtoms>
    <add key="PdfHiResRasterizeVectorLayers" value="True" />
</Aurigma.DesignAtoms>
Colors on the Canvas Do Not Match Colors in Photoshop
You created a template, but colors on the canvas look different from colors in Photoshop.
Solution
Design Editor applies color management on the canvas as well as to the hi-res outputs. This web-to-print editor uses profiles embedded in templates as source color profiles to render graphics on the canvas. If there are no color profiles in a template, then a default profile will be used depending on the color space:
- SWOP (Coated) 20%, GCR, Medium profile for CMYK
- sRGB IEC61966-2.1 profile for RGB
- Dot Gain 30% profile for Grayscale
These profiles are also used as default destination profiles for rendering hi-res outputs when you don't specify profiles in ~/Configuration/Aurigma.DesignAtoms.config. To avoid color space conversions, you can both design your templates in Photoshop and edit them in Design Editor by using the destination color profile:
-
In Photoshop, assign a profile that is compatible with your printing equipment (click Edit > Assign profile).

-
In Design Editor, specify the same color profile in the Aurigma.DesignAtoms.config file. For example, you can specify a CMYK profile as follows:
<Aurigma.DesignAtoms><add key="CmykColorProfileFileName" value="cmykColorProfile.icc" /></Aurigma.DesignAtoms> -
If you don't need to include color profiles in hi-res output files, set the
PdfRenderDeviceProfileEnabledparameter to"True".<Aurigma.DesignAtoms><add key="PdfRenderDeviceProfileEnabled" value="True" /></Aurigma.DesignAtoms>
CMYK Colors in a Hi-res Output Do Not Match the PSD Template
You set a CMYK profile in a PSD template, but hi-res output colors look different from colors in the template.
Solution
Design Editor uses color profiles from PSD templates only as source profiles. The default color profile for the CMYK color space is SWOP (Coated), 20%, GCR, Medium. So, if you set the hiResOutputColorSpace property to CMYK but did not set your profile in ~/Configuration/Aurigma.DesignAtoms.config, then the colors may differ. To set up a color space for hi-res outputs (destination colors):
-
Specify the same CMYK profile as for PSD templates. The destination colors are set up in the **Aurigma.DesignAtoms.config **file. The following example shows how you can specify the CMYK profile.
<Aurigma.DesignAtoms><add key="CmykColorProfileFileName" value="cmykColorProfile.icc" /></Aurigma.DesignAtoms> -
Set the
hiResOutputColorSpaceproperty of the rendering configuration object toCMYK.configuration = {rendering: {hiResOutputColorSpace: "CMYK",hiResOutputFileFormat: "PDF",hiResOutputDpi: 300}};
IppStsExceededSizeError occurs
The rendering of print files results in ippStsExceededSizeError.
Solution
Enable the Anisotropic9 resize interpolation mode. In Aurigma.DesignAtoms.config, set UseAnisotropic9ResizeMode to True.
<Aurigma.DesignAtoms>
    <add key="UseAnisotropic9ResizeMode" value="True" />
</Aurigma.DesignAtoms>