- Introduction
- What's New?
- Features
- Getting Started
- Integration with E-commerce
- Integration with Remote Asset Sources
- Printable Files and Proof Images
- Configuring Products
- Creating Product Templates
- User Interface
- Configuration Files
- APIs
- Add-ons
- System Requirements
- Troubleshooting
- Upgrading the Design Editor
- Migrating Your Applications
- Breaking Changes in 5.0
- Licensing
- Copyright Notices
Amazon S3 Assets
Applies to: Customer's Canvas On-Premises; Design Editor 5.35.9, 5.x (may differ) · Archived documentation
You can use assets from your Amazon S3 account in the Design Editor. This topic describes how you can arrange S3 buckets, get access keys, and configure permissions in your AWS account.
Package
To manage the Amazon S3 API, you can use Google Drive web service. You can download this package from the My Account page. If you don't have a Customer's Canvas license, contact our support team.
Getting the Access Keys
First, navigate to the S3 service in the AWS console and create two S3 buckets: one for the assets and another for preview images to be displayed in the Asset Manager. If you don't use a bucket for previews, then they will be generated every time the user opens the Asset Manager.
To get access tokens:
- In the top toolbar, click your account name and then click My Security Credentials.
- Create a group: click Groups, click Create new group, type in a group name, click Next step, select the amazonS3FullAcess policy, click Next step again, and click Create group.
- Create a user: click Users, click Add user, type in a user name, click Programmatic access, click Next permissions, select a group created in the previous step, click Next twice, and click Create user.
If successful, you can see the user's Access key ID. To display the Secret access key, click Show.

Now, you can specify these keys in the configuration of the Google Drive web service as S3.AccessKey and S3.Secret.
When you complete configuring the web service, you can enable an Amazon S3 source in the Asset Manager and browse assets from these buckets in the Design Editor.
Defining CORS Configuration
In the bucket list, click the name of your bucket, click Permissions, and click CORS configuration.
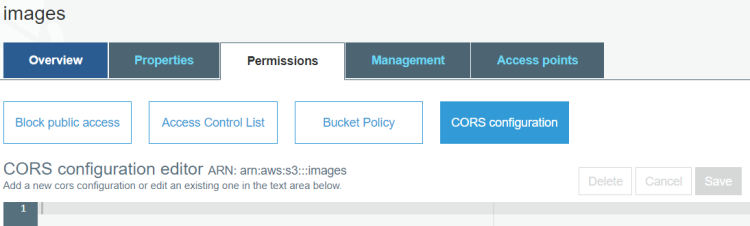
In the configuration editor, paste the following config and then click Save.
<?xml version="1.0" encoding="UTF-8"?>
<CORSConfiguration xmlns="http://s3.amazonaws.com/doc/2006-03-01/">
<CORSRule>
    <AllowedOrigin>*</AllowedOrigin>
    <AllowedMethod>PUT</AllowedMethod>
    <MaxAgeSeconds>3000</MaxAgeSeconds>
    <AllowedHeader>*</AllowedHeader>
</CORSRule>
</CORSConfiguration>