- Introduction
- What's New?
- Features
- Upgrading the Design Editor
- Breaking Changes in 6.0
- Getting Started
- Integration with E-commerce
- Integration with Remote Asset Sources
- Printable Files and Proof Images
- Configuring Products
- Creating Product Templates
- User Interface
- Simple and Advanced Web-to-Print Editor Modes
- The Asset Manager
- The Image Editor
- Editing Text Elements
- Rich Text Editor
- Customizing the User Interface
- Customizing Widgets on a Per-page Basis
- Customizing the Toolbox
- Color Picker
- Defining Names of Design Elements
- Markings
- The Preflight Check
- Localization of Customer's Canvas
- The Product Loading Screen
- UI Themes
- Watermarks
- Configuration Files
- APIs
- Add-ons
- System Requirements
- Troubleshooting
- Migrating Your Applications
- Licensing
- Copyright Notices
Watermarks
Applies to: Customer's Canvas On-Premises; Design Editor 6.15.0, 6.x (may differ) · Archived documentation
It is really disappointing when, after you have spent a lot of effort on your templates, users take screenshots or download proof images and make an order somewhere else after editing their products, instead of ordering the final product from you. For products of a small size, previews in the editor may be large enough to provide satisfactory print quality to the user.
Customer's Canvas allows you to display watermarks on both the proof images and the canvas while users are designing their products. You can specify text, an image, or both.
You can set watermarks for all products by default in the ~\Configuration\clientConfig.json file. Also, you can define them through the IConfiguration interface for a single product as the following example shows.
CustomersCanvas.IframeApi.loadEditor(
    // An iframe where the Customer's Canvas editor should be loaded.
    iframe,
    {   // The product template specified by the PSD file name (without the extension).
        surfaces: ["offer"]
    },
    {   // The watermark configuration.
        watermark: {
            text: {
                text: "watermark",
                fontSettings: {
                    postScriptName: "Roboto-Regular",
                    fauxBold: false,
                    fauxItalic: false
                },
                scale: 0.28,
                opacity: 0.5
            },
            image: {
                name: "cells.png",
                repeat: true,
                opacity: 0.1
            },
            visibility: {
                proof: true,
                canvas: true
            }
        }
    }
);
This watermark configuration results in the following editor view.
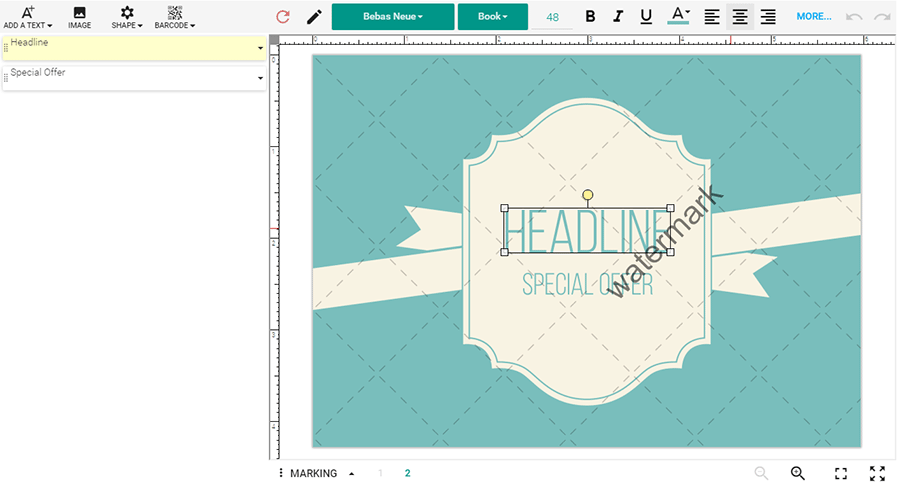
In the watermark configuration, you can set up three objects:
- visibility allows for displaying the watermarks on either the proof images, canvas, or both. By default, watermarks appear on proof images only. To change this behavior, you can set up the proof and canvas properties.
- text configures the watermark text. The text is displayed in the same place as in the previous screenshot. You can set the text to be displayed, font settings, opacity, and scale. The scale property specifies how much space the text occupies relative to the product size.
-
image configures the watermark image. Here, you can set up the file name of the image, the repeat mode, and opacity. If you set the repeat property to true, then the image is repeated on the canvas. Otherwise, it is shown in the center of the canvas. To display the image, copy it in the
~\assets\helpers\folder on your server. In the previous example, we used the following watermark image.
You can omit the text or image objects. So, you can display an image without text or text without images as a watermark.
For the default parameters of watermarks, refer to the clientConfig.json topic.
In Customer's Canvas, the canvas is measured in points, whereas watermark images are usually measured in pixels. When you add an image to the canvas, it is processed with the default 72 DPI. So, every 72 pixels of an image fit within an inch. If you find that your watermark is too big or small for your design, then you should change its DPI. For example, in Photoshop, open the image, and then click Image > Image Size. In the Image size dialog, change the Resolution value.