- Introduction
- What's New?
- Features
- Upgrading the Design Editor
- Breaking Changes in 6.0
- Getting Started
- Integration with E-commerce
- Integration with Remote Asset Sources
- Printable Files and Proof Images
- Configuring Products
- Creating Product Templates
- Creating and Editing Templates in Customer's Canvas
- Elements for Creating Designs in Customer's Canvas
- Supported Markers
- Setting Markers Outside of Templates
- Defining Marker Shortcuts
- Text Elements in Customer's Canvas
- Image Placeholders
- Specifying the Image Source Folder
- Stroke and Shadow Effects in Customer's Canvas
- In-String Placeholders and Text Validation
- Text Wrapping in Customer's Canvas
- Barcode Placeholders
- Copyfitting
- Restricting Editing Designs to Certain Regions
- Product Themes
- Product Layouts
- Group Elements in Customer's Canvas
- Photoshop Templates
- InDesign Templates
- User Interface
- Configuration Files
- APIs
- Add-ons
- System Requirements
- Troubleshooting
- Migrating Your Applications
- Licensing
- Copyright Notices
Specifying the Image Source Folder
Applies to: Customer's Canvas On-Premises; Design Editor 6.15.0, 6.x (may differ) · Archived documentation
In the In-String Placeholders and Text Validation topic, we have already discussed how to set up predefined text layers in product templates. This topic dwells on how to add image layers with pre-selected pictures, which can be chosen in the Design Editor.
For example, you can use image elements with predefined content in designs in which users can personalize, say, only a product photo. In this case, you can create a single template for all product variations. If your design requires too many images to be used as predefined options, you can organize them in a separate folder and link this folder to the image layer. When personalizing the image element, your users will be selecting images from the specified folder and Customer's Canvas will not allow them to switch to another source, including images that are supposed to be loaded from social networks. Also, this approach is useful when you change options for an image layer after the PSD template has been created.
To demonstrate this feature, let us set up the \europe_photos\ folder in the public gallery as an image source for an image layer:
- Customer's Canvas will be searching for the specified path in the public images folder. So, we will first make sure that the public folder has been set up. To perform this, open
~\Configuration\AppSettings.configand find the PublicGalleryFolder parameter. Its value should be"..\assets\images"(this is the default value); if it is not, change the value to"..\assets\images" - Make sure that the
\europe_photos\subfolder is in the~\assets\images\folder. If there is no such subfolder, then create it and place some images there. - Create the
\London\subfolder under\europe_photos\and move the defaulttower.jpgandharrods.jpgimages to it. - In Photoshop, create a new file, add an image layer, and put the
<IASF_/europe_photos/>marker into the layer name. Here,/europe_photos/is a path to the folder from which it will allow users to select content for the image layer. The path is relative to the public images folder, which we have set to~\assets\images\. - Save the template.
- Load the template into the web-to-print designer.
- Open the gallery by double-clicking the image. Note that the open file dialog displays no tabs and contains only images from the
\europe_photos\folder and its subfolder.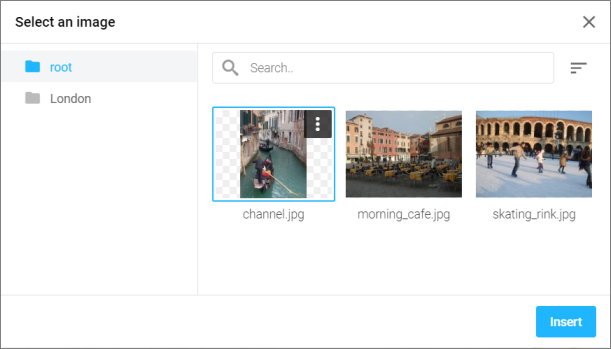
To hide this folder in the asset tab, you can prefix its name with [hidden], for example, [hidden]europe_photos. In this case, you can still specify it as the image source folder without the prefix: <IASF_/europe_photos/>.
The <IASF> marker only affects PublicSource, RemoteSource, and MemorySource. To hide other asset tabs, you can use the <AT> marker.
In Photoshop, you can embed image options into templates by using multi-value items.
For more information about configuring the Asset Manager, see The Asset Manager topic.