- Introduction
- What's New?
- Features
- Upgrading the Design Editor
- Breaking Changes in 6.0
- Getting Started
- Integration with E-commerce
- Integration with Remote Asset Sources
- Printable Files and Proof Images
- Configuring Products
- Creating Product Templates
- Creating and Editing Templates in Customer's Canvas
- Elements for Creating Designs in Customer's Canvas
- Supported Markers
- Setting Markers Outside of Templates
- Defining Marker Shortcuts
- Text Elements in Customer's Canvas
- Image Placeholders
- Specifying the Image Source Folder
- Stroke and Shadow Effects in Customer's Canvas
- In-String Placeholders and Text Validation
- Text Wrapping in Customer's Canvas
- Barcode Placeholders
- Copyfitting
- Restricting Editing Designs to Certain Regions
- Product Themes
- Product Layouts
- Group Elements in Customer's Canvas
- Photoshop Templates
- InDesign Templates
- User Interface
- Configuration Files
- APIs
- Add-ons
- System Requirements
- Troubleshooting
- Migrating Your Applications
- Licensing
- Copyright Notices
Copyfitting
Applies to: Customer's Canvas On-Premises; Design Editor 6.15.0, 6.x (may differ) · Archived documentation
When creating a template, you have to keep in mind that users may enter text of different lengths while personalizing it. If text will overflow the specified text area, the original design may be ruined. In this case, your users should either change the size of the text area or decrease the font size themselves. Also, you can limit the character number allowed for typing in this text element. In some cases, you can use text on a curve to autofit the font size.
Alternatively, Customer's Canvas provides copyfitting to keep the size of the original text area unchanged, regardless of user input.
Configuring Copyfitting in Templates
To enable this feature, you can apply the <TOS> and <TSM> markers to paragraph text layers in Photoshop and InDesign templates. The <TOS> marker defines how text appears on the canvas when it goes out of its bounding rectangle. Customer's Canvas can either cut such text or fit it to its bounds. The second marker defines how to resize the overflowing text.
Both these markers work for paragraph text and do not affect point text.
<TOS_fitToBox> and <TOS_fitToWidth> ignore rich text formatting, despite the <RT_true> marker.
Text Overflow Strategies
TOS stands for a text overflow strategy. Customer's Canvas supports the following strategies:
-
Clip
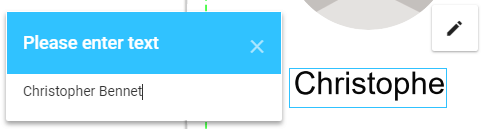
Crops text that goes out of the text region. This is the default behavior that occurs if you have not specified a TOS for a text element. To validate that bounded text is not cropped, you can enable corresponding warnings in the user interface through the violationWarningsSettings.textCropViolationWarningEnabled property.
-
ExpandBox
Expands the bottom bound of the original text area when the text goes out of this area. After that, if you erase the text, the bounding rectangle remains expanded.
-
FitToWidth
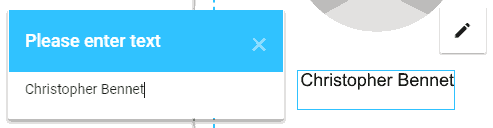
Downsizes text to fit the bounding rectangle's width. The text moves to a new line only when the user presses Enter. The following image illustrates how this option looks in the editor.
-
FitToBox
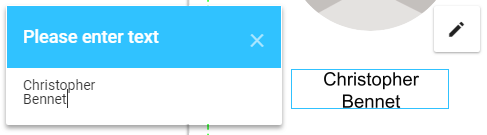
Moves text to the next line when the end of the current line is reached, and starts to downsize the text only when the bottom of the bounding rectangle is reached.
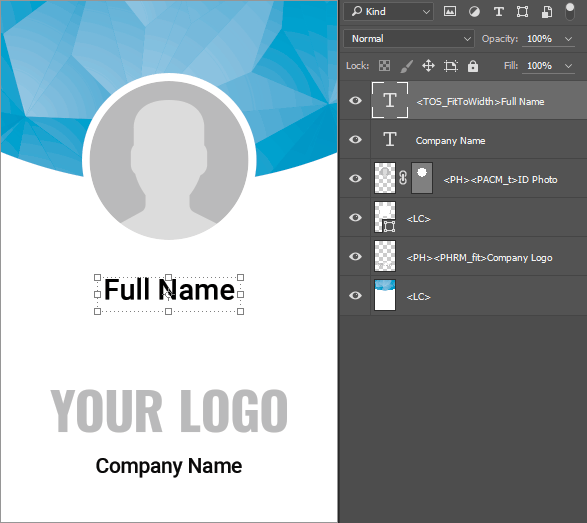
To enable a strategy, pass it as a marker parameter to a text layer name. In the following example, Full Name is the paragraph text layer, and the <TOS_FitToWidth> marker enables the FitToWidth strategy.
Shrink Modes
In addition to a strategy, you can specify in what way Customer's Canvas downsizes text that goes out of its bounds. There are two options:
-
Size
Changes the font size. This is the default shrink mode.
-
Scale
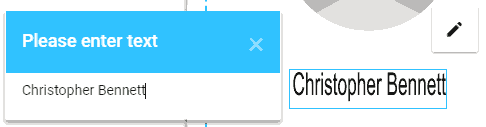
Disproportionally shrinks text in width:
or height:
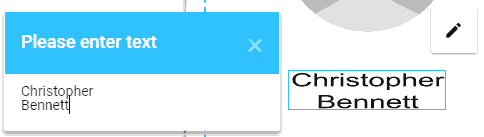
To specify a shrink mode, you can pass it as a parameter of the <TSM> marker, for example <TSM_Scale>.
The Scale mode is incompatible with the FitToBox strategy. In this mode, Customer's Canvas automatically uses the FitToWidth strategy.
Configuring Autofit for New Items
Your users can add new text elements to the canvas as well as open pre-designed templates. To enable copyfitting for new text elements, you can specify the overflow strategy and shrink mode through the defaultItemsConfig object of clientConfig.json. Also, you need to enable the Add bounded text button in the Toolbox.
{
    "defaultItemsConfig": {
        "text": {
            "overflowStrategy": "FitToWidth",
            "textShrinkMode": "Scale"
        }
    },
    "widgets": {
        "Toolbox": {
            "buttons": [ "Text", "BoundedText", "Image" ]
        }
    }
}
For more details about default item configuration, you can refer to the Default Parameters of Design Elements topic.
See Also
Manual
- Text Elements in Customer's Canvas
- Supported Markers
- The Preflight Check
- Default Parameters of Design Elements
- Curved Text