- Introduction
- What's New?
- Features
- Upgrading the Design Editor
- Breaking Changes in 6.0
- Getting Started
- Integration with E-commerce
- Integration with Remote Asset Sources
- Printable Files and Proof Images
- Configuring Products
- Creating Product Templates
- Creating and Editing Templates in Customer's Canvas
- Elements for Creating Designs in Customer's Canvas
- Supported Markers
- Setting Markers Outside of Templates
- Defining Marker Shortcuts
- Text Elements in Customer's Canvas
- Image Placeholders
- Specifying the Image Source Folder
- Stroke and Shadow Effects in Customer's Canvas
- In-String Placeholders and Text Validation
- Text Wrapping in Customer's Canvas
- Barcode Placeholders
- Copyfitting
- Restricting Editing Designs to Certain Regions
- Product Themes
- Product Layouts
- Group Elements in Customer's Canvas
- Photoshop Templates
- InDesign Templates
- User Interface
- Configuration Files
- APIs
- Add-ons
- System Requirements
- Troubleshooting
- Migrating Your Applications
- Licensing
- Copyright Notices
Overview of Creating Templates in InDesign
Applies to: Customer's Canvas On-Premises; Design Editor 6.15.0, 6.x (may differ) · Archived documentation
Customer's Canvas can import product templates from InDesign files.
Valid InDesign Templates
You can feed .idml files to Customer's Canvas. The editor works with one-page and multipage templates containing images, texts, and shapes. Although Customer's Canvas supports RGB, CMYK, and Grayscale color spaces, it is recommended to stick to the same color space in a single frame. Customer's Canvas does not support templates containing such master items as page numbers, footers, etc.
Images
The web-to-print editor supports embedded and linked images. You can use both raster and vector graphics in your templates. Customer's Canvas loads image frames as image items by default. If you want them to act as placeholders, add the <PH> marker to the image name.
You can create image placeholders of arbitrary forms by using frames from a free shape and placing images into these frames. To define how images inserted into the placeholders should be resized, you can enable Auto-Fit and use the following frame fitting options:
- Fit Content to Frame or Fit Content Proportionally to enable the Fit mode.
- Fill Frame Proportionally to enable the Fill mode.
- None to enable the Original mode.
Customer's Canvas supports scale, move, and rotate transforms. Other transforms are ignored.
Shapes
Customer's Canvas allows you to work with any shape that you created in InDesign. When importing shapes, Customer's Canvas applies a solid stroke and solid fill to them.
Fancy, rounded, or other corner types are not applied. When you import these shapes into the editor, they will have normal corners.
Text
You can use both text in frames and text on type paths. Text on a path appears on the canvas with default formatting.
Text in text frames supports multi-column layouts. However, when you change the column number in Customer's Canvas, the text frame becomes a rectangular box, and the gutter resets to the default value of 10pt. Therefore, we recommend that you disable changing the columns for non-rectangular text by using the <TACCC> marker. Customer's Canvas only supports copyfitting by using the corresponding markers.
Groups
Customer's Canvas allows you to both maintain groups of design elements and ungroup them when importing InDesign templates. The FlattenGroups parameter defines this behaviour. If this parameter is True, Customer's Canvas parses grouped elements one by one and splits a group into separate objects on the canvas and in the Object Inspector. By default, this patameter is False, which allows you to keep the design elements grouped. You can also add the <GR> or <GR_f> marker to the group name to define how that group should be imported.
As an alternative, you can paste the group of design elements into a frame in your IDML template if you want them to appear as a single image in Customer's Canvas.
Now, let us try to create an InDesign template that is compatible with Customer's Canvas.
Tutorial: Creating Your First Template
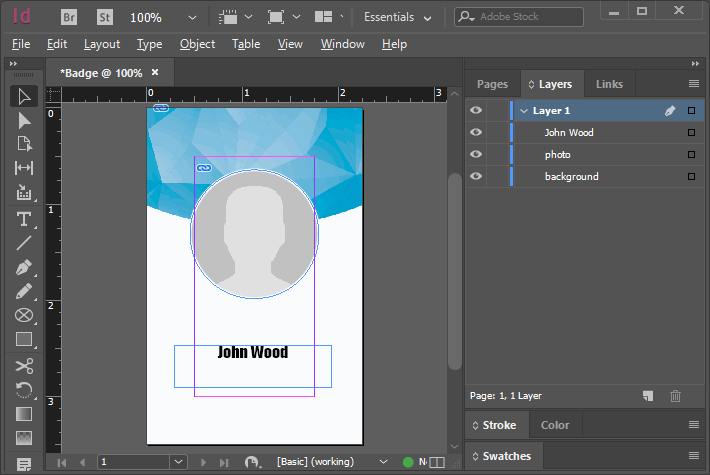
Let us imagine that we want to create a template for a badge. The size of this badge is 3.5x2.25 inches, and to keep it simple, it comprises three elements: a background image, a name, and a photo. In InDesign, perform the following steps:
- Create a new document. On the File menu, click New > Document and specify the size of 3.5x2.25 inches and the portrait orientation.
- Add a background image. On the File menu, click Place.
- Add an image frame. On the Tools panel, select an Ellipse Frame Tool and draw an ellipse.
- Add a photo. For example, drag it from the Windows File Explorer to the ellipse frame.
- Add a name. On the Tools panel, click the Type Tool, and drag to create a bounding rectangle, then enter the name.
As a result, you should get something like this:
Converting Templates to IDML
Customer's Canvas works with .idml files. If you already have a library of .indd files or are going to use linked images in Customer's Canvas, you need to build a package as follows:
- On the File menu, click Package.
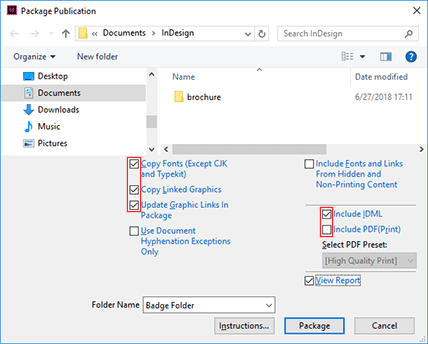
- In the Package dialog box, click Fonts and Links and Images to verify that fonts and images are available and there are no missing links, then click Package.
- In the Package Publication dialog box, select and clear check boxes according to the following image:
- Click Package.
To open this template in Customer's Canvas, copy the resulting .idml file with images in the \Links\ folder to \assets\designs\. If your template uses fonts that have not been installed on your server, you can copy them from the \Document fonts\ subfolder to \assets\fonts\.
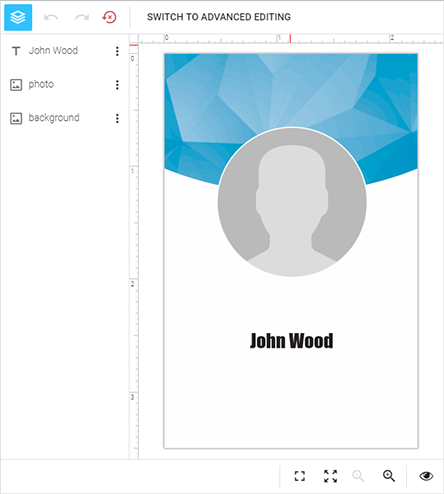
When you initialize a product by using its template name, you should see something like this:
Managing the Behavior of Design Elements
You may want to manage the template's behavior in the web-to-print designer, for example, by disabling transforms of some design elements or locking the position of others. Since Adobe InDesign does not provide this type of formatting, we have created a system of so-called markers - special symbols which you add to an element name and are used by Customer's Canvas to manage permissions for each design element. You can find details on the syntax of the markers and a complete list of them in the Supported Markers topic.
So, as the last step of this tutorial, let us configure this template to disallow changing the background and enable copyfitting for the text element. This exercise gives you an idea of how to work with the markers.
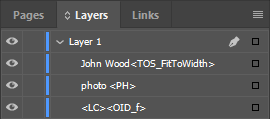
To mark the background as a non-editable image, select the appropriate element name on the Layers tab in InDesign and add <LC><OID_f> to it. There is no difference in what position you place the marker - at the beginning of the name, in the end, or somewhere inside a line. Moreover, you may leave only the marker if you like.
You can enable copyfitting in a similar way. Double-click the text layer name and add the <TOS_FitToWidth> marker to fit text to the width of its bounding rectangle.
As a result, the Layers tab looks as follows:
Now if you upload the modified template to the server, you see that the background disappears from the list of editable objects and long names fit the box width.
Preparing Customer's Canvas Templates from Existing InDesign Files
It is easy to keep IDML files compatible with Customer's Canvas when you create them from scratch. However, you may already have a number of INDD files created by designers before they become aware of the way the systems work together. In this case, convert your templates to the IDML format as we described earlier in this topic. Moreover, if you load those templates in Customer's Canvas, they might not look as you would expect.
Here is a list of the most common issues with IDML files and guidelines on how to address them.
Images Do Not Load
Customer's Canvas loads linked images if they are in the same folder as the IDML file or in the \Links\ subfolder.
Solution: First, verify that these images are in the required folders. If they are but still do not load, relink them in InDesign:
- Open your IDML template right from the
\designs\folder. - Navigate to the Links tab and specify the correct path.
As an alternative, you can embed these images in the IDML template:
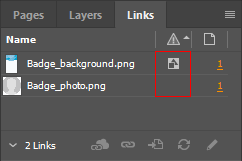
- On the Links tab, right-click an image link, and then click Embed Link.
Ensure that image links have either the OK or Embedded status.
Only the First Page Appears in the Editor
When you define products through the surfaces array, Customer's Canvas loads only the first page from IDML files.
Solution: To open a multipage IDML template as a product, use the ISurfacesFromMultipageTemplate interface and set the file property to this multipage template.
Group Splits into Objects
Customer's Canvas ignores groups in IDML templates and parses group elements one by one. This may result in poor performance.
Solution: Paste groups into frames in your IDML template.
Anything Else?
If your template is displaying incorrectly, you can contact our tech team and send your zipped template to us. We will see what the problem is with it and suggest a solution.