Let’s say that you’ve created a brand new Shopify store and want to showcase your wonderful products that customers might personalize online. That’s a great idea until you realize that you have dozens of offerings, and each one has its unique options and attributes. When you factor in design templates with their different fonts and artwork, the integration process quickly becomes a nightmare where each product takes hours or even days to set up. The only thing worse than setting up the products is managing them in this same way later on. Every attempt to make changes becomes a dangerous game where one mistake could ruin the entire integration, forcing you to start the process over again from the beginning.
Customer’s Canvas Back Office is essentially an online admin panel where users can upload and manage templates and assets that are necessary for setting up personalized products as well as maintain third-party integrations such as an e-commerce platform or MIS software.
These are the main sections of Back Office:
Assets manager
This section streamlines the management of assets that are required to create product designs.
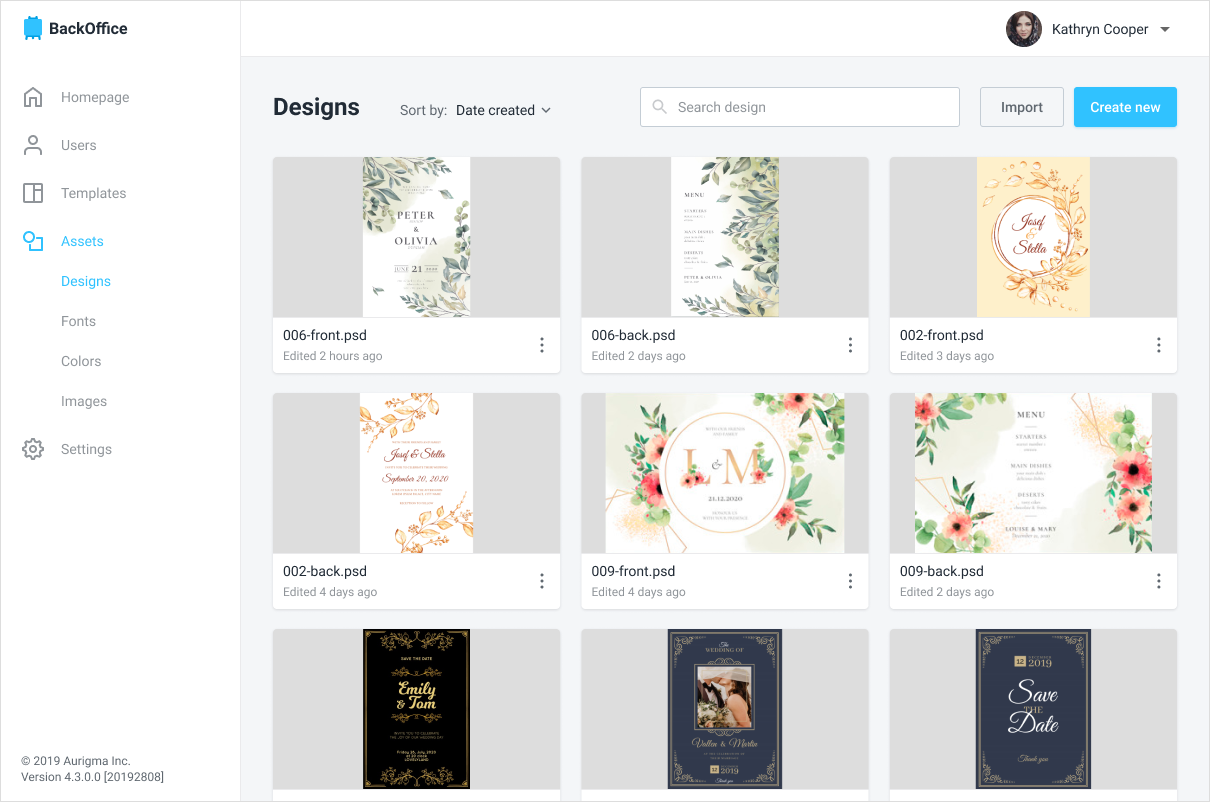
Designs
In this tab, you can see the list of all your designs.
Your customers may personalize designs in the online editor. You can create a design from scratch or import files created in Adobe InDesign or Photoshop. You can filter, sort, and search designs, create duplicates or delete them. These designs can also be edited in the embedded online editor if necessary.

Fonts
Fonts are a crucial part of product personalization. So much so that we’ve developed a new advanced Text Engine that we will be showcasing at the PRINT19 trade show. We can work with fonts in this tab. You can add new fonts that can also be attached to designs.
Template manager
The template manager is another section of Customer’s Canvas Back Office.
A template is the set of options that are applied in the online editor to personalize a specific product from your online storefront.
As an example, let’s say that you want to enable personalization of a double-sided business card. To do this, you must create a template by choosing a pre-configured editor as well as a front and back design from asset storage, then attach them to a specific business card. Your customers can click on that product on your website, launch the online editor, and start personalizing that business card.
This is where you can create product templates that comprise the following components:
- Product design
- Product configuration
- Product attributes (options, validation, defaults, etc.)
- Product assets (fonts, artwork, color profiles, etc.)
- Linking with e-commerce product categories
You can create new product templates, navigate through them, edit and preview to test them online.

The main module here is the attribute manager module that allows you to configure attributes within the product template.
Supported attributes:
- List of values that end-users may choose from (text or images)
- Сheckbox
- Number (you can set the range of values)
- Text
- Online editors
In this tab, you can create the configuration and appearance of online editors tailored for different kinds of products – from commercial printing to gifts and specialty items – without any programming involved. You can add product-specific options to make the personalization process easier for your customers. For example, you can set up a simple upload-based editor for simple products like fridge magnets or parking decals. It’s also possible to create a multi-step workflow for variable data printing postcards that includes product personalization, selecting variable fields, populating those fields with variable data, and then previewing the final result.
You can configure the editors by adding widgets like an image gallery, option selectors, or even custom HTML widgets to implement virtually any type of personalization workflow.
Be the first to see Customer’s Canvas Back Office in action
Stop by booth #131 at the PRINT19 trade show to see a demo of our Back Office technology firsthand and discuss how it can be used in your web-to-print project.


