

Widgets
A widget is the smallest functional element in a workflow file. It displays text, images, Design Editor, some options, and so on. They also send and receive some requests.
Widgets are embedded in panels of a step definition. In a workflow file, you describe widgets in a separate section, and then you embed them in steps like this.
{
  "widgets": [
    {
      "name": "my-widget",
      ...
    }
  ],
  "steps": [
    {
      "name": "Step 1",
      "mainPanel: { "name": "my-widget" }
    }
  ]
}
To learn more about the place of widgets in the structure of a workflow file, read the Structure article.
Widget anatomy
All the widgets have the same elements. Let's consider them.
| Parameter | Function |
|---|---|
Type | A widget to be loaded. For example, checkbox or input-text. |
Name | A widget identifier in a workflow file. |
Title | A caption displayed in the interface over a widget. |
Prompt | A hint explaining the usage of the widget. This is an optional parameter. |
Description | Hidden tips with explanations for a customer. This is an optional parameter. |
Params | Settings defining the behavior of a widget. They may contain dynamic expressions, which return the true or false values. |
These elements can be visualized as follows:
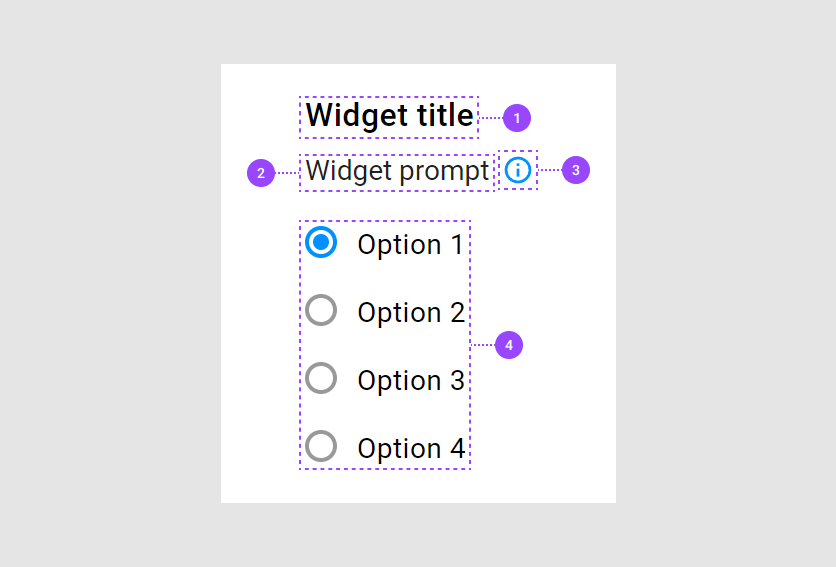
Here the numbers are:
titlepromptdescription- A widget body defined through
params
Now, let's see how you can define widgets.
Examples
Button widget
To create the following button widget, you can add the following description to your workflow file.

{
  "name": "my-button",
  "type": "button",
  "params": {
    "text": "Click"
  }
}
Dynamic expressions
To make a workflow self-updating, use dynamic expressions. To learn more about the dynamic expressions, read the Dynamic expressions article.
As for widgets, you can embed dynamic expressions only in the params of a widget.
To illustrate dynamic expressions, let's create two widgets: one for entering text, say, my-input, and another widget for displaying the entered text, say, a my-text widget.
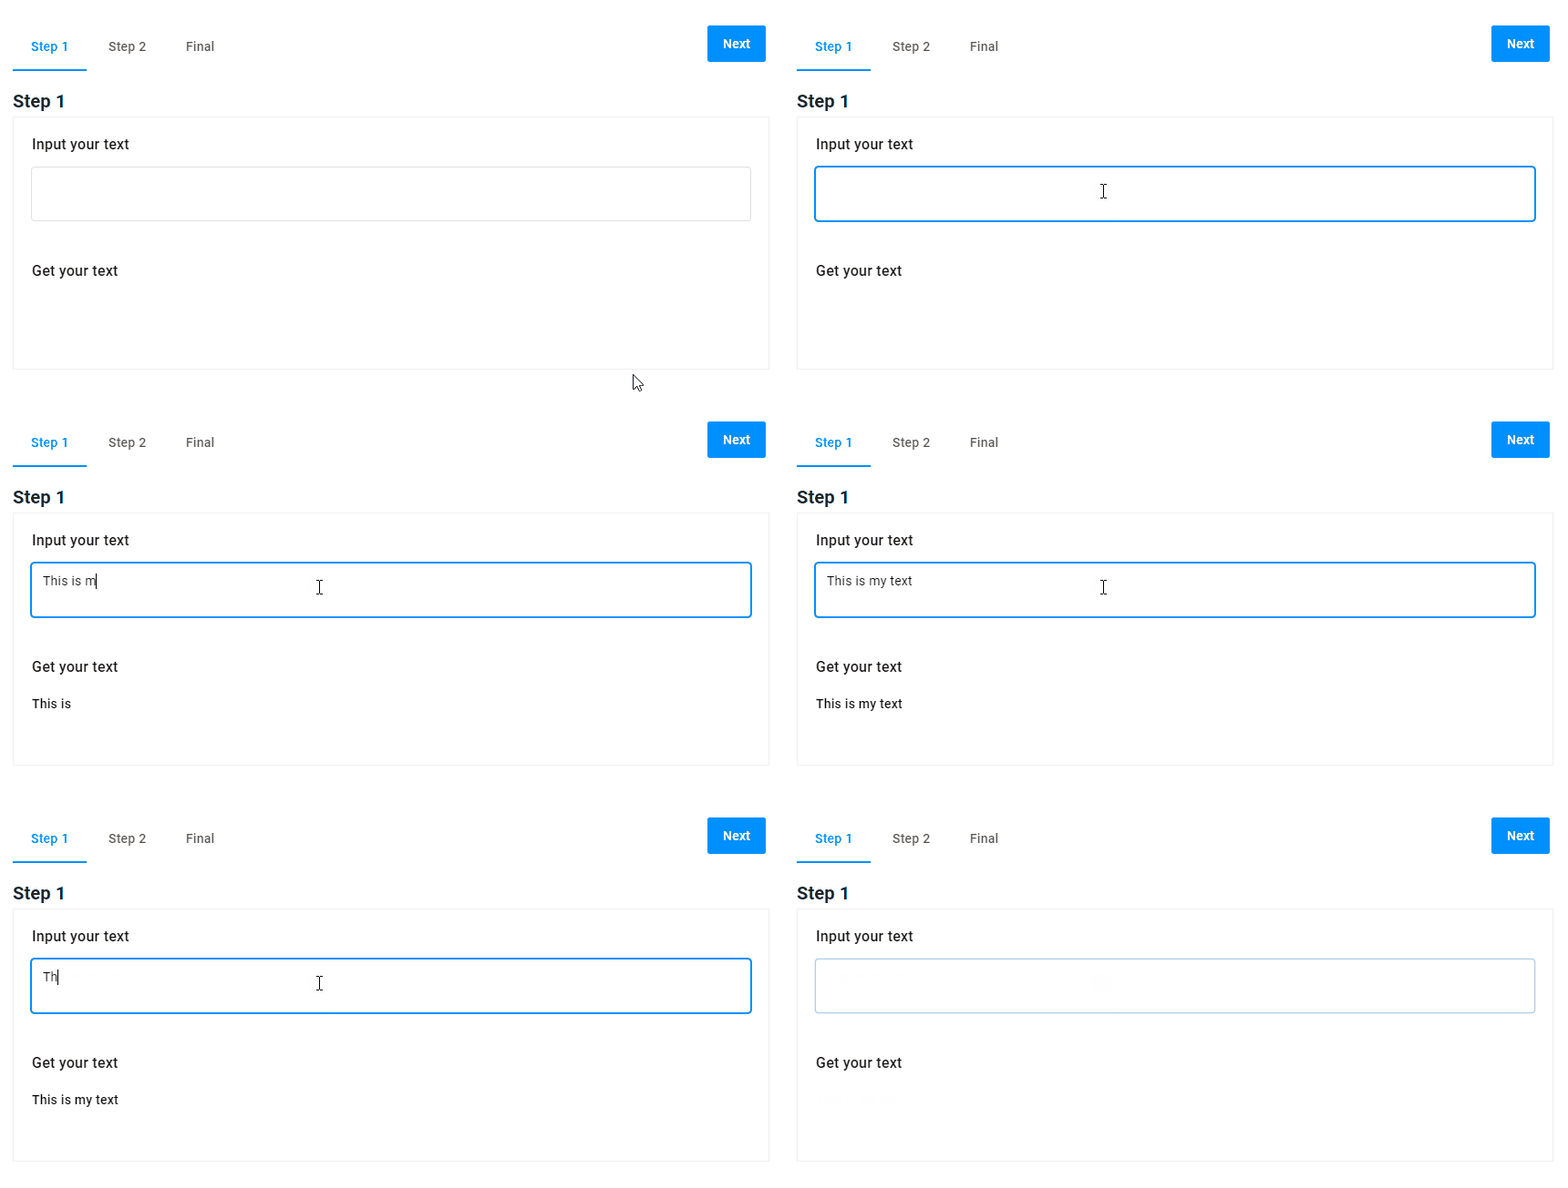
To implement this behavior, the my-text widget must refer to the value of my-input widget as follows:
{
  "name": "my-input",
  "type": "input-text",
  "title": "Input your text",
  "params": {
    "isTextArea": true
  }
},
{
  "name": "my-text",
  "title": "Get your text",
  "type": "static-text",
  "params": {
    "text": "{{$['my-input']._}}"
  }
}
Widget types
As you may recognize from the examples above, all the widgets are divided into two groups: visual and non-visual. The visual widgets may display the Design Editor, some text, images, mockups, and so on. Non-visual widgets can exchange data with a server or manage the condition of workflow elements, which aren't widgets.
Another group of widgets serves to simplify workflow configuration for option-based products in the PIM module. So, the variant-selector allows you to select one of the combination of product options, the design-selector and pim-options add the possibility to change the options or design for the personalized variant. The preview-mockup-slider and pim-ajax are adopted for PIM products.
Non-visual widgets
There are widgets that aren't displayed in the user interface. In the following example, the result of selecting a checkbox will be printed in the browser console.
{
  "widgets": [
    {
      "name": "my-checkbox",
      "type": "checkbox",
      "params": {
        "prompt": "I approve the design.",
        "value": false
      }
    },
    {
      "name": "my-trigger",
      "type": "function-trigger",
      "params": {
        "arguments": [
          "{{ $['my-checkbox']._ }}"
        ],
        "callback": [
          "{{ #function(myValue) console.log('My checkbox value is ' + myValue) }}"
        ]
      }
    }
  ]
}
Using values of params
If you want to use a value from widget1 in widget2, you can refer to the param you need by using dynamic expressions like this: "{{$['widget1'].params1}}".
{
  "widgets": [
    {
      "name": "widget1",
      "title": "My widget",
      "type": "...",
      "params": {
        "params1": 2
      }
    },
    {
      "name": "widget2",
      "type": "...",
      "params": {
        "text": "{{$['widget1'].params1}}"
      }
    }
  ]
}
The other widgets have a value that is selected or changed by a customer. For example, they are input-text, checkbox, gallery, option, and so on.
In the following example, widget2 refers to the value of input-text. To get this value, just use the ._ syntax, not the params name.
{
  "widgets": [
    {
      "name": "my-input",
      "type": "input-text",
      "title": "Input your text",
      "params": {
        "isTextArea": true
      }
    },
    {
      "name": "widget2",
      "type": "...",
      "params": {
        "text": "{{$['widget1']._}}"
      }
    }
  ]
}
To learn more details about dynamic expressions, read the Dynamic expressions article. Read the following article to learn more about each widget.