

Data-Driven Editor
This widget integrates the Data-Driven Editor into your workflow, allowing users to fill out pre-configured forms and automatically update designs based on the provided data.
{
    "name": "editor",
    "type": "data-driven-editor",
    "params": {...}
}
Key Concepts
The Data-Driven Editor is designed to:
- Load a pre-configured design from Asset Storage.
- Display a form for users to fill in data.
- Automatically update the design based on the input.
- Render and save the final product.
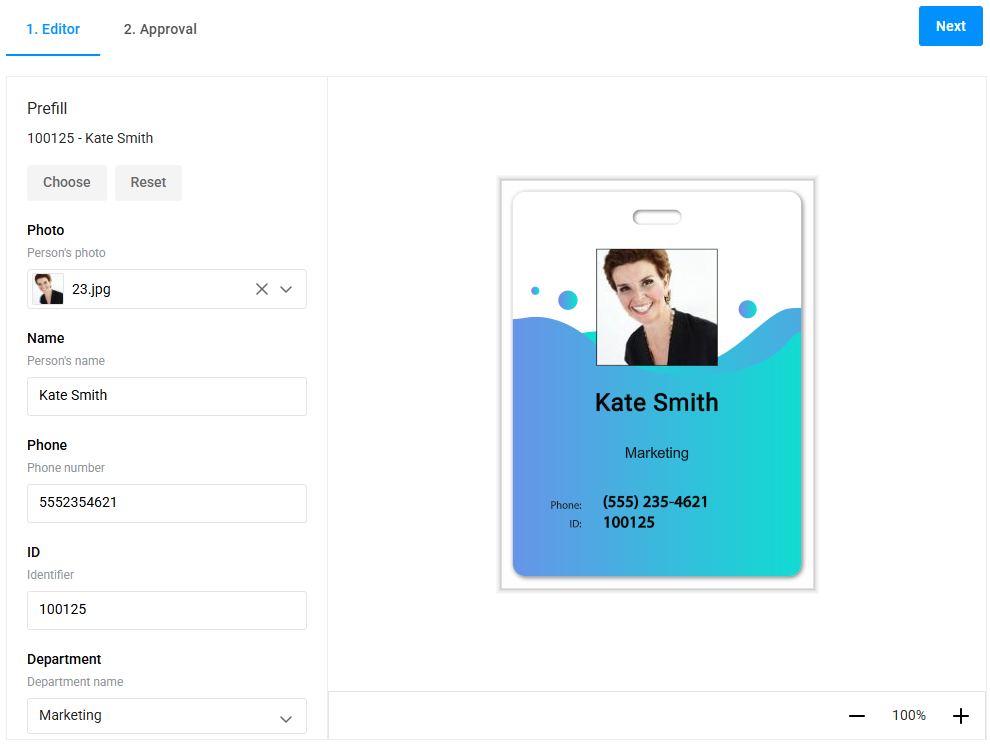
Both PIM and Product Specifications workflows can utilize this widget.
- Product Specifications use attributes to get the design, mockup, and dataset.
- PIM products get designs and mockups from the product definition, but to use a dataset, its ID must be specified in the workflow (e.g., through variables).
Configuring the Editor
The widget's configuration is organized into sections under params.config. You don't need to use all sections - only those relevant to your use case.
Basic Setup
For a minimal configuration, you only need to pass the design ID to the Data-Driven Editor widget.
Example: Credentials and Services
To integrate the editor, you also need the following settings:
access: Credentials for the editor.api: URLs to interact with services.
If these are not explicitly specified, the tenant will be automatically determined by the Client ID and Secret Key used (see the External Apps settings), and default services for your environment will be used. A temporary user will be automatically created if no userId is specified.
{
  "name": "dd-editor",
  "type": "data-driven-editor",
  "params": {
    "config": {
      "access": {
        "tenantId": "your_tenant_id",
        "userId": "your_user_id",
        "token": "your_access_token"
      },
      "api": {
        "assetProcessor": "https://api.customerscanvashub.com",
        "assetStorage": "https://api.customerscanvashub.com",
        "backOffice": "https://customerscanvashub.com",
        "designAtoms": "https://api.customerscanvashub.com"
      },
      "design": {
        "designId": "your_design_id",
        "isPrivateDesign": false
      }
    }
  }
}
Example: Basic PIM Configuration
For PIM products, once you have created either a single option for the product or multiple options for generating many variants, you can get the required product variant through the pim-design-selector widget.
{
  "vars": {
    "dataSetId": "68e745910c72f7b7ce14f889"
  },
  "widgets": [
    {
      "name": "pim-ajax",
      "type": "pim-ajax",
      "params": {
        "choices": "{{ $['pim-options']._ }}",
        "settings": {
          "designs": {
            "enabled": true
          },
          "mockups": {
            "enabled": true
          }
        }
      }
    },
    {
      "type": "pim-options",
      "name": "pim-options",
      "params": {
        "options": "{{ $['pim-ajax'].options }}",
        "modifiers": []
      }
    },
    {
      "name": "design-selector",
      "type": "pim-design-selector",
      "params": {
        "designs": "{{ $['pim-ajax'].designs }}"
      }
    },
    {
      "name": "dd-editor",
      "type": "data-driven-editor",
      "params": {
        "autoCompile": true,
        "config": {
          "design": {
            "designId": "{{ $['design-selector']?._?.designId }}",
            "isPrivateDesign": false,
            "dataSetId": "{{ vars.dataSetId }}",
            "mockup": {
              "up":  "{{ $['design-selector']?._?.mockupId }}"
            }
          }
        }
      }
    }
  ]
}
Given the current implementation's limitations, to use a dataset for PIM products, you must specify the dataset's ID in the workflow (e.g., through variables). Here, you can see using the vars.dataSetId variable.
Common Use Cases
Preview and Proof Images with Watermarks
Configure the editor to generate previews and proofs with watermarks.
{
  "vars": {
    "designId": "your_design_id",
    "mockupId": "your_mockup_id"
  },
  "widgets": [
    {
      "name": "dd-editor",
      "type": "data-driven-editor",
      "params": {
        "config": {
          "preview": {
            "width": 600,
            "height": 600
          },
          "design": {
            "designId": "{{ vars.designId }}",
            "isPrivateDesign": false,
            "mockup": {
              "up": "{{ vars.mockupId }}"
            }
          },
          "renderer": {
            "watermarkEnabled": true,
            "watermarkOpacity": 0.5,
            "format": "jpeg"
          }
        }
      }
    }
  ]
}
To start rendering the preview, you can call the createPreview method of the editor when the user navigates to the Approval step as follows:
{
  "steps": [
    {
      "name": "Personalize",
      "mainPanel": {
        "name": "dd-editor"
      }
    },
    {
      "name": "Approval",
      "mainPanel": {
        "name": "preview"
      },
      "rightToolPanel": {
        "name": "finish-group"
      },
      "onActivate": [
        "{{#function main.showPreloader(true, 'Creating preview...')}}",
        "{{#function $['dd-editor'].saveProduct() }}",
        "{{#function $['dd-editor'].createPreview()}}",
        "{{#function $['finish'].value = false}}",
        "{{#function main.showPreloader(false)}}"
      ]
    }
  ]
}
Pre-Filling User Data
You can automatically fill in form fields. This is useful for personalization workflows where user data is known in advance (e.g., from a CRM or database).
Pre-filling user data can be done either during editor initialization via the userInfo parameter or after initialization using the setUserInfo method. Both approaches are valid and achieve the same result.
{
  "widgets": [
    {
      "name": "dd-editor",
      "type": "data-driven-editor",
      "params": {
        "config": {
          "design": {
            "designId": "your_design_id",
            "isPrivateDesign": false
          },
          "userInfo": {
            "Name": "Alexander",
            "Email": "alex@example.com",
            "Phone": "+1234567890"
          }
        },
        "onReady": [
          "{{#function $['dd-editor'].setUserInfo({ 'Company': 'CA Printing' }) }}"
        ]
      }
    }
  ]
}
When the editor loads, the fields Name, Email, Phone, and Company will be pre-filled with the provided values.
Providing Datasets
Use a fixed dataSetId to work with a specific dataset. The designId is also defined here using a variable just to keep the sample short.
{
  "vars": {
    "designId": "your_design_id",
    "dataSetId": "your_dataset_id"
  },
  "widgets": [
    {
      "name": "dd-editor",
      "type": "data-driven-editor",
      "params": {
        "config": {
          "design": {
            "designId": "{{ vars.designId }}",
            "dataSetId": "{{ vars.dataSetId }}"
          }
        }
      }
    }
  ]
}
Customizing the Editor UI
You can control the editor's appearance and behavior.
{
  "name": "dd-editor",
  "type": "data-driven-editor",
  "params": {
    "config": {
      "design": { ... },
      "settings": {
        "lang": "en",
        "allowManipulations": true,
        "itemsSnapLines": true,
        "printAreaSnapLines": true,
        "symbols": ["¶", "²", "¼", "º", "—", "½", "¼"]
      }
    }
  }
}
Here, we:
- Enable snapping to design elements and the print area.
- Allow manipulating elements in the viewer.
- Define custom symbols for insertion.
Rendering and Saving the Design
After the user fills out the form, you can render and save the design using the editor's methods. This is how you can define the finish-group widget that will be displayed at the approval step.
{
  "widgets": [
    {
      "name": "dd-editor",
      "type": "data-driven-editor",
      "params": {
        "config": {
          "design": {
            "designId": "your_design_id"
          }
        }
      }
    },
    {
      "name": "finish",
      "type": "finish-group",
      "params": {
        "checkboxPrompt": "I have reviewed and approve my design.",
        "value": false,
        "checkboxEnabled": true,
        "buttonText": "Finish",
        "downloadText": "Download proof PDF",
        "downloads": [
            "{{#function main.showPreloader(true, 'Creating proof files...') }}",
            "{{#function $['dd-editor'].createPdfPreview()}}",
            "{{#function main.showPreloader(false) }}",
            "{{#function [{url: $['dd-editor'].pdfUrl, name: 'preview.pdf'}] }}"
        ],
        "onClick": [
            "{{#function main.showPreloader(true, 'Creating print files...')}}",
            "{{#function $['dd-editor'].saveProduct() }}",
            "{{#function $['dd-editor'].createIdStr() }}",
            "{{#function new Promise(res=> setTimeout(res,1000)) }}",
            "{{#function main.showPreloader(false) }}"
        ]
      }
    }
  ]
}
As a result, the Download proof PDF link will appear to trigger downloading proofs with a watermark, and the Finish button will generate print files.
Handling Form Validation
You can validate the form before allowing the user to proceed. If the user input is valid, you can also generate previews.
{
  "widgets": [
    {
      "name": "dd-editor",
      "type": "data-driven-editor",
      "params": {
        "config": {
          "design": {
            "designId": "your_design_id"
          }
        }
      }
    }
  ],
  "steps": [
    {
      "name": "design",
      "mainPanel": {
        "name": "dd-editor"
      },
      "onBeforeNextStep": [
        "{{ #function $['dd-editor'].validate() }}"
      ]
    },
    {
      "name": "preview",
      "mainPanel": { "name": "preview-widget" },
      "onActivate": [
        "{{#if $['dd-editor'].isValid }}",
          "{{#function $['dd-editor'].createPreview() }}",
        "{{/if}}"
      ]
    }
  ]
}
Here, the editor validates the form before the user moves to the preview step. If the form is valid, it renders preview images.
Methods and Properties
Key Properties
| Property | Description |
|---|---|
userId | The current user ID. |
stateId | The saved product state ID. |
pdfUrl | URL to download the rendered PDF. |
previewUrls | URLs of preview images. |
isValid | true if the form is filled out correctly. |
Key Methods
| Method | Description |
|---|---|
createPdfPreview() | Renders a PDF preview and returns a download URL. |
createPreview() | Renders preview images and returns their URLs. |
saveProduct(asNew?: boolean) | Saves the design. If asNew is true, creates a new private design. |
validate() | Validates the form. |
setUserInfo(userInfo) | Pre-fills the form with user data. |
Complete Example
Here's a full example of integrating the Data-Driven Editor into a workflow:
{
  "vars": {
    "designId": "your_design_id",
    "dataSetId": "your_dataset_id"
  },
  "widgets": [
    {
      "name": "dd-editor",
      "type": "data-driven-editor",
      "params": {
        "config": {
          "access": {
            "tenantId": "your_tenant_id",
            "userId": "your_user_id",
            "token": "your_access_token"
          },
          "api": {
            "designAtoms": "https://api.example.com/design-atoms/atoms",
            "assetProcessor": "https://api.example.com/processor",
            "assetStorage": "https://api.example.com/storage"
          },
          "design": {
            "designId": "{{ vars.designId }}",
            "dataSetId": "{{ vars.dataSetId }}",
            "isPrivateDesign": false
          },
          "settings": {
            "lang": "en",
            "allowManipulations": true,
            "itemsSnapLines": true
          },
          "renderer": {
            "width": 800,
            "height": 600,
            "format": "Pdf"
          }
        }
      }
    },
    {
      "name": "preview",
      "type": "slider",
      "params": {
        "images": [
          {
            "url": "{{$['dd-editor'].previewUrls[0]}}"
          }
        ]
      }
    },
    {
      "name": "finish",
      "type": "finish-group",
      "params": {
        "checkboxPrompt": "I have reviewed and approve my design.",
        "value": false,
        "checkboxEnabled": true,
        "buttonText": "Finish",
        "downloadText": "Download proof PDF",
        "downloads": [
            "{{#function main.showPreloader(true, 'Creating proof files...') }}",
            "{{#function $['dd-editor'].createPdfPreview()}}",
            "{{#function main.showPreloader(false) }}",
            "{{#function [{url: $['dd-editor'].pdfUrl, name: 'preview.pdf'}] }}"
        ],
        "onClick": [
            "{{#function main.showPreloader(true, 'Creating print files...')}}",
            "{{#function $['dd-editor'].createIdStr() }}",
            "{{#function new Promise(res=> setTimeout(res,1000)) }}",
            "{{#function main.showPreloader(false) }}"
        ]
      }
    }
  ],
  "steps": [
    {
      "name": "design",
      "title": "1. Personalize",
      "mainPanel": { "name": "dd-editor" },
      "onBeforeNextStep": [
        "{{ #function $['dd-editor'].validate() }}"
      ]
    },
    {
      "name": "preview",
      "title": "2. Preview",
      "mainPanel": { "name": "preview" },
      "rightToolPanel": { "name": "finish-group" },
      "onActivate": [
        "{{#if $['dd-editor'].isValid }}",
          "{{#function main.showPreloader(true, 'Creating preview...')}}",
          "{{#function $['dd-editor'].saveProduct() }}",
          "{{#function $['dd-editor'].createPreview()}}",
          "{{#function $['finish'].value = false}}",
          "{{#function main.showPreloader(false)}}"
        "{{/if}}"
      ]
    }
  ]
}